Tree
介绍 (Introduction)
Tree控件显示排列为可扩展树的分层数据。
Class 声明 (Class Declaration)
以下是mx.controls.Tree类的声明 -
public class Tree
   extends List
      implements IIMESupport
公共属性 (Public Properties)
| S.No | 财产和描述 |
|---|---|
| 1 | dataDescriptor : mx.controls.treeClasses:ITreeDataDescriptor 返回当前的ITreeDataDescriptor。 |
| 2 | dataProvider : Object [override]包含要显示的数据的对象。 |
| 3 | dragMoveEnabled : Boolean [override]表示可以移动项目,而不是仅作为拖放操作的一部分从Tree控件中复制。 |
| 4 | firstVisibleItem : Object 当前显示在树顶行的项目。 |
| 5 | hasRoot : Boolean [只读]表示当前dataProvider具有根项; 例如,分层结构中的单个顶级节点。 |
| 6 | itemIcons : Object 一个对象,指定项目的图标。 |
| 7 | maxHorizontalScrollPosition : Number [override] Tree控件的maxHorizontalScrollPosition属性的最大值。 |
| 8 | openItems : Object 已打开或设置的项目已打开。 |
| 9 | showRoot : Boolean 设置根项的可见性。 |
公共方法 (Public Methods)
| S.No | 方法和描述 |
|---|---|
| 1 | Tree() 构造函数。 |
| 2 | expandChildrenOf(item:Object, open:Boolean):void 打开或关闭指定项目下的所有树项目。 |
| 3 | expandItem(item:Object, open:Boolean, animate:Boolean = false, dispatchEvent:Boolean = false, cause:Event = null):void 打开或关闭分支项目。 |
| 4 | getParentItem(item:Object):* 返回子项的已知父项。 |
| 5 | isItemOpen(item:Object):Boolean 如果指定的项目分支已打开(显示其子项),则返回true。 |
| 6 | setItemIcon(item:Object, iconID:Class, iconID2:Class):void 设置项目的关联图标。 |
受保护的方法 (Protected Methods)
| S.No | 方法和描述 |
|---|---|
| 1 | dragCompleteHandler(event:DragEvent):void [override]处理DragEvent.DRAG_COMPLETE事件。 |
| 2 | dragDropHandler(event:DragEvent):void [override]处理DragEvent.DRAG_DROP事件。 |
| 3 | initListData(item:Object, treeListData:mx.controls.treeClasses:TreeListData):void 初始化树项呈示器使用的TreeListData对象。 |
| 4 | makeListData(data:Object, uid:String, rowNum:int):BaseListData [override]创建一个新的TreeListData实例,并根据输入数据提供程序项填充字段。 |
事件 (Events)
| S.No | 活动和描述 |
|---|---|
| 1 | itemClose 分支关闭或折叠时分派。 |
| 2 | itemOpen 在分支打开或展开时分派。 |
| 3 | itemOpening 在启动分支打开或关闭时分派。 |
方法继承 (Methods Inherited)
该类继承以下类中的方法 -
- mx.controls.List
- mx.controls.listClasess.ListBase
- mx.core.ScrollControlBase
- mx.core.UIComponent
- mx.core.FlexSprite
- flash.display.Sprite
- flash.display.DisplayObjectContainer
- flash.display.InteractiveObject
- flash.display.DisplayObject
- flash.events.EventDispatcher
- Object
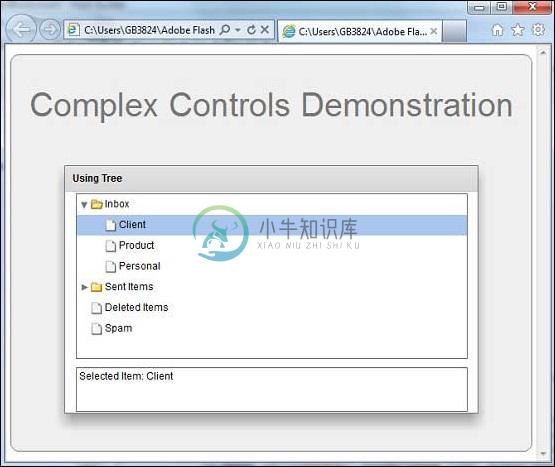
Flex树控制示例
让我们按照以下步骤通过创建测试应用程序来检查Flex应用程序中Tree控件的用法 -
| 步 | 描述 |
|---|---|
| 1 | 在cn.xnip.client包下创建一个名为HelloWorld的项目,如Flex - Create Application一章中所述。 |
| 2 | 修改HelloWorld.mxml ,如下所述。 保持其余文件不变。 |
| 3 | 编译并运行应用程序以确保业务逻辑按照要求运行。 |
以下是修改后的mxml文件src/cn.xnip/HelloWorld.mxml 。
<?xml version = "1.0" encoding = "utf-8"?>
<s:Application xmlns:fx = "http://ns.adobe.com/mxml/2009"
   xmlns:s = "library://ns.adobe.com/flex/spark"
   xmlns:mx = "library://ns.adobe.com/flex/mx
   width = "100%" height = "100%" minWidth = "500" minHeight = "500">
   <fx:Style source = "/com/xnip/client/Style.css" />
   <fx:Script>
      <![CDATA[
         [Bindable]
         public var selectedNode:XML;
         // Event handler for the Tree control change event.
         public function treeChanged(event:Event):void {
            selectedNode = Tree(event.target).selectedItem as XML;
         }
      ]]>
   </fx:Script>
   <fx:Declarations>
      <fx:XMLList id = "treeData">
         <node label = "E-Mail Box">
            <node label = "Inbox">
            <node label = "Client" />
               <node label = "Product" />
               <node label = "Personal" />
            </node>
            <node label = "Sent Items">
               <node label = "Professional" />
               <node label = "Personal" />
            </node>
            <node label = "Deleted Items" />
            <node label = "Spam" />
         </node>
      </fx:XMLList>
   </fx:Declarations>
   <s:BorderContainer width = "630" height = "480" id = "mainContainer"
      styleName = "container">
      <s:VGroup width = "100%" height = "100%" gap = "50"
         horizontalAlign = "center" verticalAlign = "middle">
         <s:Label id = "lblHeader" text = "Complex Controls Demonstration"
            fontSize = "40" color = "0x777777" styleName = "heading" />
         <s:Panel id = "treePanel" title = "Using Tree"
            width = "500" height = "300">
            <s:layout>
               <s:VerticalLayout  gap = "10" verticalAlign = "middle"
                  horizontalAlign = "center" />
            </s:layout>
            <mx:Tree id = "tree" width = "95%" height = "75%"
               labelField = "@label" showRoot = "false"
               dataProvider = "{treeData}" change = "treeChanged(event)" />
            <s:TextArea height = "20%" width = "95%"
               text = "Selected Item: {selectedNode.@label}" />
         </s:Panel>
      </s:VGroup>
   </s:BorderContainer>
</s:Application>
一旦准备好完成所有更改,让我们像在Flex - Create Application章节中那样在正常模式下编译和运行应用程序 。


