Animating a Widget across screens
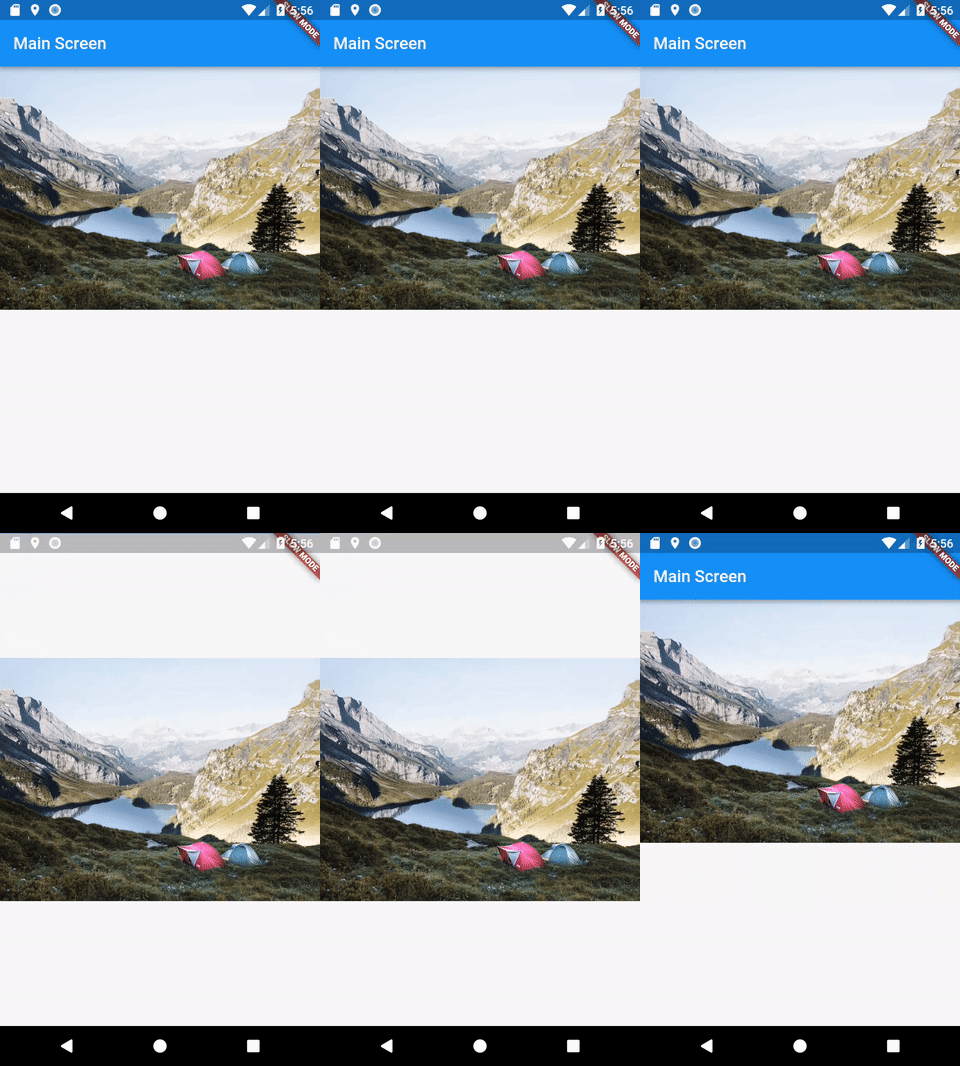
It’s often helpful to guide users through our apps as they navigate from screen to screen. A common technique to lead users through an app is to animate a Widget from one screen to the next. This creates a visual anchor connecting the two screens.
How can we animate a Widget from one screen to the next with Flutter? Using the Hero Widget!
Directions
- Create two screens showing the same image
- Add a
HeroWidget to the first screen - Add a
HeroWidget to the second screen
1. Create two screens showing the same image
In this example, we’ll display the same image on both screens. We’ll want to animate the image from the first screen to the second screen when the user taps on the image. For now, we’ll create the visual structure, and handle animations in the next steps!
Note: This example builds upon the Navigate to a new screen and back and Handling Taps recipes.
class MainScreen extends StatelessWidget {
  @override
  Widget build(BuildContext context) {
    return Scaffold(
      appBar: AppBar(
        title: Text('Main Screen'),
      ),
      body: GestureDetector(
        onTap: () {
          Navigator.push(context, MaterialPageRoute(builder: (_) {
            return DetailScreen();
          }));
        },
        child: Image.network(
          'https://picsum.photos/250?image=9',
        ),
      ),
    );
  }
}

class DetailScreen extends StatelessWidget {
  @override
  Widget build(BuildContext context) {
    return Scaffold(
      body: GestureDetector(
        onTap: () {
          Navigator.pop(context);
        },
        child: Center(
          child: Image.network(
            'https://picsum.photos/250?image=9',
          ),
        ),
      ),
    );
  }
}
2. Add a Hero Widget to the first screen
In order to connect the two screens together with an animation, we need to wrap the Image Widget on both screens in a Hero Widget. The Hero Widget requires two arguments:
tag: An object that identifies theHero. It must be the same on both screens.child: The Widget we want to animate across screens.
Hero(
  tag: 'imageHero',
  child: Image.network(
    'https://picsum.photos/250?image=9',
  ),
);
3. Add a Hero Widget to the second screen
To complete the connection with the first screen, we need to wrap the Image on the second screen with a Hero Widget as well! It must use the same tag as the first screen.
After you apply the Hero Widget to the second screen, the animation between screens will work!
Hero(
  tag: 'imageHero',
  child: Image.network(
    'https://picsum.photos/250?image=9',
  ),
);
Note: this code is identical to what we had on the first screen! In general, you could create a reusable Widget instead of repeating code, but for this example, we’ll duplicate the code for demonstration purposes.
Complete example
import 'package:flutter/material.dart';

void main() => runApp(HeroApp());

class HeroApp extends StatelessWidget {
  @override
  Widget build(BuildContext context) {
    return MaterialApp(
      title: 'Transition Demo',
      home: MainScreen(),
    );
  }
}

class MainScreen extends StatelessWidget {
  @override
  Widget build(BuildContext context) {
    return Scaffold(
      appBar: AppBar(
        title: Text('Main Screen'),
      ),
      body: GestureDetector(
        child: Hero(
          tag: 'imageHero',
          child: Image.network(
            'https://picsum.photos/250?image=9',
          ),
        ),
        onTap: () {
          Navigator.push(context, MaterialPageRoute(builder: (_) {
            return DetailScreen();
          }));
        },
      ),
    );
  }
}

class DetailScreen extends StatelessWidget {
  @override
  Widget build(BuildContext context) {
    return Scaffold(
      body: GestureDetector(
        child: Center(
          child: Hero(
            tag: 'imageHero',
            child: Image.network(
              'https://picsum.photos/250?image=9',
            ),
          ),
        ),
        onTap: () {
          Navigator.pop(context);
        },
      ),
    );
  }
}


