
Simple app state management
Now that you know about declarative UI programming and the difference between ephemeral and app state, you are ready to learn about simple app state management.
On this page, we are going to be using the scoped_model package. If you are new to Flutter and you don’t have a strong reason to choose another approach (Redux, Rx, hooks, etc.), this is probably the approach you should start with. scoped_model is easy to understand and it doesn’t use much code. It also uses concepts that are applicable in every other approach.
That said, if you have strong background in state management from other reactive frameworks, you will find packages and tutorials listed on the following page.
Our example 
For illustration, consider the following simple app.
The app has three separate screens: a login prompt, a catalog, and a cart (represented by the MyLoginScreen, MyCatalog, and MyCart widgets, respectively). It could be a shopping app, but you can imagine the same structure in a simple social networking app (replace catalog for “wall” and cart for “favorites”).
The catalog screen includes a custom app bar (MyAppBar) and a scrolling view of many list items (MyListItems).
Here’s the app visualized as a widget tree.
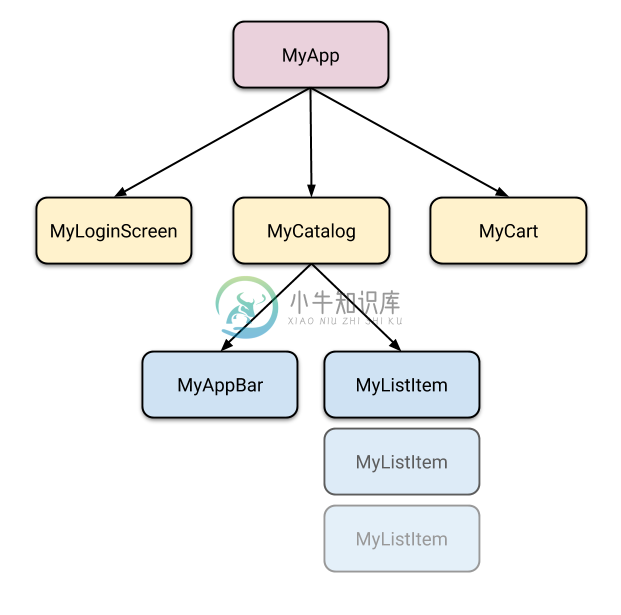
So we have at least 6 subclasses of Widget. Many of them will need access to state that “belongs” elsewhere. For example, each MyListItem will want to be able to add to cart. It might also want to see if the item that it’s displaying is already in the cart.
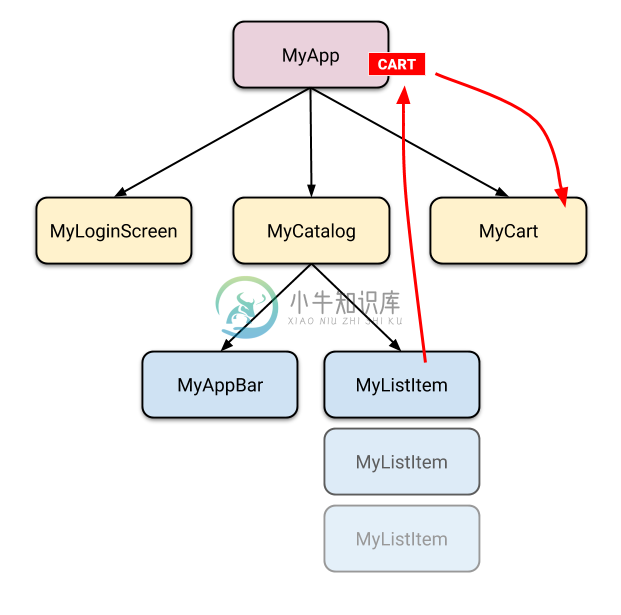
This takes us to our first question: where should we put the current state of the cart?
Lifting state up
In Flutter, it makes sense to keep the state above the widgets that use it.
Why? In declarative frameworks like Flutter, if you want to change the UI, you have to rebuild it. There is no easy way to have MyCart.updateWith(somethingNew). In other words, it’s hard to imperatively change a widget from outside, by calling a method on it. And even if you could make this work, you would be fighting the framework instead of letting it help you.
// BAD: DO NOT DO THIS
void myTapHandler() {
  var cartWidget = somehowGetMyCartWidget();
  cartWidget.updateWith(item);
}
Even if you get the above code to work, you will then have to deal with the following in the MyCart widget:
// BAD: DO NOT DO THIS
Widget build(BuildContext context) {
  return SomeWidget(
    // The initial state of the cart.
  );
}

void updateWith(Item item) {
  // Somehow you need to change the UI from here.
}
You would need to take into consideration the current state of the UI and apply the new data to it. It’s hard to avoid bugs this way.
In Flutter, you construct a new widget every time its contents change. Instead of MyCart.updateWith(somethingNew) (a method call) you use MyCart(contents) (a constructor). Because you can only construct new widgets in the build methods of their parents, if you want to change contents, it needs to live in MyCart’s parent or above.
// GOOD
void myTapHandler(BuildContext context) {
  var cartModel = somehowGetMyCartModel(context);
  cartModel.add(item);
}
Now MyCart has only one code path for building any version of the UI.
// GOOD
Widget build(BuildContext context) {
  var cartModel = somehowGetMyCartModel(context);
  return SomeWidget(
    // Just construct the UI once, using the current state of the cart.
    // ···
  );
}
In our example, contents needs to live in MyApp. Whenever it changes, it rebuilds MyCart from above (more on that later). Because of this, MyCart doesn’t need to worry about lifecycle—it just declares what to show for any given contents. When that changes, the old MyCart widget disappears and is completely replaced by the new one.
This is what we mean when we say that widgets are immutable. They don’t change—they get replaced.
Now that we know where to put the state of the cart, let’s see how to access it.
Accessing the state
When user clicks on one of the items in the catalog, it’s added to the cart. But since the cart lives above MyListItem, how do we do that?
A simple option is to provide a callback that MyListItem can call when it is clicked. Dart’s functions are first class objects, so you can pass them around any way you want. So, inside MyCatalog you can have the following:
@override
Widget build(BuildContext context) {
  return SomeWidget(
    // Construct the widget, passing it a reference to the method above.
    MyListItem(myTapCallback),
  );
}

void myTapCallback(Item item) {
  print('user tapped on $item');
}
This works okay, but for app state that you need to modify from many different places, you’d have to pass around a lot of callbacks—which gets old pretty quickly.
Fortunately, Flutter has mechanisms for widgets to provide data and services to their descendants (in other words, not just their children, but any widgets below them). As you would expect from Flutter, where Everything is a Widget™, these mechanisms are just special kinds of widgets—InheritedWidget, InheritedNotifier, InheritedModel, and more. We won’t be covering those here, because they are a bit low-level for what we’re trying to do.
Instead, we are going to use a package that works with the low-level widgets but is simple to use. It’s called scoped_model.
With scoped_model, you don’t need to worry about callbacks or InheritedWidgets. But you do need to understand 3 concepts:
- Model
- ScopedModel
- ScopedModelDescendant
Model
In scoped_model, the Model encapsulates your application state. For very simple apps, you get by with a single model. In complex ones, you’ll have several models.
In our shopping app example, we want to manage the state of the cart in a Model. We create a new class that extends Model. Like so:
class CartModel extends Model {
  /// Internal, private state of the cart.
  final List<Item> _items = [];

  /// An unmodifiable view of the items in the cart.
  UnmodifiableListView<Item> get items => UnmodifiableListView(_items);

  /// The current total price of all items (assuming all items cost $1).
  int get totalPrice => _items.length;

  /// Adds [item] to cart. This is the only way to modify the cart from outside.
  void add(Item item) {
    _items.add(item);
    // This call tells [Model] that it should rebuild the widgets that
    // depend on it.
    notifyListeners();
  }
}
The only code that is specific to Model is the call to notifyListeners(). Call this method any time the model changes in a way that might change your app’s UI. Everything else in CartModel is the model itself and its business logic.
Model doesn’t depend on any high-level classes in Flutter, so it’s easily testable (you don’t even need to use widget testing for it). For example, here’s a simple unit test of CartModel:
test('adding item increases total cost', () {
  final cart = CartModel();
  final startingPrice = cart.totalPrice;
  cart.addListener(() {
    expect(cart.totalPrice, greaterThan(startingPrice));
  });
  cart.add(Item('Dash'));
});
But Model really starts to make sense when used with the rest of the scoped_model package.
ScopedModel
ScopedModel is the widget that provides an instance of Model to its descendants.
We already know where to put it: above the widgets that will need to access it. In the case of CartModel, that means somewhere above both MyCart and MyCatalog.
You don’t want to place ScopedModel higher than necessary (because you don’t want to pollute the scope). But in our case, the only widget that is on top of both MyCart and MyCatalog is MyApp.
void main() {
  final cart = CartModel();

  // You could optionally connect [cart] with some database here.

  runApp(
    ScopedModel<CartModel>(
      model: cart,
      child: MyApp(),
    ),
  );
}
Note that we’re creating ScopedModel<CartModel> (read: “ScopedModel of CartModel”). The scoped_model package relies on types to find the right model, and the <CartModel> part makes it clear what type we’re providing here.
If you want to provide more than one model, you need to nest the ScopedModels:
ScopedModel<SomeOtherModel>(
  model: myOtherModel,
  child: ScopedModel<CartModel>(
    model: cart,
    child: MyApp(),
  ),
)
ScopedModelDescendant
Now that CartModel is provided to widgets in our app through the ScopedModel<CartModel> declaration at the top, we can start using it.
This is done through the ScopedModelDescendant widget.
return ScopedModelDescendant<CartModel>(
  builder: (context, child, cart) {
    return Text("Total price: ${cart.totalPrice}");
  },
);
We must specify the type of the model that we want to access. In this case, we want CartModel, so we write ScopedModelDescendant<CartModel>. If you don’t specify the generic (<CartModel>), the scoped_model package won’t be able to help you. As mentioned above, scoped_model is based on types, and without the type, it doesn’t know what you want.
The only required argument of the ScopedModelDescendant widget is the builder. Builder is a function that is called whenever the model changes. (In other words, when you call notifyListeners() in your model, all the builder methods of all the corresponding ScopedModelDescendant widgets are called.)
The builder is called with three attributes. The first one is context, which you also get in every build method.
The second attribute is child, which is there for optimization. If you have a large widget subtree under your ScopedModelDescendant that doesn’t change when the model changes, you can construct it once and get it through the builder.
return ScopedModelDescendant<CartModel>(
  builder: (context, child, cart) => Stack(
        children: [
          // Use SomeExpensiveWidget here, without rebuilding every time.
          child,
          Text("Total price: ${cart.totalPrice}"),
        ],
      ),
  // Build the expensive widget here.
  child: SomeExpensiveWidget(),
);
The third argument of the builder function is the model. That’s what we were asking for in the first place. You can use the data in the model to define what the UI should look like at any given point.
It is best practice to put your ScopedModelDescendant widgets as deep in the tree as possible. You don’t want to rebuild large portions of the UI just because some detail somewhere changed.
// DON'T DO THIS
return ScopedModelDescendant<CartModel>(
  builder: (context, child, cart) {
    return HumongousWidget(
      // ...
      child: AnotherMonstrousWidget(
        // ...
        child: Text('Total price: ${cart.totalPrice}'),
      ),
    );
  },
);
Instead:
// DO THIS
return HumongousWidget(
  // ...
  child: AnotherMonstrousWidget(
    // ...
    child: ScopedModelDescendant<CartModel>(
      builder: (context, child, cart) {
        return Text('Total price: ${cart.totalPrice}');
      },
    ),
  ),
);
ScopedModel.of
Sometimes, you don’t really need the data in the model to change the UI but you still need to access it. For example, a ClearCart button wants to allow the user to remove everything from the cart. It doesn’t need to display the contents of the cart, it just needs to call the clear() method.
We could use ScopedModelDescendant<CartModel> for this, but that would be wasteful. We’d be asking the framework to rebuild a widget that doesn’t need to be rebuilt.
For this use case, we can use ScopedModel.of.
ScopedModel.of<CartModel>(context).add(item);
Using the above line in a build method will not cause this widget to rebuild when notifyListeners is called.
Note: You can also use ScopedModelDescendant<CartModel>(builder: myBuilder, rebuildOnChange: false) but that’s longer and requires you to define the builder function.
Putting it all together
You can check out the example covered in this article. If you want something simpler, you can see how the simple Counter app looks like when built with scoped_model.
When you’re ready to play around with scoped_model yourself, don’t forget to add the dependency on it to your pubspec.yaml first.
name: my_name
description: Blah blah blah.

# ...

dependencies:
  flutter:
    sdk: flutter

  scoped_model: ^1.0.0

dev_dependencies:
  # ...
Now you can import 'package:scoped_model/scoped_model.dart'; and start building.