
JSON and serialization
It is hard to think of a mobile app that doesn’t need to communicate with a web server or easily store structured data at some point. When making network-connected apps, the chances are that it needs to consume some good old JSON, sooner or later.
This guide looks into ways of using JSON with Flutter. It covers which JSON solution to use in different scenarios, and why.
Which JSON serialization method is right for me?
This article covers two general strategies for working with JSON:
- Manual serialization
- Automated serialization using code generation
Different projects come with different complexities and use cases. For smaller proof-of-concept projects or quick prototypes, using code generators might be overkill. For apps with several JSON models with more complexity, encoding by hand can quickly become tedious, repetitive, and lend itself to many small errors.
Use manual serialization for smaller projects
Manual JSON decoding refers to using the built-in JSON decoder in dart:convert. It involves passing the raw JSON string to the jsonDecode() function, and then looking up the values you need in the resulting Map<String, dynamic>. It has no external dependencies or particular setup process, and it’s good for a quick proof of concept.
Manual decoding does not perform well when your project becomes bigger. Writing decoding logic by hand can become hard to manage and error-prone. If you have a typo when accessing an nonexistent JSON field, your code throws an error during runtime.
If you do not have many JSON models in your project and are looking to test a concept quickly, manual serialization might be the way you want to start. For an example of manual encoding, see Serializing JSON manually using dart:convert.
Use code generation for medium to large projects
JSON serialization with code generation means having an external library generate the encoding boilerplate for you. After some initial setup, you run a file watcher that generates the code from your model classes. For example, json_serializable and built_value are these kinds of libraries.
This approach scales well for a larger project. No hand-written boilerplate is needed, and typos when accessing JSON fields are caught at compile-time. The downside with code generation is that it requires some initial setup. Also, the generated source files may produce visual clutter in your project navigator.
You might want to use generated code for JSON serialization when you have a medium or a larger project. To see an example of code generation based JSON encoding, see Serializing JSON using code generation libraries.
Is there a GSON/Jackson/Moshi equivalent in Flutter?
The simple answer is no.
Such a library would require using runtime reflection, which is disabled in Flutter. Runtime reflection interferes with tree shaking, which Dart has supported for quite a long time. With tree shaking, you can “shake off” unused code from your release builds. This optimizes the app’s size significantly.
Since reflection makes all code implicitly used by default, it makes tree shaking difficult. The tools cannot know what parts are unused at runtime, so the redundant code is hard to strip away. App sizes cannot be easily optimized when using reflection.
Although you cannot use runtime reflection with Flutter, some libraries give you similarly easy to use APIs but are based on code generation instead. This approach is covered in more detail in the code generation libraries section.
Serializing JSON manually using dart:convert
Basic JSON encoding in Flutter is very simple. Flutter has a built-in dart:convert library that includes a straightforward JSON encoder and decoder.
Here is an example JSON for a simple user model.
{
  "name": "John Smith",
  "email": "john@example.com"
}
With dart:convert, you can encode this JSON model in two ways.
Serializing JSON inline
By looking at the dart:convert documentation, you’ll see that you can decode the JSON by calling the jsonDecode() function, with the JSON string as the method argument.
Map<String, dynamic> user = jsonDecode(jsonString);

print('Howdy, ${user['name']}!');
print('We sent the verification link to ${user['email']}.');
Unfortunately, jsonDecode() returns a Map<String, dynamic>, meaning that you do not know the types of the values until runtime. With this approach, you lose most of the statically typed language features: type safety, autocompletion and most importantly, compile-time exceptions. Your code will become instantly more error-prone.
For example, whenever you access the name or email fields, you could quickly introduce a typo. A typo that the compiler doesn’t know about since the JSON lives in a map structure.
Serializing JSON inside model classes
Combat the previously mentioned problems by introducing a plain model class, called User in this example. Inside the User class, you’ll find:
- A
User.fromJson()constructor, for constructing a newUserinstance from a map structure. - A
toJson()method, which converts aUserinstance into a map.
With this approach, the calling code can have type safety, autocompletion for the name and email fields, and compile-time exceptions. If you make typos or treat the fields as ints instead of Strings, the app won’t compile, instead of crashing at runtime.
user.dart
class User {
  final String name;
  final String email;

  User(this.name, this.email);

  User.fromJson(Map<String, dynamic> json)
      : name = json['name'],
        email = json['email'];

  Map<String, dynamic> toJson() =>
    {
      'name': name,
      'email': email,
    };
}
The responsibility of the decoding logic is now moved inside the model itself. With this new approach, you can decode a user easily.
Map userMap = jsonDecode(jsonString);
var user = new User.fromJson(userMap);

print('Howdy, ${user.name}!');
print('We sent the verification link to ${user.email}.');
To encode a user, pass the User object to the jsonEncode() function. You don’t need to call the toJson() method, since jsonEncode() already does it for you.
String json = jsonEncode(user);
With this approach, the calling code doesn’t have to worry about JSON serialization at all. However, the model class still definitely has to. In a production app, you would want to ensure that the serialization works properly. In practice, the User.fromJson() and User.toJson() methods both need to have unit tests in place to verify correct behavior.
However, real-world scenarios are not usually that simple. It’s unlikely that you would use such small JSON responses. Nested JSON objects are also commonly used.
It would be nice if there were something that handled the JSON encoding and decoding for you. Luckily, there is!
Serializing JSON using code generation libraries
Although there are other libraries available, this guide uses the json_serializable package, an automated source code generator that generates the JSON serialization boilerplate for you.
Since the serialization code is not handwritten or maintained manually anymore, you minimize the risk of having JSON serialization exceptions at runtime.
Setting up json_serializable in a project
To include json_serializable in your project, you need one regular dependency, and two dev dependencies. In short, dev dependencies are dependencies that are not included in our app source code—they are only used in the development environment.
The latest versions of these required dependencies can be seen by following the pubspec file in the JSON serializable example.
pubspec.yaml
dependencies:
  # Your other regular dependencies here
  json_annotation: ^2.0.0

dev_dependencies:
  # Your other dev_dependencies here
  build_runner: ^1.0.0
  json_serializable: ^2.0.0
Run flutter packages get inside your project root folder (or click Packages Get in your editor) to make these new dependencies available in your project.
Creating model classes the json_serializable way
The following shows how to convert the User class to a json_serializable one. For the sake of simplicity, this code uses the simplified JSON model from the previous samples.
user.dart
import 'package:json_annotation/json_annotation.dart';

/// This allows the `User` class to access private members in
/// the generated file. The value for this is *.g.dart, where
/// the star denotes the source file name.
part 'user.g.dart';

/// An annotation for the code generator to know that this class needs the
/// JSON serialization logic to be generated.
@JsonSerializable()

class User {
  User(this.name, this.email);

  String name;
  String email;

  /// A necessary factory constructor for creating a new User instance
  /// from a map. Pass the map to the generated `_$UserFromJson()` constructor.
  /// The constructor is named after the source class, in this case User.
  factory User.fromJson(Map<String, dynamic> json) => _$UserFromJson(json);

  /// `toJson` is the convention for a class to declare support for serialization
  /// to JSON. The implementation simply calls the private, generated
  /// helper method `_$UserToJson`.
  Map<String, dynamic> toJson() => _$UserToJson(this);
}
With this setup, the source code generator generates code for encoding and decoding the name and email fields from JSON.
If needed, it is also easy to customize the naming strategy. For example, if the API returns objects with snake_case, and you want to use lowerCamelCase in your models, you can use the @JsonKey annotation with a name parameter:
/// Tell json_serializable that "registration_date_millis" should be
/// mapped to this property.
@JsonKey(name: 'registration_date_millis')
final int registrationDateMillis;
Running the code generation utility
When creating json_serializable classes the first time, you’ll get errors similar to what is shown in the image below.
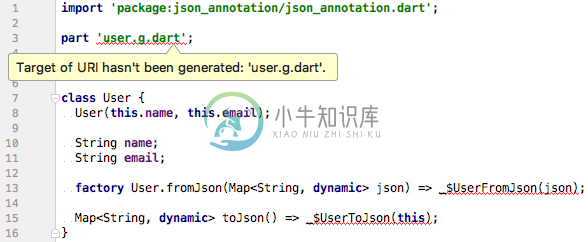
These errors are entirely normal and are simply because the generated code for the model class does not exist yet. To resolve this, run the code generator that generates the serialization boilerplate.
There are two ways of running the code generator.
One-time code generation
By running flutter packages pub run build_runner build in the project root, you generate JSON serialization code for your models whenever they are needed. This triggers a one-time build that goes through the source files, picks the relevant ones, and generates the necessary serialization code for them.
While this is convenient, it would be nice if you did not have to run the build manually every time you make changes in your model classes.
Generating code continuously
A watcher makes our source code generation process more convenient. It watches changes in our project files and automatically builds the necessary files when needed. Start the watcher by running flutter packages pub run build_runner watch in the project root.
It is safe to start the watcher once and leave it running in the background.
Consuming json_serializable models
To decode a JSON string the json_serializable way, you do not have actually to make any changes to our previous code.
Map userMap = jsonDecode(jsonString);
var user = User.fromJson(userMap);
The same goes for encoding. The calling API is the same as before.
String json = jsonEncode(user);
With json_serializable, you can forget any manual JSON serialization in the User class. The source code generator creates a file called user.g.dart, that has all the necessary serialization logic. You no longer have to write automated tests to ensure that the serialization works—it’s now the library’s responsibility to make sure the serialization works appropriately.
Further references
For more information, see the following resources: