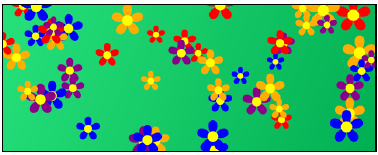
2.9 随机图形属性:绘制开满鲜花的原野
优质
小牛编辑
142浏览
2023-12-01
本节,我们通过绘制色彩缤纷的鲜花,来拥抱我们内心的嬉皮士。

绘制步骤
按照以下步骤,绘制随机的鲜花遍布整个画布:
1. 定义Flower对象的构造函数:
//定义Flower对象的构造函数
function Flower(context, centerX, centerY, radius, numPetals, color){
  this.context   = context;
  this.centerX   = centerX;
  this.centerY   = centerY;
  this.radius    = radius;
  this.numPetals = numPetals;
  this.color     = color;
}
2. 定义Flower对象的draw方法,该方法通过一个for循环来绘制多个花瓣,然后绘制一个黄色的花蕊:
//定义Flower对象的draw方法
Flower.prototype.draw  = function(){
  var context  = this.context;
  context.beginPath();
  //绘制花瓣
  for  (var n  =  0; n  < this.numPetals; n++)  {
    var theta1  =  ((Math.PI  *  2)  / this.numPetals)  *  (n  +  1);
    var theta2  =  ((Math.PI  *  2)  / this.numPetals)  *  (n);
    var x1  =  (this.radius  * Math.sin(theta1))  + this.centerX;
    var y1  =  (this.radius  * Math.cos(theta1))  + this.centerY;
    var x2  =  (this.radius  * Math.sin(theta2))  + this.centerX;
    var y2  =  (this.radius  * Math.cos(theta2))  + this.centerY;
    context.moveTo(this.centerX, this.centerY);
    context.bezierCurveTo(x1, y1, x2, y2, this.centerX, this. centerY);
  }
  context.closePath();
  context.fillStyle  = this.color;
  context.fill();
  //绘制黄色花蕊
  context.beginPath();
  context.arc(this.centerX, this.centerY, this.radius / 5, 0, 2 * Math.PI, false);
  context.fillStyle  = "yellow";
  context.fill();
};
3. 设置2D画布上下文:
window.onload  = function(){
  var canvas  = document.getElementById("myCanvas");
  var context = canvas.getContext("2d");
4. 创建绿色渐变作背景:
  //创建绿色渐变作背景
  context.beginPath();
  context.rect(0,  0, canvas.width, canvas.height);
  var grd  = context.createLinearGradient(0,  0, canvas.width, canvas.height);
  grd.addColorStop(0, "#1EDE70");  //浅绿色
  grd.addColorStop(1, "#00A747");  //深绿色
  context.fillStyle  = grd;
  context.fill();
5. 定义花瓣颜色的数组:
  //定义花瓣颜色的数组
  var colorArray  =  [];
  colorArray.push("red");  //  0
  colorArray.push("orange");  //  1
  colorArray.push("blue");  //  2
  colorArray.push("purple");  //  3
6. 创建一个循环,来随机生成鲜花的位置、尺寸和颜色:
  //定义鲜花的数目
  var numFlowers  =  50;
  //绘制随机放置的鲜花
  for  (var n  =  0; n  < numFlowers; n++)  {
    var centerX  = Math.random()  * canvas.width;
    var centerY  = Math.random()  * canvas.height;
    var radius  =  (Math.random()  *  25)  +  25;
    var colorIndex = Math.round(Math.random() * (colorArray. length  -  1));
    var thisFlower = new Flower(context, centerX, centerY, radius, 5, colorArray[colorIndex]);
    thisFlower.draw();
  }
};
7. 在HTML文档的body部分嵌入canvas标签:
<canvas id="myCanvas" width="600" height="250" style="border:1px solid black;">
</canvas>
工作原理
本节的全部内容是关于随机对象的属性,并通过HTML5的画布把其结果绘制到屏幕上。总的思想是绘制很多鲜花,这些鲜花的位置、尺寸、颜色都各不相同。
为帮助我们创建开满鲜花的原野,创建一个Flower类将非常有用,由这个类来定义鲜花的属性及绘制鲜花的方法。本节的实例中,我们保持花瓣的数目不变,如果要你来实现,你当然可以改变每朵鲜花的花瓣数目。
实际上,绘制鲜花跟上一节使用循环创建图案:绘制齿轮非常相似,只是此刻,是在一个圆的周围绘制花瓣而不是锯齿线。我已经发现,在HTML5的画布中绘制花瓣的最简单方法,是绘制一条起点和终点相连的贝塞尔曲线。贝塞尔曲线的起点和终点都在鲜花的中心,其控制点在Flower类的draw()方法的每个迭代中定义。
一旦Flower类创建完成并可以运行,我们可以创建一个循环,在循环的每个迭代中实例化一个随机的Flower对象,再调用draw()方法把它们渲染出来。
如果你试着运行本节的例子,你将看到,每次刷新屏幕,这些鲜花都是完全随机的。

