Button
介绍 (Introduction)
Button小部件代表标准按钮。
Class 声明 (Class Declaration)
以下是com.google.gwt.user.client.ui.Button类的声明 -
public class Button
   extends ButtonBase
CSS样式规则 (CSS Style Rules)
以下默认CSS样式规则将应用于所有Button小部件。 您可以根据自己的要求覆盖它。
.gwt-Button { }
类构造函数 (Class Constructors)
| Sr.No. | 构造函数和描述 |
|---|---|
| 1 | Button() 创建一个没有标题的按钮。 |
| 2 | protected Button(Element element) 子类可以使用此构造函数来显式使用现有元素。 |
| 3 | Button(java.lang.String html) 创建具有给定HTML标题的按钮。 |
| 4 | Button(java.lang.String html, ClickListener listener) 使用给定的HTML标题创建一个按钮,然后单击侦听器。 |
Class Methods
| Sr.No. | 功能名称和描述 |
|---|---|
| 1 | click() 程序化等效于用户单击按钮。 |
| 2 | static Button wrap(Element element) 创建一个包装现有元素的Button小部件。 |
方法继承 (Methods Inherited)
该类继承以下类中的方法 -
com.google.gwt.user.client.ui.UIObject
com.google.gwt.user.client.ui.Widget
com.google.gwt.user.client.ui.FocusWidget
com.google.gwt.user.client.ui.ButtonBase
java.lang.Object
按钮小部件示例
此示例将指导您完成在GWT中显示Button Widget的使用的简单步骤。 按照以下步骤更新我们在GWT - Create Application的GWT应用程序GWT - Create Application章节 -
| 步 | 描述 |
|---|---|
| 1 | 在com.包下创建一个名为HelloWorld的项目,如GWT - Create Application一章中所述。 |
| 2 | 修改HelloWorld.gwt.xml , HelloWorld.css , HelloWorld.html和HelloWorld.java ,如下所述。 保持其余文件不变。 |
| 3 | 编译并运行应用程序以验证实现的逻辑的结果。 |
以下是修改后的模块描述符src/com.
/HelloWorld.gwt.xml 。<?xml version = "1.0" encoding = "UTF-8"?>
<module rename-to = 'helloworld'>
<!-- Inherit the core Web Toolkit stuff. -->
<inherits name = 'com.google.gwt.user.User'/>
<!-- Inherit the default GWT style sheet. -->
<inherits name = 'com.google.gwt.user.theme.clean.Clean'/>
<!-- Specify the app entry point class. -->
<entry-point class = 'com..client.HelloWorld'/>
<!-- Specify the paths for translatable code -->
<source path = 'client'/>
<source path = 'shared'/>
</module>
以下是修改后的样式表文件war/HelloWorld.css 。
body {
   text-align: center;
   font-family: verdana, sans-serif;
}
h1 {
   font-size: 2em;
   font-weight: bold;
   color: #777777;
   margin: 40px 0px 70px;
   text-align: center;
}
.gwt-Button {
   color:red;
}
.gwt-Green-Button {
   color:green;
}
.gwt-Blue-Button {
   color:blue;
}
以下是修改后的HTML主机文件war/HelloWorld.html 。
<html>
   <head>
      <title>Hello World</title>
      <link rel = "stylesheet" href = "HelloWorld.css"/>
      <script language = "javascript" src = "helloworld/helloworld.nocache.js">
      </script>
   </head>
   <body>
      <h1>Button Widget Demonstration</h1>
      <div id = "gwtContainer"></div>
   </body>
</html>
让我们有以下Java文件src/com.
/HelloWorld.java ,它将演示Button小部件的使用。package com..client;
import com.google.gwt.core.client.EntryPoint;
import com.google.gwt.event.dom.client.ClickEvent;
import com.google.gwt.event.dom.client.ClickHandler;
import com.google.gwt.user.client.Window;
import com.google.gwt.user.client.ui.Button;
import com.google.gwt.user.client.ui.RootPanel;
import com.google.gwt.user.client.ui.VerticalPanel;
public class HelloWorld implements EntryPoint {
public void onModuleLoad() {
//create buttons
Button redButton = new Button("Red");
Button greenButton = new Button("Green");
Button blueButton = new Button("Blue");
// use UIObject methods to set button properties.
redButton.setWidth("100px");
greenButton.setWidth("100px");
blueButton.setWidth("100px");
greenButton.addStyleName("gwt-Green-Button");
blueButton.addStyleName("gwt-Blue-Button");
//add a clickListener to the button
redButton.addClickHandler(new ClickHandler() {
@Override
public void onClick(ClickEvent event) {
Window.alert("Red Button clicked!");
}
});
//add a clickListener to the button
greenButton.addClickHandler(new ClickHandler() {
@Override
public void onClick(ClickEvent event) {
Window.alert("Green Button clicked!");
}
});
//add a clickListener to the button
blueButton.addClickHandler(new ClickHandler() {
@Override
public void onClick(ClickEvent event) {
Window.alert("Blue Button clicked!");
}
});
// Add button to the root panel.
VerticalPanel panel = new VerticalPanel();
panel.setSpacing(10);
panel.add(redButton);
panel.add(greenButton);
panel.add(blueButton);
RootPanel.get("gwtContainer").add(panel);
}
}
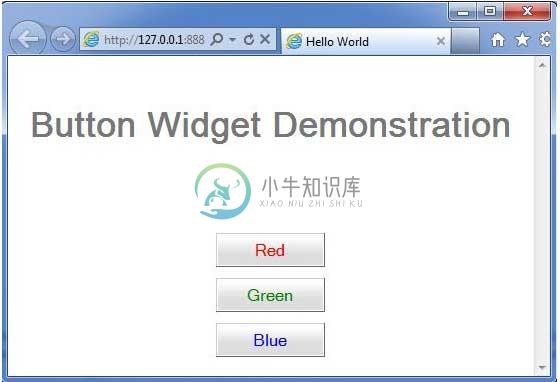
一旦准备好完成所有更改,让我们像在GWT - 创建应用程序章节中那样在开发模式下编译和运行应用程序 。 如果您的应用程序一切正常,这将产生以下结果 -

当您单击“ Click Me按钮时,它将显示一条警告消息Hello World!

