Label
介绍 (Introduction)
Label只能包含任意文本,不能解释为HTML。 此小部件使用“div”元素,使其以块布局显示。
Class 声明 (Class Declaration)
以下是com.google.gwt.user.client.ui.Label类的声明 -
public class Label
   extends Widget
      implements HasHorizontalAlignment, HasText, HasWordWrap,
         HasDirection, HasClickHandlers, SourcesClickEvents,
            SourcesMouseEvents, HasAllMouseHandlers
CSS样式规则 (CSS Style Rules)
以下默认CSS样式规则将应用于所有标签。 您可以根据自己的要求覆盖它。
.gwt-Label { }
类构造函数 (Class Constructors)
| Sr.No. | 构造函数和描述 |
|---|---|
| 1 | Label() 创建一个空标签。 |
| 2 | protected Label(Element element) 子类可以使用此构造函数来显式使用现有元素。 |
| 3 | Label(java.lang.String text) 创建具有指定文本的标签。 |
| 4 | Label(java.lang.String text, boolean wordWrap) 创建具有指定文本的标签。 |
Class Methods
| Sr.No. | 方法和描述 |
|---|---|
| 1 | void addClickListener(ClickListener listener) 添加侦听器接口以接收单击事件。 |
| 2 | void addMouseListener(MouseListener listener) 添加侦听器接口以接收鼠标事件。 |
| 3 | void addMouseWheelListener(MouseWheelListener listener) 获取此小部件的父面板。 |
| 4 | HasDirection.Direction getDirection() 获取窗口小部件的方向性。 |
| 5 | HasHorizontalAlignment. HorizontalAlignmentConstant getHorizontalAlignment() 获取水平对齐方式。 |
| 6 | java.lang.String getText() 获取此对象的文本。 |
| 7 | boolean getWordWrap() 获取是否启用自动换行。 |
| 8 | void onBrowserEvent(Event event) 删除以前添加的侦听器界面。 |
| 9 | void removeClickListener(ClickListener listener) 在将窗口小部件与浏览器的文档分离之前立即调用此方法。 |
| 10 | void removeMouseListener(MouseListener listener) 删除以前添加的侦听器界面。 |
| 11 | void removeMouseWheelListener(MouseWheelListener listener) 删除以前添加的侦听器界面。 |
| 12 | void setDirection(HasDirection.Direction direction) 设置窗口小部件的方向性。 |
| 13 | void setHorizontalAlignment(HasHorizontalAlignment. HorizontalAlignmentConstant align) 设置水平对齐。 |
| 14 | void setText(java.lang.String text) 设置此对象的文本。 |
| 15 | void setWordWrap(boolean wrap) 设置是否启用自动换行。 |
| 16 | static Label wrap(Element element) 创建一个包装现有 或元素的Label小部件。 |
方法继承 (Methods Inherited)
该类继承以下类中的方法 -
com.google.gwt.user.client.ui.UIObject
com.google.gwt.user.client.ui.Widget
标签小部件示例
此示例将指导您完成在GWT中显示Label Widget的使用的简单步骤。 按照以下步骤更新我们在GWT - Create Application的GWT应用程序GWT - Create Application章节 -
| 步 | 描述 |
|---|---|
| 1 | 在com.包下创建一个名为HelloWorld的项目,如GWT - Create Application一章中所述。 |
| 2 | 修改HelloWorld.gwt.xml , HelloWorld.css , HelloWorld.html和HelloWorld.java ,如下所述。 保持其余文件不变。 |
| 3 | 编译并运行应用程序以验证实现的逻辑的结果。 |
以下是修改后的模块描述符src/com.
/HelloWorld.gwt.xml 。<?xml version = "1.0" encoding = "UTF-8"?>
<module rename-to = 'helloworld'>
<!-- Inherit the core Web Toolkit stuff. -->
<inherits name = 'com.google.gwt.user.User'/>
<!-- Inherit the default GWT style sheet. -->
<inherits name = 'com.google.gwt.user.theme.clean.Clean'/>
<!-- Specify the app entry point class. -->
<entry-point class = 'com..client.HelloWorld'/>
<!-- Specify the paths for translatable code -->
<source path = 'client'/>
<source path = 'shared'/>
</module>
以下是修改后的样式表文件war/HelloWorld.css 。
body {
   text-align: center;
   font-family: verdana, sans-serif;
}
h1 {
   font-size: 2em;
   font-weight: bold;
   color: #777777;
   margin: 40px 0px 70px;
   text-align: center;
}
.gwt-Label{
   font-size: 150%;
   font-weight: bold;
   color:red;
   padding:5px;
   margin:5px;
}
.gwt-Green-Border{
   border:1px solid green;
}
.gwt-Blue-Border{
   border:1px solid blue;
}
以下是修改后的HTML主机文件war/HelloWorld.html的内容,以容纳两个按钮。
<html>
   <head>
      <title>Hello World</title>
      <link rel = "stylesheet" href = "HelloWorld.css"/>
      <script language = "javascript" src = "helloworld/helloworld.nocache.js">
      </script>
   </head>
   <body>
      <h1>Label Widget Demonstration</h1>
      <div id = "gwtContainer"></div>
   </body>
</html>
让我们有以下Java文件src/com.
/HelloWorld.java ,它将演示Label小部件的使用。package com..client;
import com.google.gwt.core.client.EntryPoint;
import com.google.gwt.user.client.ui.Label;
import com.google.gwt.user.client.ui.RootPanel;
import com.google.gwt.user.client.ui.VerticalPanel;
public class HelloWorld implements EntryPoint {
public void onModuleLoad() {
// create two Labels
Label label1 = new Label("This is first GWT Label");
Label label2 = new Label("This is second GWT Label");
// use UIObject methods to set label properties.
label1.setTitle("Title for first Lable");
label1.addStyleName("gwt-Green-Border");
label2.setTitle("Title for second Lable");
label2.addStyleName("gwt-Blue-Border");
// add labels to the root panel.
VerticalPanel panel = new VerticalPanel();
panel.add(label1);
panel.add(label2);
RootPanel.get("gwtContainer").add(panel);
}
}
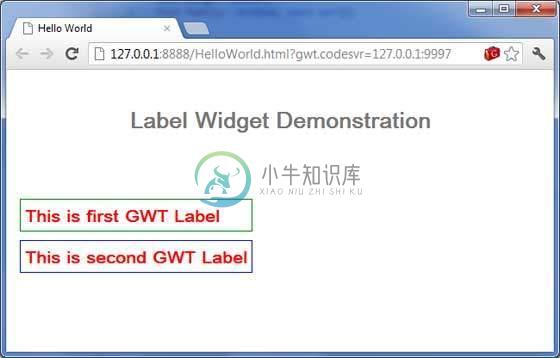
一旦准备好完成所有更改,让我们像在GWT - 创建应用程序章节中那样在开发模式下编译和运行应用程序 。 如果您的应用程序一切正常,这将产生以下结果 -


