
Comments 2-0
Introduction
The Comments 2.0 plugin provides the ability to start or join a conversation by adding comments to the content within the TinyMCE editor. The Comments 2.0 plugin is built upon the Annotations API and uses annotations to create comment threads (conversations).
Comments is a premium plugin from Tiny. Please see the Premium features section for all the buying options.
After obtaining the Comments 2.0 plugin, refer to the following instructions for using it.
Add the Comments 2.0 plugin
To add the Comments 2.0 plugin to the TinyMCE editor, use the following script:
tinymce.init({
  selector: '#tiny-ui .editor',
  plugins: 'paste tinycomments',
  tinycomments_mode: 'embedded',
  tinycomments_author: 'Author'
});
Modes
There are two modes available in Comments 2.0 that provide the ability to save comments. These modes are configured in the Comments 2.0 settings.
- Callback Mode - This is the default mode in Comments. This mode is used to configure storage and save comments on user’s server. This option gives the user a choice to configure the storage settings to either persist comments immediately or save them at the same time as the content. Additional callbacks are required to be configured to use Comments in the callback mode. Refer to the configuring callbacks for comments section, for more information.
- Embedded Mode - This mode allows the user to store the comments within the content. No additional callbacks are required to be configured to use this mode.
Configuring Comments 2.0 embedded mode
To configure Comments 2.0 to use the embedded mode use the following script:
tinymce.init({
  selector: "#textarea",
  tinycomments_author: 'Embedded Journalist',
  tinycomments_mode: 'embedded'
 ...
})
Configuring the Comments 2.0 addcomment toolbar button
The addcomment toolbar button provides the ability to add comments.
The Add comment toolbar button is available by default if the toolbar menu is not customized.
In case of a customized toolbar menu, use the following script to configure the Comments 2.0 toolbar button:
tinymce.init({
 selector: "#textarea",
 toolbar: 'bold italic underline insertfile | addcomment',
 ...
})
Result: The Comments toolbar button appears in the toolbar menu. The function of this button is to add comments to the selected text.
Configuring the Comments 2.0 showcomments toolbar button
The showcomments toolbar button provides the ability to display comments field for the selected text. It is a toggle button and is used to hide the comments sidebar as well.
Use the following script to configure the Comments 2.0 toolbar button:
tinymce.init({
 selector: "#textarea",
 toolbar: 'bold italic underline insertfile | showcomments',
 ...
})
Result: The Comments toolbar button appears in the toolbar menu. The function of this button is to show comments to for the selected text.
Configuring the Comments 2.0 menu item
By default, when Comments 2.0 is added to the plugin list, the default menus will have entries for addcomment (Insert Menu), showcomments (View Menu), and deleteallconversations (File Menu).
For more information on configuring menu items refer to the toolbar and menu sections.
Currently, there are three menu items available:
addcomment- Provides the ability to add comments. By default, this option can be accessed through Insert -> Add comment menu bar item.showcomments- Provides the ability to display comments field for the selected text. It is a toggle button and is used to hide the comments as well. By default, this option can be accessed through View -> Show comment menu bar item.deleteallconversations- Provides the ability to delete all the comments in the content. By default, this option can be accessed through File -> Delete all conversations menu bar item.
Configuring the commented text properties
The highlight styles are now a part of the overall content skin and are changed through customizing the skin.
TinyMCE open source project oxide (default skin), defines the variables used for changing the annotation colours.
Refer to the documentation for building a skin using this repo.
For more information on configuring TinyMCE formats, refer to the formats section.
Using Comments
To add a comment
- Select the text from the desired location in the editor body.
- From the navigation menu, choose Insert-> Add Comment or click on the Comments toolbar button to add the comment.
- The Comment dialog box appears in the sidebar of the editor instance.
- Type the comment in the box displaying “Say something…” suggested text.
- Press Clear to delete or Save to store the input comment.
Result: The selected text will be highlighted as per the configured options. The following screen with the option for editing, deleting, and replying to the comment, will appear.
Note: The above procedure can be followed for adding multiple comments to the document.
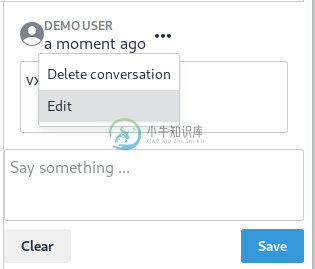
Editing a comment
Follow this procedure to edit a comment.
- Click on this icon above the comments box to expand the menu.
- Select Edit from the menu items.
- The comment field becomes editable. Make the required changes.
- Click Cancel to discard or Save to store the changes.
Delete a comment
Follow this procedure to delete a comment. This option is not available for the first comment in a conversation.
- Click on this icon above the comments box to expand the menu.
- Select Delete from the menu items.
- The following options appear in the comments sidebar:
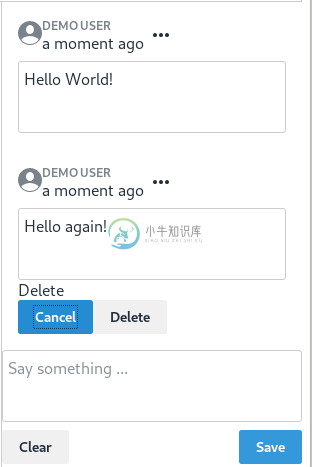
- Click Cancel to save or Delete to remove the comment from the conversation.
Delete conversation
This option is only available for the first comment in a conversation. Once the comment is saved, follow this procedure to delete a conversation.
- Click on this icon above the comments box to expand the menu.
- Select Delete conversation from the menu items.
- The following decision dialog box will appear:
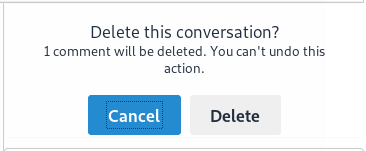
- Click Cancel to save or Delete to remove the conversation.
Result: The conversation and all its subsequent comments will be deleted.
Show comment
Follow this procedure to display the comments sidebar:
- Place the cursor on the desired text in the editor body:
- From the navigation menu, choose View -> Show Comment or click on the Show Comments toggle toolbar button to display the comment.
Result: The comments sidebar will appear and display the corresponding conversation for the highlighted text.
Delete all conversations
Follow this procedure to delete all conversations in the document:
- From the navigation menu, choose File -> Delete all conversations option to delete all the comments in a document.
- The following decision dialog box will appear:
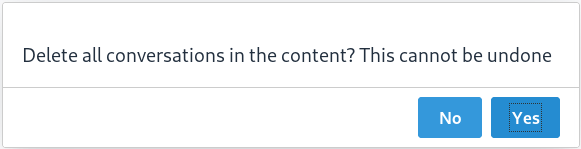
- Click Ok to remove the all the comments or Cancel to dismiss the action.
Result: All the comments for the selected document will be deleted.
Check out the Comments demo to try this new feature.
Using Comments 2.0 embedded mode with the Full Page plugin
Users have to be cautious when deciding the order in which the plugins are added in the plugins list.
Comments can cause an issue if the Full Page plugin fullpage appears before Comments 2.0 plugin tinycomments in the plugin list, and tinycomments is configured to use embedded mode.
The order that the plugins appear affects the order that the getContent hooks are processed in. This creates an issue with tinycomments working as expected since the fullpage plugin adds outer <html> elements before tinycomments adds its comment data. This leads to the comment data being in the wrong place. The consequence of this situation is that when a saved document is re-opened, the comment data is lost (but the highlights are still there).
For a workaround, please ensure that tinycomments is listed before fullpage in the plugins list. This should result in tinycomments working properly.