碰撞检测
碰撞检测
现在你知道了如何制造种类繁多的图形对象,但是你能用他们做什么?一个有趣的事情是利用它制作一个简单的 碰撞检测系统 。你可以用一个叫做:hitTestRectangle 的自定义的函数来检测两个矩形精灵是否接触。
hitTestRectangle(spriteOne, spriteTwo)
如果它们重叠, hitTestRectangle 会返回 true。你可以用 hitTestRectangle 结合 if 条件语句去检测两个精灵是否碰撞:
if (hitTestRectangle(cat, box)) {//There's a collision} else {//There's no collision}
正如你所见, hitTestRectangle 是走入游戏设计这片宇宙的大门。
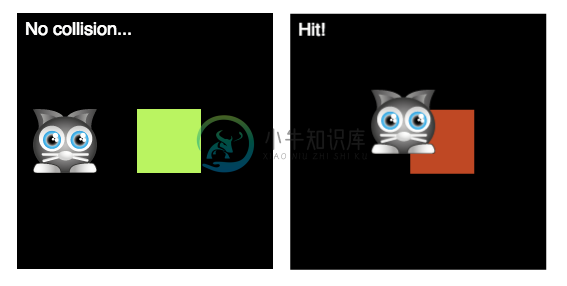
运行在 examples 文件夹的 collisionDetection.html 文件,看看怎么用 hitTestRectangle工作。用方向按键去移动猫,如果猫碰到了盒子,盒子会变成红色,然后 “Hit!” 文字对象会显示出来。

你已经看到了创建这些所有元素的代码,让猫移动的键盘控制。唯一的新的东西就是 hitTestRectangle 函数被用在 play 函数里检测碰撞。
function play(delta) {//use the cat's velocity to make it movecat.x += cat.vx;cat.y += cat.vy;//check for a collision between the cat and the boxif (hitTestRectangle(cat, box)) {//if there's a collision, change the message text//and tint the box redmessage.text = "hit!";box.tint = 0xff3300;} else {//if there's no collision, reset the message//text and the box's colormessage.text = "No collision...";box.tint = 0xccff99;}}
play 函数被每秒调用了60次,每一次这个 if 条件语句都会在猫和盒子之间进行碰撞检测。如果 hitTestRectangle 为 true,那么文字 message 对象会用 setText 方法去显示 “Hit”:
message.text = "Hit!";
这个盒子的颜色改变的效果是把盒子的 tint 属性改成一个16进制的红色的值实现的。
box.tint = 0xff3300;
如果没有碰撞,消息和盒子会保持它们的原始状态。
message.text = "No collision...";box.tint = 0xccff99;
代码很简单,但是你已经创造了一个看起来完全活着的互动的世界!它简直跟魔术一样!令人惊讶的是,你大概已经拥有了你需要用Pixi制作游戏的全部技能!
碰撞检测函数
hitTestRectangle 函数都有些什么呢?它做了什么,还有它是如何工作的?关于碰撞检测算法的细节有些超出了本教程的范围。最重要的事情是你要知道如何使用它。但是,只是作为你的参考资料,不让你好奇,这里有全部的 hitTestRectangle 函数的定义。你能从注释弄明白它都做了什么吗?
function hitTestRectangle(r1, r2) {//Define the variables we'll need to calculatelet hit, combinedHalfWidths, combinedHalfHeights, vx, vy;//hit will determine whether there's a collisionhit = false;//Find the center points of each spriter1.centerX = r1.x + r1.width / 2;r1.centerY = r1.y + r1.height / 2;r2.centerX = r2.x + r2.width / 2;r2.centerY = r2.y + r2.height / 2;//Find the half-widths and half-heights of each spriter1.halfWidth = r1.width / 2;r1.halfHeight = r1.height / 2;r2.halfWidth = r2.width / 2;r2.halfHeight = r2.height / 2;//Calculate the distance vector between the spritesvx = r1.centerX - r2.centerX;vy = r1.centerY - r2.centerY;//Figure out the combined half-widths and half-heightscombinedHalfWidths = r1.halfWidth + r2.halfWidth;combinedHalfHeights = r1.halfHeight + r2.halfHeight;//Check for a collision on the x axisif (Math.abs(vx) < combinedHalfWidths) {//A collision might be occuring. Check for a collision on the y axisif (Math.abs(vy) < combinedHalfHeights) {//There's definitely a collision happeninghit = true;} else {//There's no collision on the y axishit = false;}} else {//There's no collision on the x axishit = false;}//`hit` will be either `true` or `false`return hit;};

