从一个纹理贴图集创建精灵
从已经加载的纹理贴图集中创建精灵
通常Pixi给你三种方式从已经加载的纹理贴图集中创建精灵:
- 使用
TextureCache:let texture = TextureCache["frameId.png"],sprite = new Sprite(texture);
- 如果你是使用的
loader来加载纹理贴图集, 使用loader的resources:let sprite = new Sprite(resources["images/treasureHunter.json"].textures["frameId.png"]);
- 要创建一个精灵需要输入太多东西了!
所以我建议你给纹理贴图集的textures对象创建一个叫做id的别名,象是这样:
现在你就可以像这样实例化一个精灵了:let id = PIXI.loader.resources["images/treasureHunter.json"].textures;
真不错啊~!let sprite = new Sprite(id["frameId.png"]);
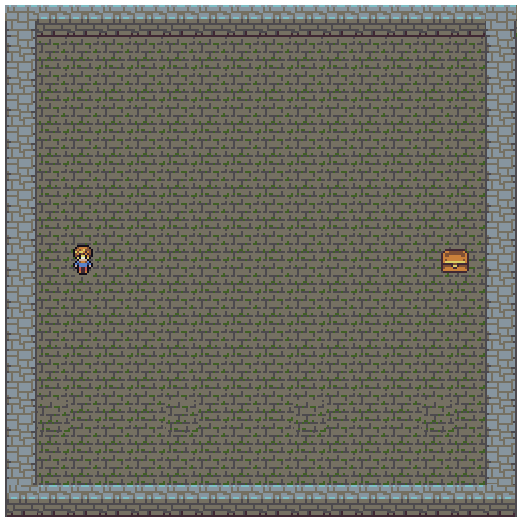
这里在setup函数中用三种不同的创建方法创建和显示了dungeon, explorer, 和 treasure精灵。
//Define variables that might be used in more//than one functionlet dungeon, explorer, treasure, id;function setup() {//There are 3 ways to make sprites from textures atlas frames//1. Access the `TextureCache` directlylet dungeonTexture = TextureCache["dungeon.png"];dungeon = new Sprite(dungeonTexture);app.stage.addChild(dungeon);//2. Access the texture using throuhg the loader's `resources`:explorer = new Sprite(resources["images/treasureHunter.json"].textures["explorer.png"]);explorer.x = 68;//Center the explorer verticallyexplorer.y = app.stage.height / 2 - explorer.height / 2;app.stage.addChild(explorer);//3. Create an optional alias called `id` for all the texture atlas//frame id textures.id = PIXI.loader.resources["images/treasureHunter.json"].textures;//Make the treasure box using the aliastreasure = new Sprite(id["treasure.png"]);app.stage.addChild(treasure);//Position the treasure next to the right edge of the canvastreasure.x = app.stage.width - treasure.width - 48;treasure.y = app.stage.height / 2 - treasure.height / 2;app.stage.addChild(treasure);}
这里是代码运行的结果:

舞台定义为512像素见方的大小,你可以看到代码中app.stage.height和app.stage.width属性使得精灵们排成了一排。下面的代码使得explorer的y属性垂直居中了。
explorer.y = app.stage.height / 2 - explorer.height / 2;
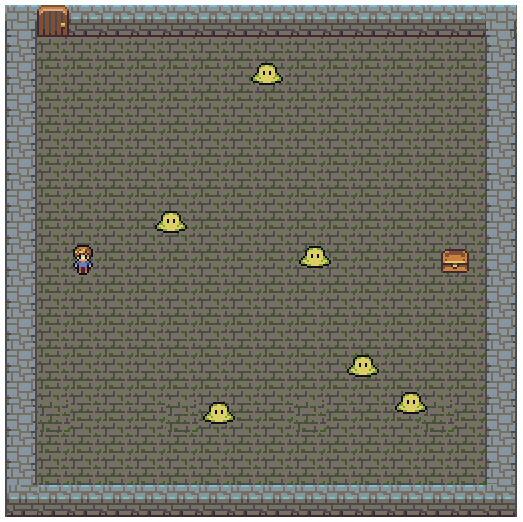
学会使用纹理贴图集来创建一个精灵是一个基本的操作。所以在我们继续之前,你来试着写一些这样的精灵吧:blob们和exit的门,让他们看起来象是这样:

下面就是所有的代码啦。我也把HTML放了进来,现在你可以看见所有的上下文。(你可以在examples/spriteFromTextureAtlas.html找到可以用于演示的代码。)注意,blob精灵是用一个循环加进舞台的,并且他有一个随机的位置。
<!doctype html><meta charset="utf-8"><title>Make a sprite from a texture atlas</title><body><script src="../pixi/pixi.min.js"></script><script>//Aliaseslet Application = PIXI.Application,Container = PIXI.Container,loader = PIXI.loader,resources = PIXI.loader.resources,TextureCache = PIXI.utils.TextureCache,Sprite = PIXI.Sprite,Rectangle = PIXI.Rectangle;//Create a Pixi Applicationlet app = new Application({width: 512,height: 512,antialias: true,transparent: false,resolution: 1});//Add the canvas that Pixi automatically created for you to the HTML documentdocument.body.appendChild(app.view);//load a JSON file and run the `setup` function when it's doneloader.add("images/treasureHunter.json").load(setup);//Define variables that might be used in more//than one functionlet dungeon, explorer, treasure, door, id;function setup() {//There are 3 ways to make sprites from textures atlas frames//1. Access the `TextureCache` directlylet dungeonTexture = TextureCache["dungeon.png"];dungeon = new Sprite(dungeonTexture);app.stage.addChild(dungeon);//2. Access the texture using throuhg the loader's `resources`:explorer = new Sprite(resources["images/treasureHunter.json"].textures["explorer.png"]);explorer.x = 68;//Center the explorer verticallyexplorer.y = app.stage.height / 2 - explorer.height / 2;app.stage.addChild(explorer);//3. Create an optional alias called `id` for all the texture atlas//frame id textures.id = PIXI.loader.resources["images/treasureHunter.json"].textures;//Make the treasure box using the aliastreasure = new Sprite(id["treasure.png"]);app.stage.addChild(treasure);//Position the treasure next to the right edge of the canvastreasure.x = app.stage.width - treasure.width - 48;treasure.y = app.stage.height / 2 - treasure.height / 2;app.stage.addChild(treasure);//Make the exit doordoor = new Sprite(id["door.png"]);door.position.set(32, 0);app.stage.addChild(door);//Make the blobslet numberOfBlobs = 6,spacing = 48,xOffset = 150;//Make as many blobs as there are `numberOfBlobs`for (let i = 0; i < numberOfBlobs; i++) {//Make a bloblet blob = new Sprite(id["blob.png"]);//Space each blob horizontally according to the `spacing` value.//`xOffset` determines the point from the left of the screen//at which the first blob should be added.let x = spacing * i + xOffset;//Give the blob a random y position//(`randomInt` is a custom function - see below)let y = randomInt(0, app.stage.height - blob.height);//Set the blob's positionblob.x = x;blob.y = y;//Add the blob sprite to the stageapp.stage.addChild(blob);}}//The `randomInt` helper functionfunction randomInt(min, max) {return Math.floor(Math.random() * (max - min + 1)) + min;}</script></body>
你可以看见所有的泡泡怪都用一个for循环被创建了,每一个泡泡怪都有一个独一无二的x坐标,像是下面这样:
let x = spacing * i + xOffset;blob.x = x;
spacing变量的值是48,xOffset的值是150。这意味着第一个blob怪的位置的x坐标将会是150。这个偏移使得泡泡怪离舞台左边的距离有150个像素。每一个泡泡怪都有个48像素的空余,也就是说每一个泡泡怪都会比在循环之中前一个创建的泡泡怪的位置的x坐标多出48像素以上的增量。它使得泡泡怪们相互间隔,从地牢地板的左边排向右边。
每一个blob也被赋予了一个随机的y坐标,这里是处理这件事的代码:
let y = randomInt(0, stage.height - blob.height);blob.y = y;
泡泡怪的y坐标将会从0到512之间随机取值,它的变量名是stage.height。它的值是利用randomInt函数来得到的。randomInt返回一个由你定义范围的随机数。
randomInt(lowestNumber, highestNumber)
这意味着如果你想要一个1到10之间的随机数,你可以这样得到它:
let randomNumber = randomInt(1, 10);
这是randomInt方法的定义:
function randomInt(min, max) {return Math.floor(Math.random() * (max - min + 1)) + min;}
randomInt是一个很好的用来做游戏的工具函数,我经常用他。

