Learning the Interface 学习界面
First Launch 首次运行
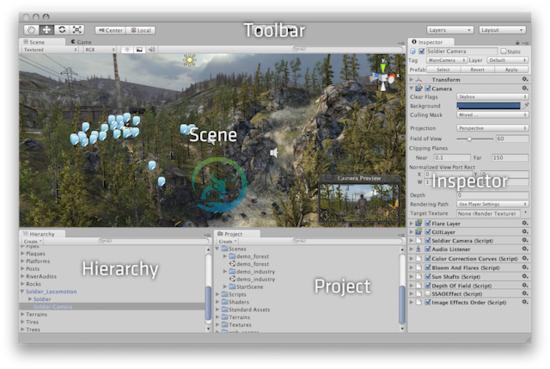
Let's begin learning Unity. If you have not yet opened Unity, you can find it inside Start » Programs » Unity on Windows, or Applications » Unity on Mac. The Unity Editor will appear. Take your time to look over the Unity Editor interface and familiarize yourself with it. The Main Editor Window is made up of several Tabbed Windows, called Views. There are several types of Views in Unity, each with a specific purpose.
让我们开始学习Unity。如果你还没有打开Unity,你可以在Windows里面找到开始 » 程序 » Unity启动它,或者在Mac系统中通过Applications » Unity启动它。你自己可以观察Unity编辑器界面并熟悉它。主编辑器窗口是由几个选项卡式窗口组成,称之为视图。在Unity中,有不同类型的特殊用途的视图。
Project View 项目视图
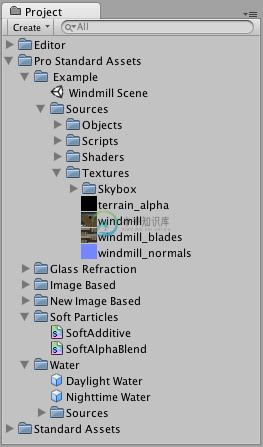
Every Unity project contains an Assets folder. The contents of this folder are presented in the Project View. This is where you store all the assets that make up your game, like scenes, scripts, 3D models, textures, audio files, and Prefabs. If you right-click on any asset in the Project View, you can choose Reveal in Explorer (Reveal in Finder on Mac) to actually see the asset itself in your file system.
每个Unity的项目包含一个资源文件夹。此文件夹的内容呈现在项目视图。这里存放着你游戏的所有资源,比如场景、脚本、三维模型、纹理、音频文件和预制组件。如果你在项目视图里右击任何资源,你都可以在资源管理器中(在Mac系统中是Reveal in Finder)找到这些真正的文件本身。
Important Note: You should never move project assets around using the OS since this will break any metadata associated with the asset. Always use the Project View to organize your assets.
重要提示:不要使用操作系统来移动项目资源,因为这将破坏与资源相关的一些元数据。你应该始终使用项目视图来组织自己的资源。
To add assets to your project, you can drag any file from your OS into the Project View, or use Assets » Import New Asset. Your asset is now ready to be used in your game. For more information about working with assets, skip ahead to the Asset Workflow section of the manual.
要添加资源到你的项目中,你可以拖动操作系统的任何文件到项目视图,或者使用Assets » Import New Asset导入新资源。你的资源现在可以在你的游戏中使用了。如需更多使用资源的信息,直接跳到资源工作流程手册。
Scenes are also stored in the Project View. Think of these as individual levels. For example, the Islands Scene loads by default when Unity first launches. To create a new Scene, use Control-N (Command-N on Mac). To save the current Scene into the Project View, use Control-S (Command-S on Mac).
场景也存储在项目视图中。想想这些独特的层次。例如,Unity第一次启动时默认加载的“孤岛危机”场景。要创建新的场景,使用Ctrl+N(在Mac系统中使用Command-N),要在项目视图中保存当前场景,使用Ctrl+S(在Mac系统中使用Command-S)。
Some game assets need to be created from within Unity. To do this, use the Create drop-down, or right click » Create.
有些游戏资源必须从Unity内部建立。要做到这一点,使用Create下拉菜单,或通过右键然后点击 » Create来创建。
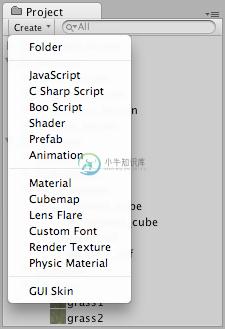
The Create drop-down
This will allow you to add scripts, Prefabs, or folders to keep your project organized. You can rename any asset/folder by pressing F2 on Windows, or Enter on Mac, or with two paced clicks on the asset name. If you hold the Alt key while you expand or contract a directory, all subdirectories will also be expanded or contracted.
这将允许你添加脚本、预制组件(想不出更好的名字了)、或文件夹让您的项目组织有序。你可以在Windows系统中按F2键(Mac系统中为回车)重新命名任何资源/文件夹,或通过在资源名字上两次点击(不是双击)来重命名。如果你按住Alt键的同时,展开或收起一个目录,所有子目录也将展开或收起。
Hierarchy 层级面板
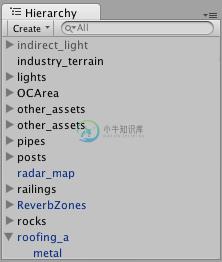
The Hierarchy contains every GameObject in the current Scene. Some of these are direct instances of asset files like 3D models, and others are instances of Prefabs -- custom objects that will make up much of your game. You can select and Parent objects in the Hierarchy. As objects are added and removed from the scene, they will appear and disappear from the Hierarchy as well.
层次视图包含了每一个当前场景的游戏对象(GameObject)。其中一些是资源文件的实例,如3D模型和其他预制组件(完善你的游戏的自定义对象)的实例。您可以在层次结构视图中选择对象或者生成对象。当在场景中增加或者删除对象,层次结构视图中相应的对象则会出现或消失。
Parenting 父对象
Unity uses a concept called Parenting. To make any GameObject the child of another, drag the desired child onto the desired parent in the Hierarchy. A child will inherit the movement and rotation of its parent. You can now expand and contract the parent to see its children in the Hierarchy without affecting your game.
Unity使用父对象的概念。要想让一个游戏对象成为另一个的子对象,只需在层次视图中把它拖到另一个上即可。一个子对象将继承其父对象的移动和旋转属性。在层级视图面板展开和折叠父对象来查看它的子对象,而不会影响游戏。
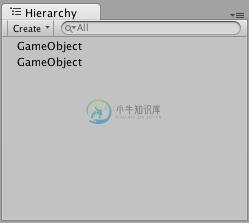
Two unparented objects 两个没有父对象的对象
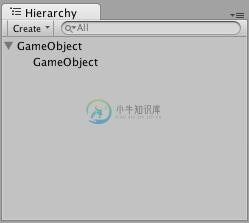
One object parented to another 一个对象是另一个的父对象
To learn more about Parenting, please review the Parenting section of the Transform Component page.
要学习更多关于父对象的知识,请查看Transform Component page的关于父对象的部分。
Toolbar 工具条

The Toolbar consists of five basic controls. Each relate to different parts of the Editor.
工具栏包括五个基本控制,每一个涉及到不同部分的编辑。
![]() Transform Tools -- used with the Scene View 变换工具——用于场景视图
Transform Tools -- used with the Scene View 变换工具——用于场景视图![]() Transform Gizmo Toggles -- affect the Scene View display 变换Gizmo(可以理解为辅助线框)—— 影响场景视图中的显示
Transform Gizmo Toggles -- affect the Scene View display 变换Gizmo(可以理解为辅助线框)—— 影响场景视图中的显示![]() Play/Pause/Step Buttons -- used with the Game View 运行/暂停/单步执行按钮—— 用于游戏视图
Play/Pause/Step Buttons -- used with the Game View 运行/暂停/单步执行按钮—— 用于游戏视图![]() Layers Drop-down -- controls which objects are displayed in Scene View 层 下拉菜单——控制场景视图中选中对象的显示
Layers Drop-down -- controls which objects are displayed in Scene View 层 下拉菜单——控制场景视图中选中对象的显示![]() Layout Drop-down -- controls arrangement of all Views 布局 下拉菜单——控制所有视图的排列
Layout Drop-down -- controls arrangement of all Views 布局 下拉菜单——控制所有视图的排列
Scene View 场景视图
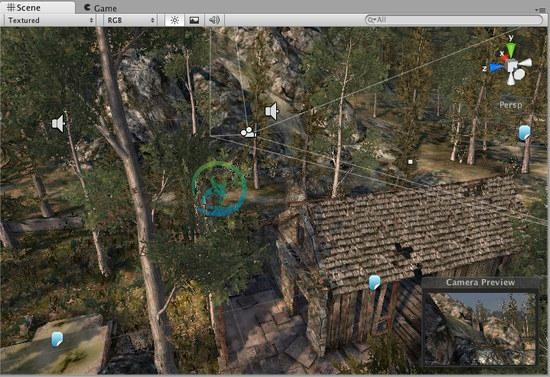
The Scene View
The Scene View is your interactive sandbox. You will use the Scene View to select and position environments, the player, the camera, enemies, and all other GameObjects. Maneuvering and manipulating objects within the Scene View are some of the most important functions in Unity, so it's important to be able to do them quickly.
场景视图是交互式沙盒。可以使用它来选择和布置环境、玩家、摄像机、敌人和所有其他游戏对象。在场景视图中调动和操作对象是Unity最重要的功能,因此,能够迅速掌握它们是非常重要的。
Scene View Navigation 场景视图导航
See Scene View Navigation for full details on navigating the scene view. Here's a brief overview of the essentials:
要查看场景视图导航的全部详细资料请点击Scene View Navigation,下面是简要概述:
- Hold the right mouse button to enter Flythrough mode. This turns your mouse and WASD keys (plus Q and E for up and down) into quick first-person view navigation.
按住鼠标右键进入飞行穿越模式。旋转你的鼠标且使用WASD键(Q向上、E向下)进入快速的第一人称视角导航。(这句翻译也别扭,能明白意思就行) - Select any GameObject and press the F key. This will center the Scene View and pivot point on the selection.
选择任意游戏对象,然后按F键,所选择的物体将在场景视图的中心位置显示。 - Use the arrow keys to move around on the X/Z plane.
使用方向键,将沿X/Z平面方向移动。 - Hold Alt and click-drag to orbit the camera around the current pivot point.
ALT+鼠标左键拖动使当前视野沿当前纵轴作圆周运动。 - Hold Alt and middle click-drag to drag the Scene View camera around.
ALT+鼠标中键拖动可以拖动当前视野。 - Hold Alt and right click-drag to zoom the Scene View. This is the same as scrolling with your mouse wheel.
ALT+鼠标右键拖动可以缩放场景视野,这和你的鼠标滚轮作用相同。
You might also find use in the Hand Tool (shortcut: Q), especially if you are using a one-button mouse. With the Hand tool is selected,
也许你已经发现了手形工具(快捷键:Q),尤其是当你使用单键鼠标时,下面是各种选中状态的含义:
![]() Click-drag to drag the camera around. 在场景中拖动视野。
Click-drag to drag the camera around. 在场景中拖动视野。![]() Hold Alt and click-drag to orbit the camera around the current pivot point. ALT+鼠标左键拖动使当前视野沿当前纵轴作圆周运动。
Hold Alt and click-drag to orbit the camera around the current pivot point. ALT+鼠标左键拖动使当前视野沿当前纵轴作圆周运动。![]() Hold Control (Command on Mac) and click-drag to zoom the camera. 按住CTRL(Mac系统中为Command键)+鼠标左键拖动缩放当前视野。
Hold Control (Command on Mac) and click-drag to zoom the camera. 按住CTRL(Mac系统中为Command键)+鼠标左键拖动缩放当前视野。
In the upper-right corner of the Scene View is the Scene Gizmo. This displays the Scene Camera's current orientation, and allows you to quickly modify the viewing angle.
在场景视图右上角是场景小工具(Scene Gizmo)。这里显示场景摄像机的当前方向,你可以快速地变换视角。

You can click on any of the arms to snap the Scene Camera to that direction and change it to Isometric Mode. While in Isometric Mode, you can right-click drag to orbit, and Alt-click drag to pan. To exit this mode, click the middle of the Scene Gizmo. You can also Shift-click the middle of the Scene Gizmo any time to toggle Isometric Mode.
你可以点击任意方向杆从而使场景摄像机朝那个方向而且变为等轴(等距)模式。在等轴模式中,您可以鼠标右键拖动作圆周,也可以按住Alt键拖动来平移。按Scene Gizmo的中心退出此模式。你还可以按住Shift键单击Scene Gizmo的中心随时切换等轴模式。
Positioning GameObjects 定位游戏对象
See Positioning GameObjects for full details on positioning GameObjects in the scene. Here's a brief overview of the essentials:
查看详情请点击Positioning GameObjects,下面是概述:
When building your games, you'll place lots of different objects in your game world. To do this use the Transform Tools in the Toolbar to Translate, Rotate, and Scale individual GameObjects. Each has a corresponding Gizmo that appears around the selected GameObject in the Scene View. You can use the mouse and manipulate any Gizmo axis to alter the Transform Component of the GameObject, or you can type values directly into the number fields of the Transform Component in the Inspector.
建立你的游戏时,你会在你的游戏世界中放置许多不同的对象。要做到这一点必须使用工具栏的变换工具来调动、旋转和按比例缩放个别游戏对象,每个在场景视图中选中的对象都有一个对应的Gizmo,你可以用鼠标操作Gizmo轴来改变游戏对象的转换组件,也可以在检视视图中为转换组件的各字段直接输入数字。
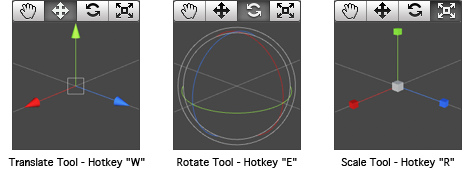
调动工具——快捷键“W” 旋转工具——快捷键“E” 缩放工具——快捷键“R”
Scene View Control Bar 场景视图控制条
![]()
The Scene View control bar lets you see the scene in various view modes - Textured, Wireframe, RGB, Overdraw, and many others. It will also enable you to see (and hear) in-game lighting, game elements, and sound in the Scene View. See View Modes for all the details.
场景视图控制条可以让你看到不同的视图模式——纹理模式,线框模式,RGB模式,透视模式,等等,它也可以让你看到(听到)游戏中的灯光、游戏要素、声音等。点击View Modes查看视图模式的详情。
Game View 游戏视图
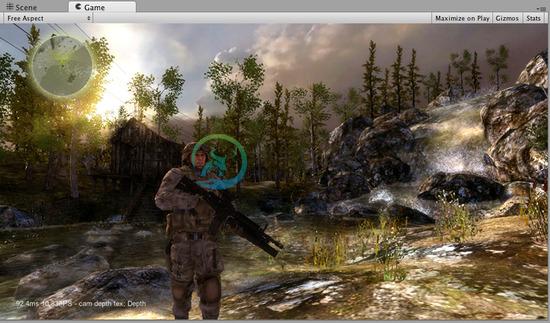
The Game View is rendered from the Camera(s) in your game. It is representative of your final, published game. You will need to use one or more Cameras to control what the player actually sees when they are playing your game. For more information about Cameras, please view the Camera Component page.
游戏视图显示你最后发布游戏后的运行画面,你需要使用一个或多个摄像机来控制玩家在游戏时实际看到的画面。如需更多关于摄像机的信息,请查看Camera Component page。
Play Mode 播放模式
![]()
Use the buttons in the Toolbar to control the Editor Play Mode and see how your published game will play. While in Play mode, any changes you make are temporary, and will be reset when you exit Play mode. The Editor UI will darken to remind you of this.
使用工具条按钮控制运行模式来看看您发布的游戏如何运行。在运行模式下,任何更改都只是暂时的,它们将在退出运行模式时重置复位。提醒你一点,在运行模式下编辑界面会变暗。
Game View Control Bar 游戏视图控制条
![]()
The first drop-down on the Game View control bar is the Aspect Drop-down. Here, you can force the aspect ratio of the Game View window to different values. It can be used to test how your game will look on monitors with different aspect ratios.
控制条的第一个下拉菜单是Aspect外观菜单,在这里,你可以强制游戏窗口为不同的长宽比,它可以用来测试游戏在不同长宽比的显示器中的不同情况。
Further to the right is the Maximize on Play toggle. While enabled, the Game View will maximize itself to 100% of your Editor Window for a nice full-screen preview when you enter Play mode.
再往右是最大化运行切换开关Maximize on Play,启用后,在你进入运行模式时将全屏幕最大化游戏。
Continuing to the right is the Gizmos toggle. While enabled, all Gizmos that appear in Scene View will also be drawn in Game View. This includes Gizmos drawn using any of the Gizmos class functions.
继续往右是Gizmos切换开关,启用后,所有在场景视图中出现的Gizmos也将出现在游戏视图画面中,这包括使用任意Gizmos类函数生成的Gizmos。
Finally we have the Stats button. This shows Rendering Statistics window that is very useful for Optimizing Graphics Performance.
最后是状态按钮,它将显示在渲染状态窗口中一些对优化图形性能非常有用的渲染统计状态数值。
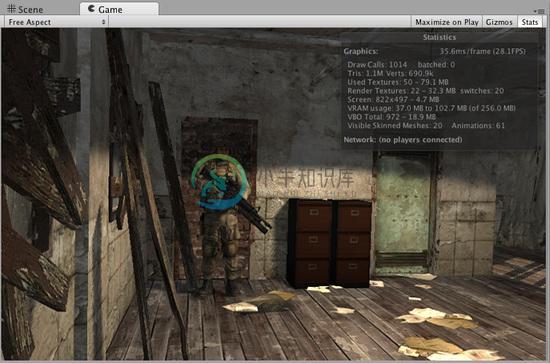
Game View Stats of your game.游戏中的游戏视图状态。
Inspector 检视面板视图
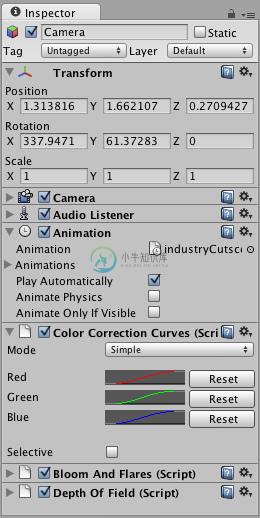
Games in Unity are made up of multiple GameObjects that contain meshes, scripts, sounds, or other graphical elements like Lights. The Inspector displays detailed information about your currently selected GameObject, including all attached Components and their properties. Here, you modify the functionality of GameObjects in your scene. You can read more about the GameObject-Component relationship, as it is very important to understand.
Unity的游戏都是由包含网格、脚本、声音和其他图形元素(如光源)的多种游戏对象组成的,检视视图显示当前选定的游戏对象的所有附加组件及其属性的相关详细信息,在这里,您可以修改场景中的游戏对象的功能。你可以阅读更多有关游戏对象组件的内容,因为它非常重要。
Any property that is displayed in the Inspector can be directly modified. Even script variables can be changed without modifying the script itself. You can use the Inspector to change variables at runtime to experiment and find the magic gameplay for your game. In a script, if you define a public variable of an object type (like GameObject or Transform), you can drag and drop a GameObject or Prefab into the Inspector to make the assignment.
任何在检视视图中显示的属性,都可以直接修改,即使是脚本变量也可以直接修改而无需修改脚本本身。你可以使用检视视图在游戏运行时更改变量来尝试这种奇妙的方式。在脚本中,如果你定义一个对象类型(如游戏对象或Transform属性)为公共变量,那么你可以在检视视图中通过拖放将它分配给一个游戏对象或预制组件。
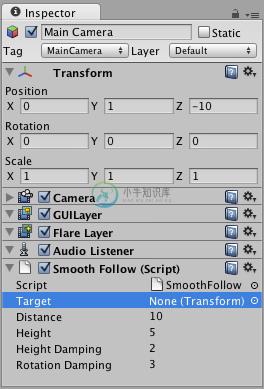
Click the question mark beside any Component name in the Inspector to load its Component Reference page. Please view the Component Reference for a complete and detailed guide to all of Unity's Components.
点击检视视图中任何组件名称旁边的问号将载入其组件参考页。请查看完整而详细的有关Unity所有组件的参考。
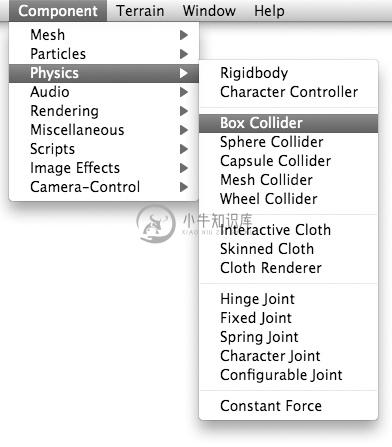
Add Components from the Component menu 通过组件菜单添加组件
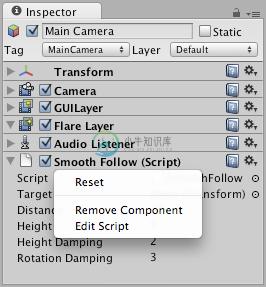
You can click the tiny gear icon (or right-click the Component name) to bring up a context menu for the specific Component.
你也可点击小齿轮图标(或右键单击组件名称)弹出特定组件的相关菜单。
The Inspector will also show any Import Settings for a selected asset file.
检视视图还将显示选定的资源文件的导入设置。
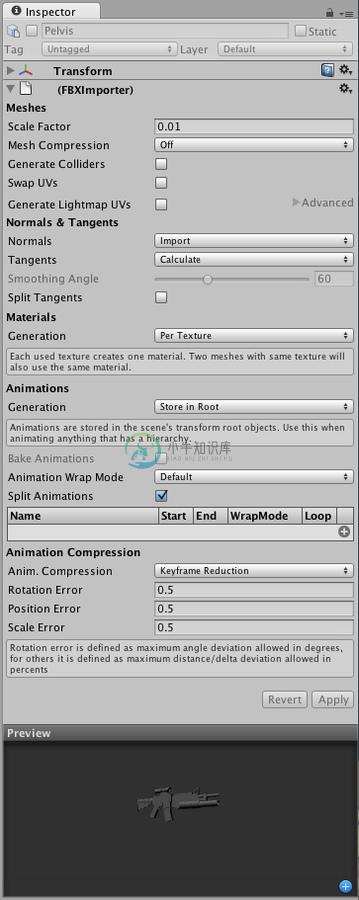
Click Apply to reimport your asset. 单击应用以重新导入你的资源
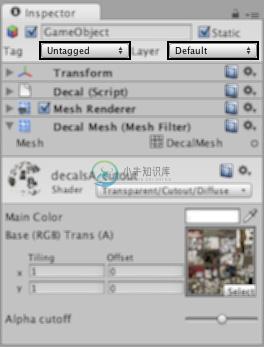
Use the Layer drop-down to assign a rendering Layer to the GameObject. Use the Tag drop-down to assign a Tag to this GameObject.
使用Layer下拉菜单为游戏对象指派渲染层。使用Tag下拉菜单为此游戏对象指派一个标签。
Prefabs 预制
If you have a Prefab selected, some additional buttons will be available in the Inspector. For more information about Prefabs, please view the Prefab manual page.
如果你选择了一个预设件,检视视图中将出现一些额外的可用按钮。如需更多预设件信息,请查看Prefab manual page。
Other Views 其它视图
The Views described on this page covers the basics of the interface in Unity. The other Views in Unity are described elsewhere on separate pages:
这个页面中的视图描述涵盖了Unity界面的基本知识,Unity的其他视图描述在其他单独页面上:
- The Console shows logs of messages, warnings, and errors.
控制台显示关于消息、警告和错误的日志。 - The Animation View can be used to animate objects in the scene.
动画视图可以用来制作场景中的动画对象。 - The Profiler can be used to investigate and find the performance bottle-necks in your game.
事件探查器可以用来研究和发现你的游戏的性能瓶颈。 - The Asset Server View can be used to manage version control of the project using Unity's Asset Server.
资源服务器视图可用于管理使用Unity资源服务器的项目的版本控制 - The Lightmapping View can be used to manage lightmaps using Unity's built-in lightmapping.
lightmapping视图可以用来管理光照贴图,使用Unity内置lightmapping。 - The Occlusion Culling View can be used to manage Occlusion Culling for improved performance.
遮挡剔除视图可以用来管理遮挡剔除,以提高性能。

