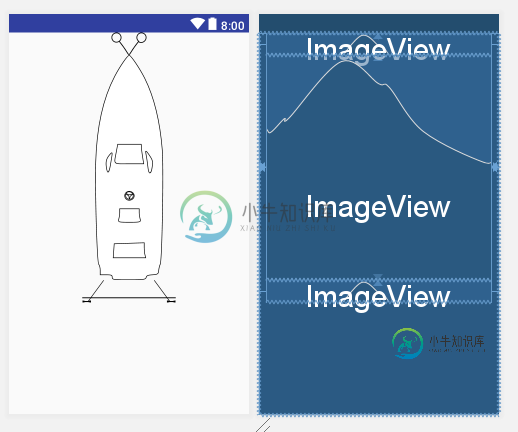
可调自定义用户界面

但为了让它看起来像这样,我必须添加硬编码的大小限制,从而使它不具有自适应性。

这里是xml布局。
<?xml version="1.0" encoding="utf-8"?>
<merge xmlns:android="http://schemas.android.com/apk/res/android"
  xmlns:app="http://schemas.android.com/apk/res-auto">
  <android.support.constraint.ConstraintLayout
    xmlns:android="http://schemas.android.com/apk/res/android"
    xmlns:app="http://schemas.android.com/apk/res-auto"
    xmlns:tools="http://schemas.android.com/tools"
    android:layout_width="match_parent"
    android:layout_height="match_parent"
    tools:context="in.avimarine.boatangels.activities.InspectionResultActivity"
    tools:visibility="visible">

    <ImageView
      android:id="@+id/moored_boat_bowlines"
      android:layout_width="0dp"
      android:layout_height="0dp"
      android:contentDescription="@string/boat_drawing_content_description"
      app:layout_constraintBottom_toTopOf="@+id/moored_boat_body"
      app:layout_constraintEnd_toEndOf="@+id/moored_boat_body"
      app:layout_constraintStart_toStartOf="@+id/moored_boat_body"
      app:layout_constraintTop_toTopOf="parent"
      app:srcCompat="@drawable/ic_monohull_mooring_bow"
      tools:visibility="visible"/>
    <ImageView
      android:id="@+id/moored_boat_body"
      android:layout_width="0dp"
      android:layout_height="0dp"
      android:contentDescription="@string/boat_drawing_content_description"
      app:layout_constraintBottom_toTopOf="@+id/moored_boat_sternlines"
      app:layout_constraintDimensionRatio="h,1:1"
      app:layout_constraintEnd_toEndOf="parent"
      app:layout_constraintStart_toStartOf="parent"
      app:layout_constraintTop_toBottomOf="@+id/moored_boat_bowlines"
      app:layout_constraintVertical_chainStyle="spread_inside"
      app:srcCompat="@drawable/ic_top_mv"
      tools:visibility="visible"/>
    <ImageView
      android:id="@+id/moored_boat_sternlines"
      android:layout_width="0dp"
      android:layout_height="0dp"
      android:layout_marginBottom="8dp"
      android:contentDescription="@string/boat_drawing_content_description"
      app:layout_constraintBottom_toBottomOf="parent"
      app:layout_constraintEnd_toEndOf="@+id/moored_boat_body"
      app:layout_constraintStart_toStartOf="@+id/moored_boat_body"
      app:layout_constraintTop_toBottomOf="@+id/moored_boat_body"
      app:srcCompat="@drawable/ic_monohull_dock_aft"
      tools:visibility="visible"/>

  </android.support.constraint.ConstraintLayout>
</merge>
如何使此图像具有自适应性,并且仍然看起来像第一张图像?
共有3个答案
我有办法让这一切顺利。包括android。支持限制指南
现在,您可以将所有三个元素排列在屏幕中心,一个在另一个下面,如图所示。
由于我使用的图像很小,它看起来很小,并附在屏幕顶部。但在你的情况下,这看起来和预期的一样。所有图像都使用高度和宽度作为wrap\u内容
下面是相同的xml
<android.support.constraint.ConstraintLayout xmlns:android="http://schemas.android.com/apk/res/android"
    android:layout_width="match_parent"
    android:layout_height="match_parent"
    xmlns:app="http://schemas.android.com/apk/res-auto">
    <android.support.constraint.Guideline
        android:layout_width="wrap_content"
        android:layout_height="wrap_content"
        android:id="@+id/left_guideline"
        app:layout_constraintGuide_percent=".02"
        android:orientation="vertical"
        />
    <android.support.constraint.Guideline
        android:layout_width="wrap_content"
        android:layout_height="wrap_content"
        android:id="@+id/right_guideline"
        app:layout_constraintGuide_percent=".98"
        android:orientation="vertical"
        />
    <ImageView
        android:layout_width="wrap_content"
        android:layout_height="wrap_content"
        android:src="@drawable/profile"
        android:id="@+id/iconOne"
        app:layout_constraintTop_toTopOf="parent"
        app:layout_constraintLeft_toLeftOf="@+id/left_guideline"
        app:layout_constraintRight_toRightOf="@+id/right_guideline"
        />

    <ImageView
        android:layout_width="wrap_content"
        android:layout_height="wrap_content"
        android:id="@+id/iconTwo"
        android:src="@drawable/contactus"
        app:layout_constraintTop_toBottomOf="@id/iconOne"
        app:layout_constraintLeft_toLeftOf="@+id/left_guideline"
        app:layout_constraintRight_toRightOf="@+id/right_guideline"
        />
    <ImageView
        android:layout_width="wrap_content"
        android:layout_height="wrap_content"
        android:id="@+id/iconThree"
        android:src="@drawable/pricelist"
        app:layout_constraintTop_toBottomOf="@id/iconTwo"
        app:layout_constraintLeft_toLeftOf="@+id/left_guideline"
        app:layout_constraintRight_toRightOf="@+id/right_guideline"
        />
</android.support.constraint.ConstraintLayout>
现在,如果你想这三个图像到屏幕的中心,那么下面的方法将是好的。
相应的xml将是
<android.support.constraint.ConstraintLayout xmlns:android="http://schemas.android.com/apk/res/android"
    android:layout_width="match_parent"
    android:layout_height="match_parent"
    xmlns:app="http://schemas.android.com/apk/res-auto">
    <android.support.constraint.Guideline
        android:layout_width="wrap_content"
        android:layout_height="wrap_content"
        android:id="@+id/left_guideline"
        app:layout_constraintGuide_percent=".02"
        android:orientation="vertical"
        />
    <android.support.constraint.Guideline
        android:layout_width="wrap_content"
        android:layout_height="wrap_content"
        android:id="@+id/right_guideline"
        app:layout_constraintGuide_percent=".98"
        android:orientation="vertical"
        />
    <ImageView
        android:layout_width="wrap_content"
        android:layout_height="wrap_content"
        android:src="@drawable/profile"
        android:id="@+id/iconOne"
        app:layout_constraintBottom_toTopOf="@id/iconTwo"
        app:layout_constraintLeft_toLeftOf="@+id/left_guideline"
        app:layout_constraintRight_toRightOf="@+id/right_guideline"
        />
    <ImageView
        android:layout_width="wrap_content"
        android:layout_height="wrap_content"
        android:id="@+id/iconTwo"
        android:src="@drawable/contactus"
        app:layout_constraintBottom_toBottomOf="parent"
        app:layout_constraintEnd_toEndOf="parent"
        app:layout_constraintStart_toStartOf="parent"
        app:layout_constraintTop_toTopOf="parent"
        />
    <ImageView
        android:layout_width="wrap_content"
        android:layout_height="wrap_content"
        android:id="@+id/iconThree"
        android:src="@drawable/pricelist"
        app:layout_constraintTop_toBottomOf="@id/iconTwo"
        app:layout_constraintLeft_toLeftOf="@+id/left_guideline"
        app:layout_constraintRight_toRightOf="@+id/right_guideline"
        />
</android.support.constraint.ConstraintLayout>
这些样品将使我们的产品有一个良好的开端
参考文献一参考文献二参考文献三
您可以使用RelativeLayout而不是ConstraintLayout。
<?xml version="1.0" encoding="utf-8"?>
<RelativeLayout xmlns:android="http://schemas.android.com/apk/res/android"
    android:layout_width="match_parent"
    android:layout_height="match_parent">

    <ImageView
        android:id="@+id/first"
        android:layout_width="wrap_content"
        android:layout_height="wrap_content"
        android:layout_centerHorizontal="true"
        android:src="@drawable/first" />

    <ImageView
        android:id="@+id/sec"
        android:layout_width="wrap_content"
        android:layout_height="wrap_content"
        android:layout_below="@id/first"
        android:layout_centerHorizontal="true"
        android:src="@drawable/sec" />

    <ImageView
        android:id="@+id/third"
        android:layout_width="wrap_content"
        android:layout_height="wrap_content"
        android:layout_below="@id/sec"
        android:layout_centerHorizontal="true"
        android:src="@drawable/third" />
</RelativeLayout>
可以使用ConstraintLayout创建自定义自适应视图。请注意布局约束垂直权重属性。
船xml:
<?xml version="1.0" encoding="utf-8"?>
<android.support.constraint.ConstraintLayout xmlns:android="http://schemas.android.com/apk/res/android"
    xmlns:app="http://schemas.android.com/apk/res-auto"
    android:layout_width="match_parent"
    android:layout_height="match_parent">

    <ImageView
        android:id="@+id/moored_boat_bowlines"
        android:layout_width="0dp"
        android:layout_height="0dp"
        android:src="@drawable/bowlines"
        app:layout_constraintBottom_toTopOf="@+id/moored_boat_body"
        app:layout_constraintEnd_toEndOf="parent"
        app:layout_constraintStart_toStartOf="parent"
        app:layout_constraintTop_toTopOf="parent"
        app:layout_constraintVertical_weight="1" />

    <ImageView
        android:id="@+id/moored_boat_body"
        android:layout_width="0dp"
        android:layout_height="0dp"
        android:src="@drawable/body"
        app:layout_constraintBottom_toTopOf="@+id/moored_boat_sternlines"
        app:layout_constraintEnd_toEndOf="parent"
        app:layout_constraintStart_toStartOf="parent"
        app:layout_constraintTop_toBottomOf="@+id/moored_boat_bowlines"
        app:layout_constraintVertical_weight="10" />

    <ImageView
        android:id="@+id/moored_boat_sternlines"
        android:layout_width="0dp"
        android:layout_height="0dp"
        android:src="@drawable/sternlines"
        app:layout_constraintBottom_toBottomOf="parent"
        app:layout_constraintEnd_toEndOf="parent"
        app:layout_constraintStart_toStartOf="parent"
        app:layout_constraintTop_toBottomOf="@+id/moored_boat_body"
        app:layout_constraintVertical_weight="1" />

</android.support.constraint.ConstraintLayout>
然后您可以在任何其他布局中使用它。
活动1。xml:
<?xml version="1.0" encoding="utf-8"?>
<LinearLayout xmlns:android="http://schemas.android.com/apk/res/android"
    xmlns:app="http://schemas.android.com/apk/res-auto"
    android:layout_width="match_parent"
    android:layout_height="match_parent"
    android:orientation="vertical">

    <TextView
        android:layout_width="match_parent"
        android:layout_height="100dp"
        android:background="#8493"
        android:gravity="center"
        android:text="Filled!"
        app:layout_constraintBottom_toBottomOf="parent"
        app:layout_constraintLeft_toLeftOf="parent"
        app:layout_constraintRight_toRightOf="parent"
        app:layout_constraintTop_toTopOf="parent" />

    <include layout="@layout/boat" />

</LinearLayout>
活动二。xml:
<?xml version="1.0" encoding="utf-8"?>
<android.support.constraint.ConstraintLayout xmlns:android="http://schemas.android.com/apk/res/android"
    android:layout_width="match_parent"
    android:layout_height="match_parent">

    <include
        android:id="@+id/boat_view"
        layout="@layout/boat"
        android:layout_width="100dp"
        android:layout_height="100dp" />

</android.support.constraint.ConstraintLayout>
-
我正在使用node.sdk、stormpath、express.js和passport.js为我的新网站制作一个用户帐户系统。所以我设置了一个自定义数据槽的帐户。我想知道,当他们注销时,我如何将新数据发布到这个自定义数据槽中,并在他们登录时检索它。我对使用node是新手,我不知道在他们登录时,我的代码应该放在哪里,也不知道如何访问“用户”帐户信息。据我所知,Passport.js正在处理身份验证,
-
用户自定义 本章讲介绍一些开发过程中常用需要自定义的东西。 一、自定义404页面 一般比较完整的站点,都会有自定义的404页面,既美观统一、又能保持访问者不至于因为错误页面而退出网站。 比如说duowan.com的404页面,是一个坦克大战的小游戏,可以在线玩并且成绩还会进入排行榜,和其他网友一较高下。 对404错误页面的建议: 建议不要使用PHP动态页面,纯HTML页面会比较好。 具特色,但不能
-
一份简单的元素定义 Editor.UI.registerElement('foobar-label', { template: ` <div class="text">Foobar</div> `, style: ` .text { color: black; padding: 2px 5px; border-radius: 3px
-
$this->db->call_function(); 这个方法用于执行一些 CodeIgniter 中没有定义的 PHP 数据库函数,而且 使用了一种平台独立的方式。举个例子,假设你要调用 mysql_get_client_info() 函数,这个函数 CodeIgniter 并不是原生支持的,你可以这样做: $this->db->call_function('get_client_info')
-
本文向大家介绍微信小程序自定义可滑动日历界面,包括了微信小程序自定义可滑动日历界面的使用技巧和注意事项,需要的朋友参考一下 本文实例为大家分享了微信小程序可滑动日历界面的具体代码,供大家参考,具体内容如下 参考某个博主的自定义控件做了一些改动,希望这篇博客能帮助需要的人。 WXML CSS JS 效果图 以上就是本文的全部内容,希望对大家的学习有所帮助,也希望大家多多支持呐喊教程。
-
主要内容:函数定义函数是一组可重复使用的代码,可以在程序中的任何地方调用。这消除了一遍又一遍地编写相同的代码的需要。这使程序员能够将一个大程序划分成许多小的可管理的功能模块。 除了内置函数外,VBA还允许编写用户定义的函数。 在本章中,我们将学习如何在VBA中编写自己的函数。 函数定义 一个VBA函数可以有一个可选的语句。如果要从函数返回值,则可使用语句。 例如,可以在一个函数中传递两个数字,然后从函数中返回它们的

