当前位置: 首页 > 文档资料 > HTML5 在线教程 >

12.22 HTML Canvas动画对象

优质
小牛编辑
132浏览
2023-12-01

在创建动画时,需要克服的一个主要问题是:准确记忆要绘制的对象的内容及位置。我们采用的方法是:在循环外部设置一个变量来保存需要绘制的对象的位置值,并通过fillRect调用和在循环内部使用位置变量,就可以获取需要绘制的对象的内容及位置信息。 但是,如果需要绘制多个动画形状该怎么办呢?甚至在创建循环时你都不知道需要创建多少种动画形状又该怎么办?因此,我们需要采用一种更好的方法。

创建动画对象

你也许试图在动画循环外部使用独立的变量来存储每种形状的位置值。为什么不可以呢?既然这种方法适用于一种形状,那么为什么不适用于多个形状呢? 这样做从功能角度来讲是可以的,但这种方法非常笨拙,需要复制大量代码,并且以后代码维护也是个大问题。

以下代码展示了如何通过修改上一节的代码来使多个形状产生动画效果。

var firstX = 0; 
var secondX = 50;
var thirdX = 100; 

function animate() { 
firstX++; 
secondX++; 
thirdX++; 

context.clearRect(0, 0, canvasWidth, canvasHeight); 

context.fillRect(firstX, 50, 10, 10); 
context.fillRect(secondX, 100, 10, 10); 
context.fillRect(thirdX, 150, 10, 10); 

if (playAnimation) { 
setTimeout(animate, 33); 
}; 
}; 

animate();

这个例子和前面例子的不同之处在于代码中使用了3次位置变量,并3次调用了fillRect方法。代码的运行结果如图1所示。

Start Stop
实现多个动画的简单代码

这种方法在此处也许很管用,但是,如果需要绘制上百个形状该怎么办呢?你会编写上百个位置变量并上百次调用fillRect方法吗?当然不行,我们得借助面向对象的方法。

我们使用对象数组来简化代码。首先从上述问题中抽象出动画对象,该动画对象(类)是一个形状(Shape),然后我们提取Shape的一些基本属性,可以是位置、速度、大小、颜色等。

var Shape = function(x, y) { 
this.x = x; 
this.y = y; 
};

对象这个概念非常重要,在C++等面向对象编程语言中,对象(Object)是一个类(Class)的实例(Instance)。JavaScript的对象概念借鉴自这些语言,在本课程的JavaScript部分,我们还将详细阐述这些概念。

但是,仅仅定义对象还不够,还需要通过某种方式来存储对象,这样就不必手动引用上百种形状了。为此,可以在数组中存储形状对象,这样能够把它们按顺序存储在同一个变量中:

var shapes = new Array(); 

shapes.push(new Shape(50, 50)); 
shapes.push(new Shape(100, 100)); 
shapes.push(new Shape(150, 150));

向数组中添加形状对象时,可以使用Array对象的push方法。这听起来也许很复杂,其实该方法就是在数组的末尾添加对象。在本例中,该对象是一个形状对象。其功能与以下代码完全相同:

var shapes = new Array(); 

shapes[0] = new Shape(50, 50); 
shapes[1] = new Shape(100, 100); 
shapes[2] = new Shape(150, 150); 

使用push方法的好处是,无须知道数组中最后一个元素的序号,该方法将会自动在数组的末端添加对象。

现在就得到了一组形状,每个形状都有不同的x和y值,这些值存储在一个数组中(这个数组已经被赋给shapes变量)。接下来的任务是如何将这些形状从数组中取出来并更新它们的位置(使它们产生动画效果),然后绘制这些形状。为此,需要在动画循环内部设置一个for循环:

function animate() { 
context.clearRect(0, 0, canvasWidth, canvasHeight); 

var shapesLength = shapes.length; 
for (var i = 0; i < shapesLength; i++) { 
var tmpShape = shapes[i]; 
tmpShape.x++; 
context.fillRect(tmpShape.x, tmpShape.y, 10, 10); 
}; 

if (playAnimation) { 
setTimeout(animate, 33); 
}; 
};

for循环遍历了数组中的每个形状,并将形状赋给了tmpShape变量,因此很容易访问它。现在你已经有了对数组中当前形状的引用,下面只需更新形状的x属性,然后使用x和y属性在当前位置绘制形状就可以了。

以下是完整的代码(如图2所示):

var canvasWidth = canvas.width(); 
var canvasHeight = canvas.height(); 

var playAnimation = true; 

var startButton = $("#startAnimation"); 
var stopButton = $("#stopAnimation"); 

startButton.hide(); 
startButton.click(function() { 
$(this).hide(); 
stopButton.show(); 

playAnimation = true; 
animate(); 
}); 

stopButton.click(function() { 
$(this).hide(); 
startButton.show(); 

playAnimation = false;
}); 
var Shape = function(x, y) { 
this.x = x; 
this.y = y; 
}; 
var shapes = new Array(); 
shapes.push(new Shape(50, 50, 10, 10)); 
shapes.push(new Shape(100, 100, 10, 10)); 
shapes.push(new Shape(150, 150, 10, 10)); 
function animate() { 
context.clearRect(0, 0, canvasWidth, canvasHeight); 
var shapesLength = shapes.length; 
for (var i = 0; i < shapesLength; i++) { 
var tmpShape = shapes[i]; 
tmpShape.x++; 
context.fillRect(tmpShape.x, tmpShape.y, 10, 10); 
}; 
if (playAnimation) { 
setTimeout(animate, 33); 
}; 
}; 
animate();
Start Stop
使用数组对象实现多个形状的动画

随机产生形状

现在已经可以采用一种快速而简单的方法来创建形状了,接下来就是如何产生随机形状。因为使用了对象,所以解决这个问题非常简单。首先,需要更改Shape类来定义形状的宽度和高度:

var Shape = function(x, y, width, height) { 
this.x = x; 
this.y = y; 
this.width = width; 
this.height = height; 
};

然后,为每个形状随机选取起始位置和大小,并使用以下代码替换shapes.push语句:

for (var i = 0; i < 10; i++) { 
var x = Math.random()*250; 
var y = Math.random()*250; 
var width = height = Math.random()*50; 
shapes.push(new Shape(x, y, width, height)); 
};

width和heighr变量的赋值语句是一个双赋值语句,看上去也许有些奇怪,但它可以为这两个变量赋相同的值。另外,还需要更改对fillRect方法的调用,以便采用新的宽度和高度:

context.fillRect(tmpShape.x, tmpShape.y, tmpShape.width, tmpShape.height); 

就这么简单。使用类和对象的优点在于,代码复用度大大提高。我们可以在几乎不添加新代码的情况下,实现10个不同大小和位置的形状移动动画(如图3所示)。

Start Stop
随机设置图形的大小和位置

动画方向和速度

你已经知道了如何让一个形状向右移动(把x的值增加),但是如果需要改变运动的速度又该如何实现呢,或者如何改变动画的方向呢?非常简单:只需要增加(或减少)x和y值就可以了。如果你使用与前面示例相同的代码,按以下方式修改tmpShape.x++语句,就可以非常方便地使形状沿着向右的对角线方向运动:

tmpShape.x += 2; 
tmpShape.y++; 

与前面代码的不同之处在于,上面的代码将x值每次增加2,而不是增加1,并将y值每次增加1。这样产生的效果是,在每次动画循环中,每个形状向右移动2像素,并向下移动1像素,即为向右的对角线方向移动(如图1所示)。
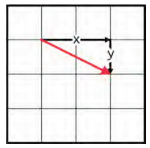
图1
让形状沿着对角线运动

或者还可以实现一些非常有趣的效果。例如,在每个动画循环中将x和y值设为随机值。这样产生的动画效果就具有不可预测性和无序性,形状将表现为不规则的运动形式,这种方法可以让对象的运动更加生动自然:

tmpShape.x += Math.random()*4-2; 
tmpShape.y += Math.random()*4-2; 

以上代码的作用是产生一个介于0到4之间的随机数(Math.random产生一个0到1之间的数,然后将该数乘以4),然后减去2得到一个介于-2到2之间的随机数。 通过这种方法,形状可以向右运动(x值为正数)、向左运动(x值为负数)、向上运动(y值为正数)和向下运动(y值为负数)。

点击Start启动动画,随机大小的形状被创建,同时会随机运动,出现摆动的有趣效果(如图5)。

Start Stop
形状的随机运动
$(document).ready(function () { var canvas1 = $("#canvas1"); var context1 = canvas1.get(0).getContext("2d"); var canvasWidth1 = canvas1.width(); var canvasHeight1 = canvas1.height(); var canvas2 = $("#canvas2"); var context2 = canvas2.get(0).getContext("2d"); var canvasWidth2 = canvas2.width(); var canvasHeight2 = canvas2.height(); var canvas3 = $("#canvas3"); var context3 = canvas3.get(0).getContext("2d"); var canvasWidth3 = canvas3.width(); var canvasHeight3 = canvas3.height(); var playAnimation1 = false; var playAnimation2 = false ; var playAnimation3 = false; var startButton1 = $("#startAnimation1"); var stopButton1 = $("#stopAnimation1"); var startButton2 = $("#startAnimation2"); var stopButton2 = $("#stopAnimation2"); var startButton3 = $("#startAnimation3"); var stopButton3 = $("#stopAnimation3"); stopButton1.hide(); startButton1.click(function () { $(this).hide(); stopButton1.show(); playAnimation1 = true; animate1(); }); stopButton1.click(function () { $(this).hide(); startButton1.show(); playAnimation1 = false; }); stopButton2.hide(); startButton2.click(function () { $(this).hide(); stopButton2.show(); playAnimation2 = true; animate2(); }); stopButton2.click(function () { $(this).hide(); startButton2.show(); playAnimation2 = false; }); stopButton3.hide(); startButton3.click(function () { $(this).hide(); stopButton3.show(); playAnimation3 = true; animate3(); }); stopButton3.click(function () { $(this).hide(); startButton3.show(); playAnimation3 = false; }); var firstX = 0; var secondX = 50; var thirdX = 100; function animate1() { firstX++; secondX++; thirdX++; context1.clearRect(0, 0, canvasWidth1, canvasHeight1); context1.fillRect(firstX, 50, 10, 10); context1.fillRect(secondX, 100, 10, 10); context1.fillRect(thirdX, 150, 10, 10); if (playAnimation1) { setTimeout(animate1, 33); }; }; animate1(); // Class that defines new shapes to draw var Shape = function (x, y, width, height) { this.x = x; this.y = y; this.width = width; this.height = height; }; // Array that holds all the shapes to draw var shapes2 = new Array(); shapes2.push(new Shape(50, 50)); shapes2.push(new Shape(100, 100)); shapes2.push(new Shape(150, 150)); function animate2() { context2.clearRect(0, 0, canvasWidth2, canvasHeight2); var shapesLength = shapes2.length; for (var i = 0; i < shapesLength; i++) { var tmpShape = shapes2[i]; tmpShape.x++; context2.fillRect(tmpShape.x, tmpShape.y, 10, 10); }; if (playAnimation2) { setTimeout(animate2, 33); }; }; animate2(); var shapes3 = new Array(); // Setting up some shapes for (var i = 0; i < 10; i++) { var x = Math.random() * 250; var y = Math.random() * 250; var width = height = Math.random() * 30; shapes3.push(new Shape(x, y, width, height)); }; // Animation loop that does all the fun stuff function animate3() { // Clear context3.clearRect(0, 0, canvasWidth3, canvasHeight3); // Loop through every shape var shapesLength = shapes3.length; for (var i = 0; i < shapesLength; i++) { var tmpShape = shapes3[i]; // Update // Move each shape 1 pixel to the right tmpShape.x++; // Draw context3.fillRect(tmpShape.x, tmpShape.y, tmpShape.width, tmpShape.height); }; if (playAnimation3) { // Run the animation loop again in 33 milliseconds setTimeout(animate3, 33); }; }; // Start the animation loop animate3(); var canvas = $("#canvas4"); var context = canvas.get(0).getContext("2d"); var canvasWidth = canvas.width(); var canvasHeight = canvas.height(); var playAnimation = false; var startButton = $("#startAnimation4"); var stopButton = $("#stopAnimation4"); stopButton.hide(); startButton.click(function () { $(this).hide(); stopButton.show(); playAnimation = true; animate(); }); stopButton.click(function () { $(this).hide(); startButton.show(); playAnimation = false; }); // Class that defines new shapes to draw var Shape = function (x, y, width, height) { this.x = x; this.y = y; this.width = width; this.height = height; }; // Array that holds all the shapes to draw var shapes = new Array(); // Setting up some shapes for (var i = 0; i < 10; i++) { var x = Math.random() * 500; var y = Math.random() * 500; var width = height = Math.random() * 30; shapes.push(new Shape(x, y, width, height)); }; // Animation loop that does all the fun stuff function animate() { // Clear context.clearRect(0, 0, canvasWidth, canvasHeight); // Loop through every shape var shapesLength = shapes.length; for (var i = 0; i < shapesLength; i++) { var tmpShape = shapes[i]; // Update // Move each shape 1 pixel to the right tmpShape.x += Math.random() * 4 - 2; tmpShape.y += Math.random() * 4 - 2; // Draw context.fillRect(tmpShape.x, tmpShape.y, tmpShape.width, tmpShape.height); }; if (playAnimation) { // Run the animation loop again in 33 milliseconds setTimeout(animate, 33); }; }; });