绘制标准圆弧
高级路径
今天开始,我们就要征战路径最后也是最难的部分了——高级路径。之前我们学习的都是绘制线条(基本路径),接下来的四节课我们详细看看绘制曲线(高级路径)的有关方法。
剧透一下,主要有四个方法:
- 标准圆弧:
arc() - 复杂圆弧:
arcTo() - 二次贝塞尔曲线:
quadraticCurveTo() - 三次贝塞尔曲线:
bezierCurveTo()
在开始之前,我们优化一下我们的作图环境。灵感来自于上节课的纹理,如果不喜欢这个背景,我在images目录下还提供了其他的背景图,供大家选择。另外把所有的样式表都写在了<head>下。
<!DOCTYPE html>
<html lang="zh">
<head>
    <meta charset="UTF-8">
    <title>新的画布</title>
    <style>
        body { background: url("./images/bg3.jpg") repeat; }
        #canvas { border: 1px solid #aaaaaa; display: block; margin: 50px auto; }
    </style>
</head>
<body>
<div id="canvas-warp">
    <canvas id="canvas">
        你的浏览器居然不支持Canvas?!赶快换一个吧!!
    </canvas>
</div>

<script>
    window.onload = function(){
        var canvas = document.getElementById("canvas");
        canvas.width = 800;
        canvas.height = 600;
        var context = canvas.getContext("2d");
        context.fillStyle = "#FFF";
        context.fillRect(0,0,800,600);

    }
</script>
</body>
</html>
运行结果:

之所以要绘制一个空白的矩形填满画布,是因为我们之前说过,canvas是透明的,如果不设置背景色,那么它就会被我设置的<body>纹理所覆盖,想要使其拥有背景色(白色),只有绘制矩形覆盖canvas这一个方法。
怎么样,是不是非常的酷?
使用arc()绘制圆弧
arc()的使用方法如下:
context.arc(x,y,radius,startAngle,endAngle,anticlockwise)
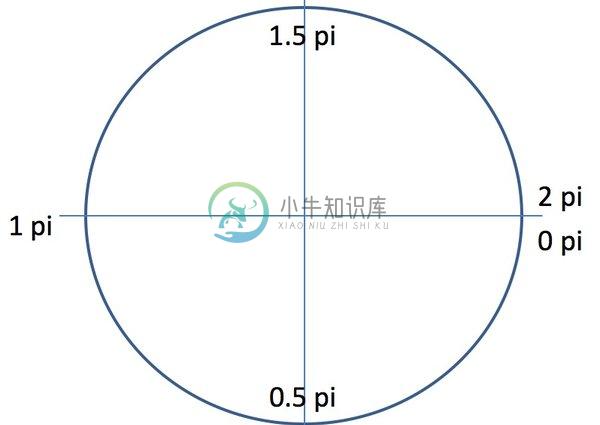
前面三个参数,分别是圆心坐标与圆半径。startAngle、endAngle使用的是弧度值,不是角度值。弧度的规定是绝对的,如下图。

anticlockwise表示绘制的方法,是顺时针还是逆时针绘制。它传入布尔值,true表示逆时针绘制,false表示顺时针绘制,缺省值为false。
弧度的规定是绝对的,什么意思呢?就是指你要绘制什么样的圆弧,弧度直接按上面的那个标准填就行了。
比如你绘制 0.5pi ~ 1pi 的圆弧,如果顺时针画,就只是左下角那1/4个圆弧;如果逆时针画,就是与之互补的右上角的3/4圆弧。此处自己尝试,不再举例。
绘制圆角矩形
下面,我们结合基本路径和高级路径的知识,绘制一个圆角矩形。
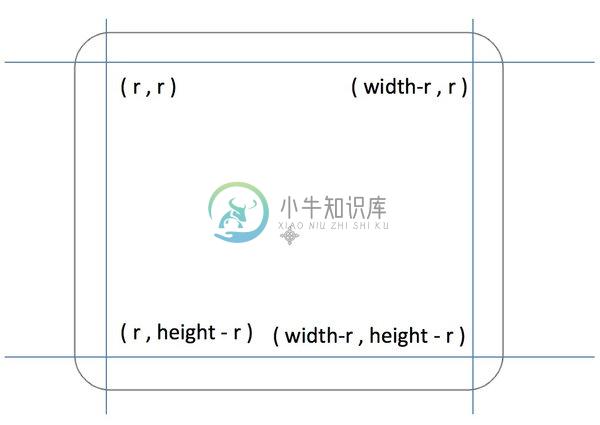
圆角矩形是由四段线条和四个1/4圆弧组成,拆解如下。

因为我们要写的是函数而不是一个固定的圆角矩形,所以这里列出的是函数需要的参数。分析好之后,直接敲出代码。
<!DOCTYPE html>
<html lang="zh">
<head>
    <meta charset="UTF-8">
    <title>圆角矩形</title>
    <style>
        body { background: url("./images/bg3.jpg") repeat; }
        #canvas { border: 1px solid #aaaaaa; display: block; margin: 50px auto; }
    </style>
</head>
<body>
<div id="canvas-warp">
    <canvas id="canvas">
        你的浏览器居然不支持Canvas?!赶快换一个吧!!
    </canvas>
</div>

<script>
    window.onload = function(){
        var canvas = document.getElementById("canvas");
        canvas.width = 800;
        canvas.height = 600;
        var context = canvas.getContext("2d");
        context.fillStyle = "#FFF";
        context.fillRect(0,0,800,600);

        drawRoundRect(context, 200, 100, 400, 400, 50);
        context.strokeStyle = "#0078AA";
        context.stroke();
    }

    function drawRoundRect(cxt, x, y, width, height, radius){
        cxt.beginPath();
        cxt.arc(x + radius, y + radius, radius, Math.PI, Math.PI * 3 / 2);
        cxt.lineTo(width - radius + x, y);
        cxt.arc(width - radius + x, radius + y, radius, Math.PI * 3 / 2, Math.PI * 2);
        cxt.lineTo(width + x, height + y - radius);
        cxt.arc(width - radius + x, height - radius + y, radius, 0, Math.PI * 1 / 2);
        cxt.lineTo(radius + x, height +y);
        cxt.arc(radius + x, height - radius + y, radius, Math.PI * 1 / 2, Math.PI);
        cxt.closePath();
    }
</script>
</body>
</html>
运行结果:

建议大家自己动手绘制一个圆角矩形,这样有助于对路径的掌握。
下面我们用这个函数来做点其他的事情。
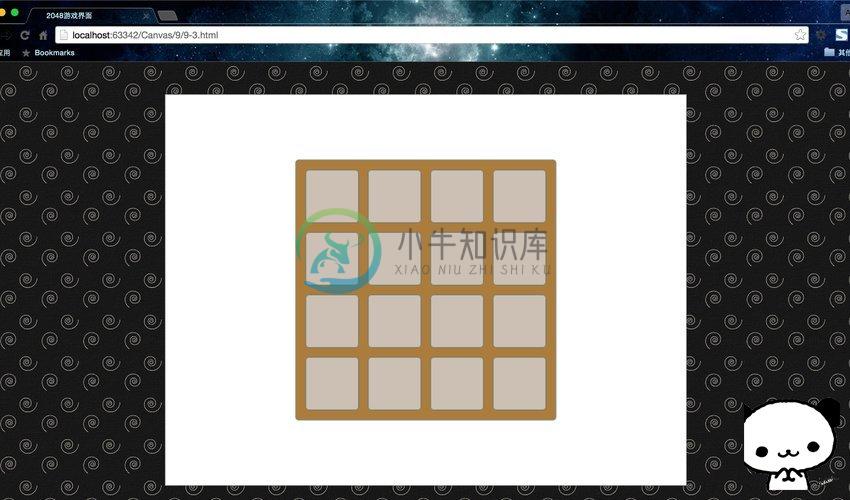
绘制2048游戏界面
对代码不做过多讲解,大家自己研究研究,建议自己动手先尝试写一下。因为我这里采用的是硬编码,所以不是很好,大家也可尝试优化一下。
<!DOCTYPE html>
<html lang="zh">
<head>
    <meta charset="UTF-8">
    <title>2048游戏界面</title>
    <style>
        body { background: url("./images/bg3.jpg") repeat; }
        #canvas { border: 1px solid #aaaaaa; display: block; margin: 50px auto; }
    </style>
</head>
<body>
<div id="canvas-warp">
    <canvas id="canvas">
        你的浏览器居然不支持Canvas?!赶快换一个吧!!
    </canvas>
</div>

<script>
    window.onload = function(){
        var canvas = document.getElementById("canvas");
        canvas.width = 800;
        canvas.height = 600;
        var context = canvas.getContext("2d");
        context.fillStyle = "#FFF";
        context.fillRect(0,0,800,600);

        drawRoundRect(context, 200, 100, 400, 400, 5);
        context.fillStyle = "#AA7B41";
        context.strokeStyle = "#0078AA";
        context.stroke();
        context.fill();

        for(var i = 1; i <= 4; i++){
            for(var j = 1; j <= 4; j++){
                drawRoundRect(context, 200 + 16 * i + 80 * (i - 1), 100 + 16 * j + 80 * (j - 1), 80, 80, 5);
                context.fillStyle = "#CCBFB4";
                context.strokeStyle = "#0078AA";
                context.stroke();
                context.fill();
            }
        }
    }

    function drawRoundRect(cxt, x, y, width, height, radius){
        cxt.beginPath();
        cxt.arc(x + radius, y + radius, radius, Math.PI, Math.PI * 3 / 2);
        cxt.lineTo(width - radius + x, y);
        cxt.arc(width - radius + x, radius + y, radius, Math.PI * 3 / 2, Math.PI * 2);
        cxt.lineTo(width + x, height + y - radius);
        cxt.arc(width - radius + x, height - radius + y, radius, 0, Math.PI * 1 / 2);
        cxt.lineTo(radius + x, height +y);
        cxt.arc(radius + x, height - radius + y, radius, Math.PI * 1 / 2, Math.PI);
        cxt.closePath();
    }
</script>
</body>
</html>
运行结果:

这个圆角矩形的函数写好之后,可以自己封装进JS文件里,以后遇到什么好的函数都可以放进去,这样积累下来,这个文件就是一套属于自己的图形库和游戏引擎了,是不是非常的酷?
其实游戏制作是Canvas的主要用途,但是要知道每一个游戏设计师都是一个艺术家。是不是觉得前途一片光明?让我们继续前进!

