创建和删除记录(Creating and Deleting Records)
优质
小牛编辑
180浏览
2023-12-01
您可以在模型实例上创建和删除记录。
语法 (Syntax)
import Ember from 'ember';
export default Ember.Route.extend ({
   model() {
      //code here
   },
   actions:{
      addNewCategory(id, name) {
         this.controller.get('model').pushObject({ var1,va2});
      },
      deleteCategory(category) {
         this.controller.get('model').removeObject(model_name);
      }
   }
});
例子 (Example)
下面给出的示例显示了记录的创建和删除。 创建名为record_demo的新路由,并在此路由中再创建一条路由并将其命名为categories 。 现在打开router.js文件来定义URL映射 -
import Ember from 'ember';
//Access to Ember.js library as variable Ember
import config from './config/environment';
//It provides access to app's configuration data as variable config
//The const declares read only variable
const Router = Ember.Router.extend ({
   location: config.locationType,
   rootURL: config.rootURL
});
//Defines URL mappings that takes parameter as an object to create the routes
Router.map(function() {
   this.route('record_demo', function() {
      this.route('categories');
   });
});
//It specifies Router variable available to other parts of the app
export default Router;
使用以下代码打开在app/templates/下创建的application.hbs文件 -
{{#link-to 'record_demo'}}Go to Records demo page{{/link-to}}
{{outlet}}
当您单击上面的链接时,它将打开record_demo模板页面,该页面在app/templates/下创建。 record_demo.hbs文件包含record_demo.hbs代码 -
<h2>Welcome...Click the below link for Categories page</h2>
{{#link-to 'record_demo.categories'}}Go to Categories page{{/link-to}}
{{outlet}}
上面的模板页面打开categories.hbs文件,该文件在app/templates/record_demo下创建,包含以下代码 -
<h2>Categories Page</h2>
<form>
   <label>ID:</label>
   {{input value=newCategoryId}}
   <label>NAME:</label>
   {{input value = newCategoryName}}
   //when user adds records, the 'addNewCategory' function fires and adds
      the records to model
   <button type = "submit" {{action 'addNewCategory' newCategoryId newCategoryName}}>
      Add to list
   </button>
</form>
<ul>
   {{#each model as |category|}}
      <li>
         Id: {{category.id}}, Name: {{category.name}}
         //when user delete records, the ‘deleteCategory’ function fires and remove
            the records from model
         <button {{action 'deleteCategory' category}}>Delete</button>
      </li>
   {{/each}}
</ul>
//it counts the number of added records and removed records from the model
<strong>Category Counter: {{model.length}}</strong>
{{outlet}}
现在使用以下代码打开在app/routes/record_demo下创建的categories.js文件 -
import Ember from 'ember';
export default Ember.Route.extend ({
   model() {
      //model will display these records when you execute the code
      return [{
         id: 1,
         name: 'Category One'
      }, {
         id: 2,
         name: 'Category Two'
      }];
   },
   actions: {
      //it adds records to model
      addNewCategory(id, name) {
         this.controller.get('model').pushObject({id,name});
      },
      //it removes the records from model
      deleteCategory(category) {
         this.controller.get('model').removeObject(category);
      }
   }
});
输出 (Output)
运行ember服务器; 你会收到以下输出 -

当您单击该链接时,它将打开带有类别页面链接的records_demo页面 -

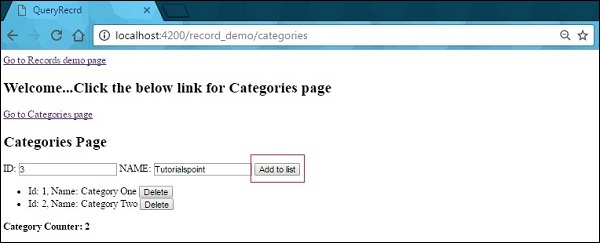
接下来,将打开类别模板页面。 在输入框中输入ID和名称,然后单击Add to list按钮,如下面的屏幕截图所示 -

接下来,单击“添加”按钮; 您将看到列表中添加的记录,计数将增加 -

如果要从列表中删除记录,请单击“ Delete按钮。

