
5.2 iOS 接入文档英文版
Dev environment
- iOS system version
- SDK support iOS 6.0 and above minmumly,please set the iOS Deployment Target to iOS 6.0 above when you integrate Jice SDK.
- Xcode version
- When you integrate SDK, you should work on xcode 7.0 and above.
Integration SDK
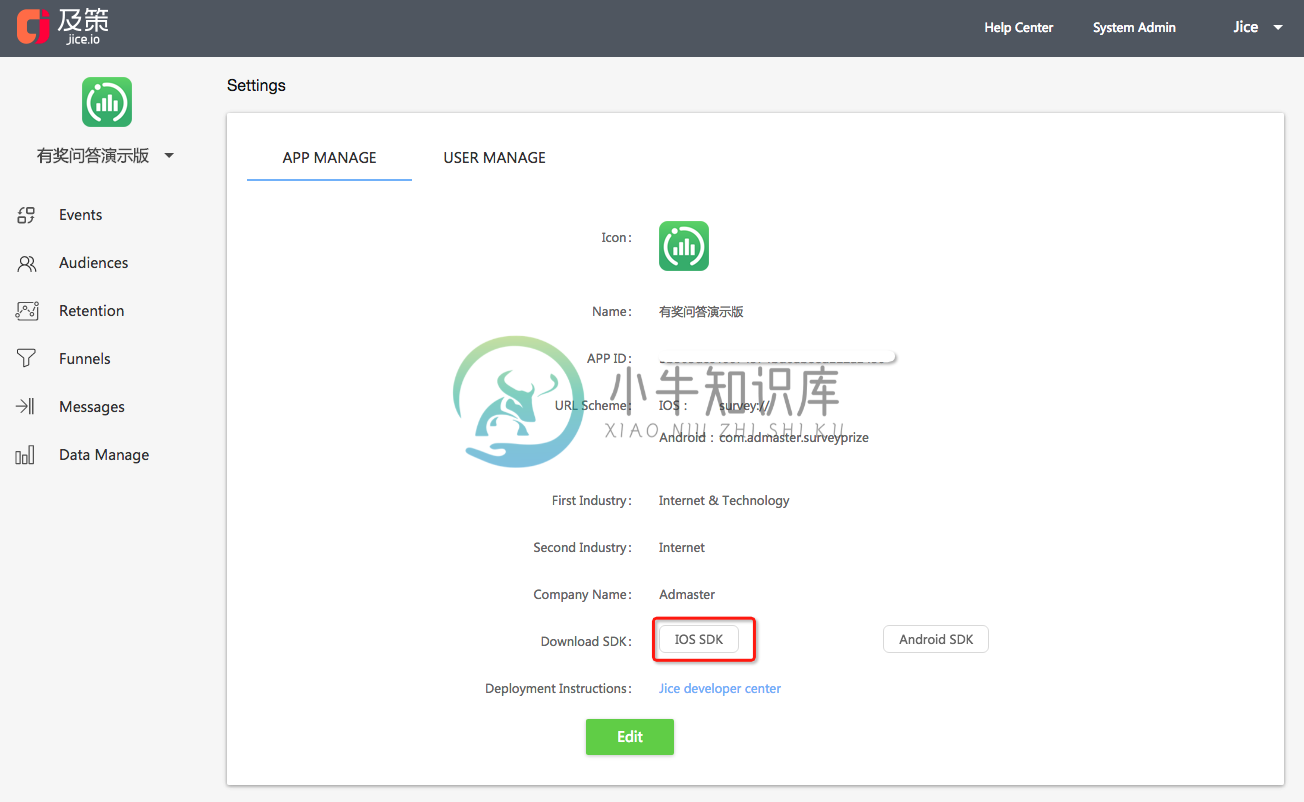
step 1: Download SDK
Login https://jice.io/login and go to settings on the bottom. Then download the iOS SDK.
step 2:Add SDK to your project
After downloading successfully, unzip the file and put the JiceSDKLib in your app. Make sure check the Copy items into destination group's folder(if needed) and the right Target in Add To Targets on the dialog during integration.
step 3: Add the required dependencies Framework for SDK
Select TARGETS-->Build Phases-->Link Binary With Libraries--> + to add the following framework:
libz.1.2.5.td
Security.framework
AdSupport.framework
CoreTelephony.framework
SystemConfiguration.framework
Integration SDK
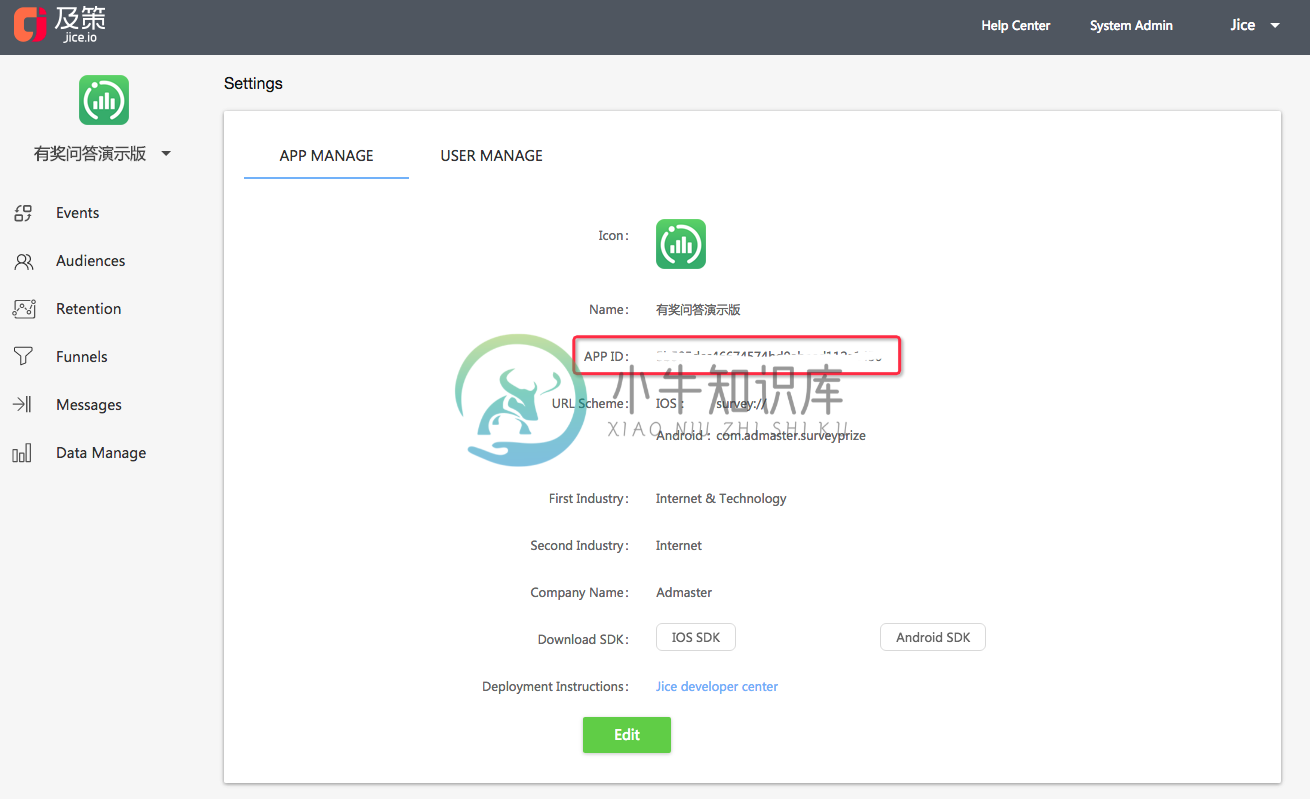
Login https://jice.io/login and go to settings on the bottom to get the app key.
Import JiceSDK.h at the entrance(such as AppDelegate.m) to the program, and call shareInstanceWithAppKey:launchOption:config: in the initialization method(such as application:didFinishLaunchingWithOptions:)
- API Parameters
config:SDK config class.if you want to custom it,view Custom SDK configuration at the end.appKey: The appid you get from Jice platform.shareInstance:You can get this instance after initialization successfully.The instance is used to event and user profile track.
// Default initializtion,debug mode is off
JiceConfig *config = [[JiceConfig alloc] init];
NSString *appKey = @"Your app key";
[JiceSDK shareInstanceWithAppKey:appKey launchOption:launchOptions config:config];
OR
NSString *appKey = @"Your app key";
[JiceSDK shareInstanceWithAppKey:appKey launchOption:launchOptions config:nil];
Congratulations! You have performed the basic SDK integration.If integrate successfully, Jice will receive event data after restarting app. Note that it may take a few minutes for your first datapoints to show up within the Jice.
After initializing our SDK, we are authorized to collect private data such as user device information by default. At the same time, the site builder should add the relevant privacy agreement statement when the user activates the APP for the first time to obtain the user's consent.
Sending Event
Once you've initialized jice SDK successfully, you can track an event by calling track:event properties:. Before add the event tracking code, your operation colleague need to add the tracking event on Jice website and then download the tracking codes. You can add the event tracking code with the code file. 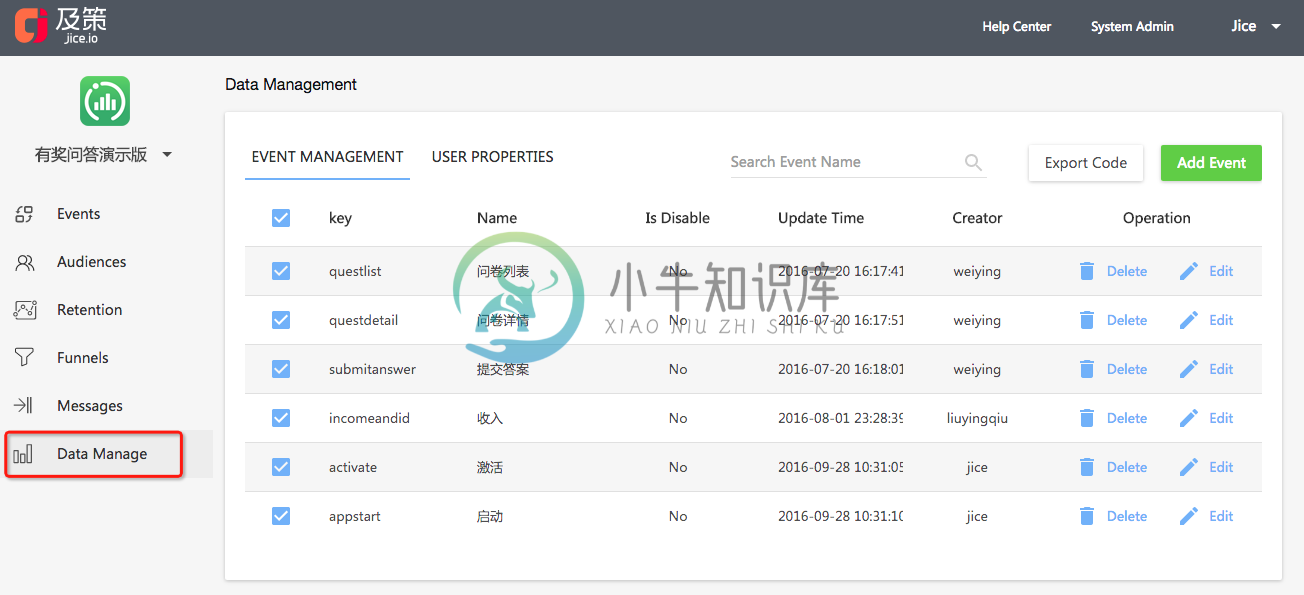
- API Parameters
eventName:The event name you define on Jice website, for example,@"addtocart"in the demo.properties: The properties of the event you define on Jice website, for example,@{@"productname" : @"tshirt"in the demo.
- (void) trackEventName:(NSString *)eventName properties:(NSDictionary *)properties;
- Demo
//If the event don't have  properties, ignore the following
- (void) trackEventName:(NSString *)eventName properties:(NSDictionary *)properties;
    [[JiceSDK shareInstance] trackEventName:@"addtocart"
                        properties:@{@"productname" : @"tshirt",
                                     @"price" : @"100"}];
If the event don't have properties,you can also use the following method.
- (void) trackEventName:(NSString *)eventName;
Notice:
- The event is required and the event properties are optional.
- The event key and the property key should be same with the event settings on Jice website. Or you cannot see data on Jice.
- You can add as much as 50 events and 20 event properties per event.
Congratulations! You have performed the event track SDK integration. If integrate successfully, Jice will receive event data after triggering an event. Note that it may take a few minutes for your first datapoints to show up within the Jice.
Storing user profiles
If you want to know who trigger the tracking event further more. You can call addUserIndentifier: to track the user. Before add the profile tracking code, your operation colleague need to add the tracking profiles on Jice website and then download the tracking codes. You can add the profile tracking code with the code file. 
- When a user registers, you can call this method to track user profile, such as name,email,sex etc.
- When a user update profile, you should call this method to update this user profile. Note reseting profile before call the method.
- API Parameters
userid: User unique identifier in your app.properties:User properties, such as email,name,sex etc. If you assignuseridandproperties[@"id"]diffrent value at the same time, Jice sdk will useuseridas the user unique identifier
- (void)addUserIndentifier:(NSString *)userid properties:(NSDictionary *)properties;
- Demo
NSDictionary *profile = @{ @"id" : @"74568544",
                           @"name" : @"Jim",
                           @"gender" : @"Male",
                           @"birthday" : @"1989-10-01",
                           @"email" : @"nono@site.cn",
                           @"levl" : @"no",
                           @"phonenumber" : @"13299186743"};

[[JiceSDK shareInstance] addUserIndentifier:profile[@"id"] properties:profile];
Notice:
- The user property key should be same with the property settings on Jice website. Or you cannot see data on Jice.
Congratulations! You have performed the event track SDK integration. If integrate successfully, Jice will receive user data after a user register. Note that it may take a few minutes for your first datapoints to show up within the Jice.
Sending in-app message
You can create beautiful in-app messages on the Jice website and send them to the people you want. Before using the magic function, you need to finish the following steps.
step #1: Controlling when to show an in-app message
For example, you have a shopping app and would like to show an in-app message when a user visit fresh category.You need call addJiceViewOn: at the appropriate point in your app.
- API Parameters
- The view is the targeted view where the message show. The size of message window depends on the targeted view. If you want to show the message in the full screen center,you need set this parameter to
keyWindow. - You can implement the
JiceViewDelegateif you want do something during the message show or click. View the details in the next step.
- The view is the targeted view where the message show. The size of message window depends on the targeted view. If you want to show the message in the full screen center,you need set this parameter to
- (void)addJiceViewOn:(UIView *)view WithDelegate:(id<JiceViewDelegate>)delegate;
- Demo
[[JiceSDK shareInstance] addJiceViewOn:[UIApplication sharedApplication].keyWindow WithDelegate:self];
step #2: Controlling how to show the info after clicking the in-app message
If you want the user to visit some view after click the in-app message further more, you should Implement the jiceViewDidClick: method of JiceViewDelegate interface. The showInfo is the url you input on the Jice website and Jice SDK outputs it as strings. You can parse it as you need.
You can do more things in the JiceViewDelegate interface of course.
@protocol JiceViewDelegate <NSObject>

@optional

- (void)jiceViewWillShow; //The message will be shown
- (void)jiceViewDidShow; //The message has been shown
- (void)jiceViewDidClick:(NSString *)showInfo;//The message has been cliked. You can parse the showInfo as you need
- (void)jiceViewDidDismiss;//The message will dismiss
- (void)jiceViewError:(NSError *)error;//If sdk failed to show a message,it will call this method.
@end
Error Code Enum used in jiceViewError method:
typedef NS_ENUM(NSUInteger, JicePushShowError) {
    JicePushNoData = 1000,              // There are no messages
    JicePushIsShowing = 1001,           // Some message are on show now
    JicePushNoNet = 1002,               // There is no network currently
    JicePushIsDownloading = 1003        // Download
};
step #3: Integrate online test
We suggest you to test the message before send it to the online. During the online test, you can see if the message is shown as you want. Before using the online test,You need to take a few steps. After doing these, you can use your mobile scan QRCode on the Jice website to test the message.
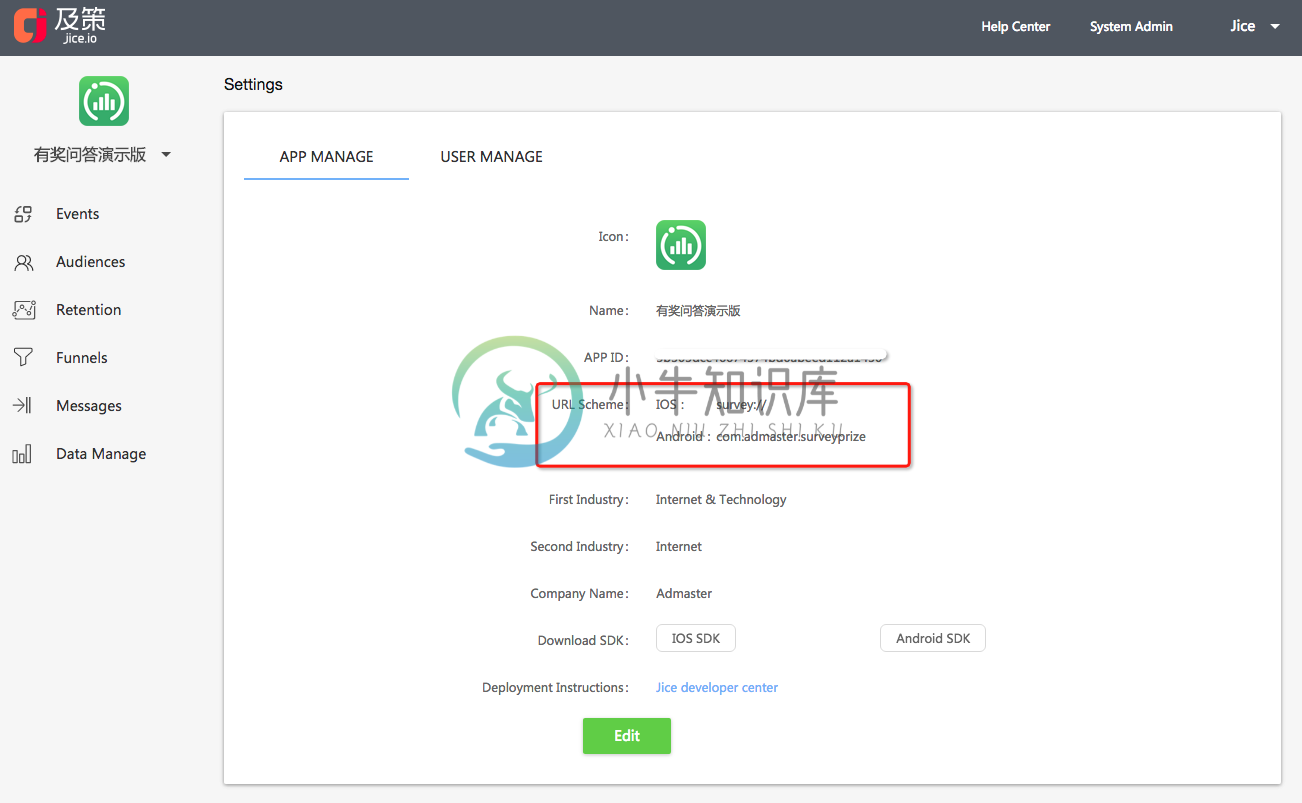
- Define URL Scheme in your app configuration. Come to the setting of your project in Xcode and Select the TARGETS tab and add the URL scheme in URL type under the info tab.
- Input this URL Scheme in the setting tab of Jice website.
- Add the following method in the AppDelegate.m file. The url parameter is passed through QRCode scan.
// Compatible iOS9
- (BOOL)application:(UIApplication *)application openURL:(NSURL *)url sourceApplication:(NSString *)sourceApplication annotation:(id)annotation
{
    [[JiceSDK shareInstance] handleOpenURL:url];
    return YES;
}

- (BOOL)application:(UIApplication *)app openURL:(NSURL *)url options:(NSDictionary<NSString*, id> *)options {
    [[JiceSDK shareInstance] handleOpenURL:url];
    return YES;

}
Congratulations! You have performed the in-app message SDK integration. If integrate successfully, your app will receive an in-app message after scaning QR code of a message created on Jice website.
Custom SDK configuration
If you want to custom SDK configuratins, for example, config the network strategry for sending data, you can set related properties in the JiceConfig.
trackServer: [optional] privatisation deployment server report server address, and don't set up using the default address, for example:at http://jice.fw4.mepushServer: [optional] push distributed server address, and the deployment of privatisation is not set to use the default address, for example:at http://ac.jice.iosendCondition: Network strategy for sending tracking data. You can chosewifiorcellular networks. The default value isWifi+WWAN.loadCondition: Network strategy for showing in-app message .You can chosewifiorcellular networks. The default value isWifi+WWAN.sessionInterval: Time interval marked as a new appstart when an app switches from back to front. The unit is sencond and 0 is default. For example, if you set the interval to 10s, an appstart that switch from back to front less than 10s will not be a new start.isDebugMode: IfisDebugModeis set to true, you can see console log when the tracking data is sent.isAlreadyActivated: [optional] equipment has been activated, identified whether the user has been activated before the SDK to use equipment, developers can be introduced to avoid conflicts with the old data, continuous activation data calculation,YESare activated don't repeat statistical data, the defaultNO
JiceConfig *config = [[JiceConfig alloc] init];
// Network strategy for sending tracking data
config.sendCondition = JiceNetworkConditionWWAN | JiceNetworkConditionWifi;
// Network strategy for showing in-app message
config.loadCondition =  JiceNetworkConditionWifi;
//Time interval marked as a new appstart, unit is sencond
config.sessionInterval = 15;
//isDebugMode
config.isDebugMode = YES;