创建模板(Creating Template)
在本章中,我们将研究如何在Joomla中create a template 。
创建模板
以下是在Joomla中创建模板的简单步骤 -
Step (1) - 在Joomla → Templates文件夹中创建一个名为MyFirstTemplate文件夹。 在MyFirstTemplate文件夹中,再创建2个名为images和CSS的文件夹,以保存所有图像和CSS文件。
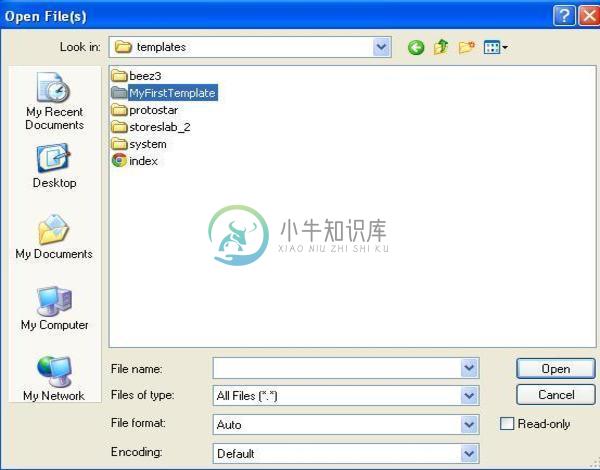
Step (2) −在MyFirstTemplate文件夹中,创建一个名为templateDetails.xml的文件,如果没有此文件,模板将不会显示在Joomla中。
templateDetails.xml
<?xml version = "1.0" encoding = "utf-8"?>
<extension version = "3.0" type = "template">
   <name>xnip</name>
   <creationDate>2015-06-13</creationDate>
   <author>xnip</author>
   <authorEmail>tutorials@example.com</authorEmail>
   <authorUrl>http://www.example.com </authorUrl>
   <copyright>Jack 2015</copyright>
   <license>GNU/GPL</license>
   <version>1.0.2</version>
   <description>My First Template</description>
   <files>
      <filename>index.php</filename>
      <filename>templateDetails.xml</filename>
      <folder>images</folder>
      <folder>css</folder>
   </files>
   <positions>
      <position>breadcrumb</position>
      <position>left</position>
      <position>right</position>
      <position>top</position>
      <position>user1</position>
      <position>user2</position>
      <position>user3</position>
     <position>user4</position>
     <position>footer</position>
   </positions>
</extension>
代码详情
《files》 - 它包含MyFirstTemplate文件夹中的可用文件和文件夹。
《folder》 - 它占用MyFirstTemplate文件夹中的所有可用文件夹。
Step (3) - 创建一个名为index.php的文件。 这有助于执行所有Joomla页面。
index.php
<?php defined( '_JEXEC' ) or die( 'Restricted access' );?>
<!DOCTYPE html>
<html xmlns = "http://www.w3.org/1999/xhtml" xml:lang = "<?php echo $this->language; ?>" lang = "<?php echo $this->language; ?>" >
   <head>                                         //head section
      <jdoc:include type = "head" />
      <link rel = "stylesheet" href = "<?php echo $this->baseurl ?>/templates/system/css/system.css" type = "text/css" />
      <link rel = "stylesheet" href = "<?php echo $this->baseurl ?>/templates/system/css/general.css" type = "text/css" />
      <link rel = "stylesheet" href = "<?php echo $this->baseurl ?>/templates/<?php echo $this->template; ?>/css/template.css" type="text/css" />
   </head>
   <body>                                          //body section
      <jdoc:include type = "modules" name = "top" />
      <jdoc:include type = "component" />
      <jdoc:include type = "modules" name = "bottom" />
   </body>
</html>
?>
代码详情
<?php defined( '_JEXEC' ) or die( 'Restricted access' );?>
<!DOCTYPE html>
<html xmlns = "http://www.w3.org/1999/xhtml" xml:lang = "<?php echo $this->language; ?>" lang = "<?php echo $this->language; ?>" >
此代码用于告诉浏览器正在使用哪种类型的html页面,并通过描述网站中使用的语言来开始HTML文档。
<head>                                         //head section
   <jdoc:include type = "head" />
   <link rel = "stylesheet" href = "<?php echo $this->baseurl ?>/templates/system/css/system.css" type = "text/css" />
   <link rel = "stylesheet" href = "<?php echo $this->baseurl ?>/templates/system/css/general.css" type = "text/css" />
   <link rel = "stylesheet" href = "<?php echo $this->baseurl ?>/templates/<?php echo $this->template; ?>/css/template.css" type = "text/css" />
</head>
这些行用于链接Joomla中模板的各种样式表。
<body>                                          //body section
   <jdoc:include type = "modules" name = "top" />
   <jdoc:include type = "component" />
   <jdoc:include type = "modules" name = "bottom" />
</body>
在body部分中, jdoc用于包含Joomla系统某些部分的Joomla输出。 name = "top"用于将菜单设置在顶部。
Step (4) - 创建这两个文件后,登录Joomla并单击Extension → Extension Manager ,将显示以下页面。
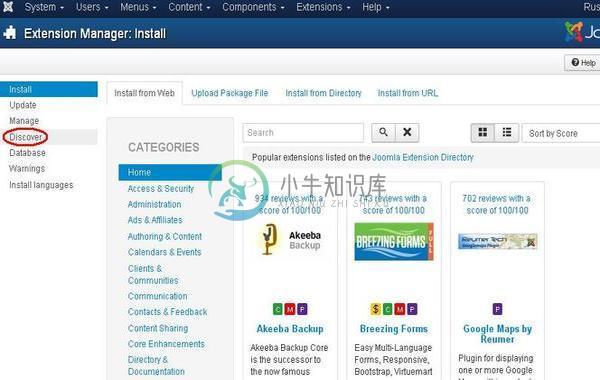
Step (5) - 在上面的页面中,单击“ Discover链接,将显示以下页面。
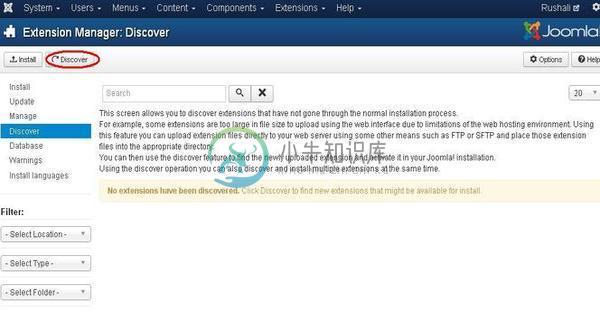
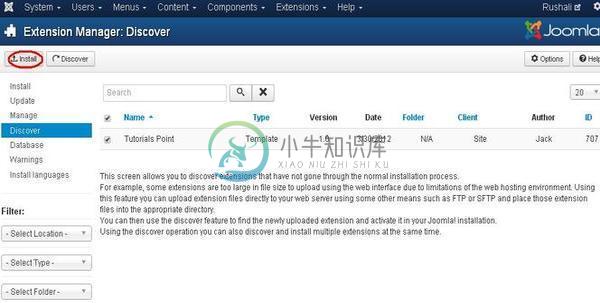
Step (6) - 接下来,单击“ Discover按钮以发现新创建的模板,如下所示。
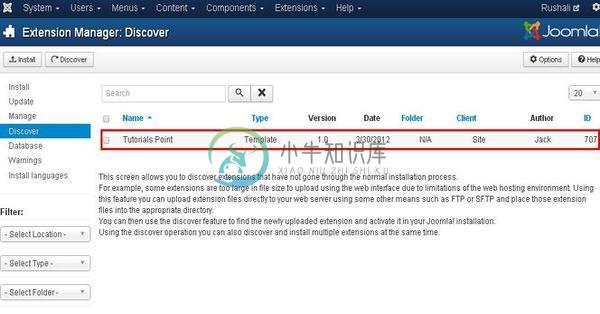
Step (7) - 单击复选框以选择模板,然后单击“ Install按钮在Joomla中安装模板。
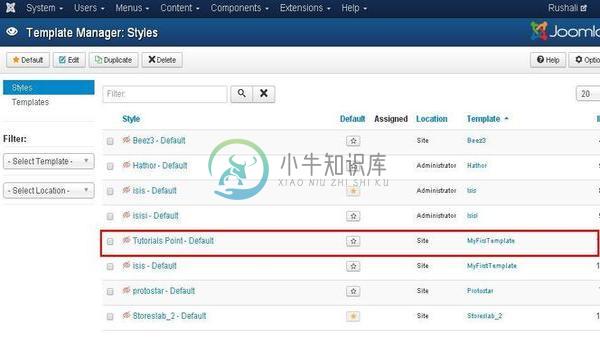
Step (8) - 安装模板后,您可以通过单击Extension → Template Manager查看新创建的模板。 您将看到列出的新创建模板如下所示。
工具栏 (Toolbar)
以下是模板管理器中的工具栏选项 -
Default - 选择默认模板。
Edit - 选择要编辑的模板。
Duplicate - 复制所选模板的副本。
Delete - 删除Joomla的模板。

