接口调用流程
优质
小牛编辑
135浏览
2023-12-01
LFMultipleLivenessManager 调用流程
LFMultipleLivenessManager 是对LFMultipleLivenessController 调用流程进一步的封装,方便用户直接调用
1 初始化 LFMultipleLivenessManager 输入token
token
LFMultipleLivenessManager *manager = [[LFMultipleLivenessManager alloc] initLFLivenessWithToken:token];
2 配置 LFMultipleLivenessConfigItem 进行参数设置
LFMultipleLivenessConfigItem *configItem = [[LFMultipleLivenessConfigItem alloc] init];
configItem.outType = self.outType;
configItem.complexity = self.complexity;
configItem.openRandom = self.openRandom;
configItem.sequence = self.sequence;
configItem.openVoice = self.openVoice;
configItem.openVideo = self.openVideo;
configItem.videoQuality = self.videoQuality;
[manager setLFLivenessConfig:configItem];
3 开始活体检测,设置present 活体检测视图控制器和代理
[manager startLFLivenessWithCurrentController:self multipleLivenessDelegate:self];
活体检测SDK的接口调用主要是LFLivefaceViewController。下面是详细介绍。
LFMultipleLivenessController 调用流程
LFMultipleLivenessController是对LFLivefaceViewController的一层封装,已经写好了一部分内部逻辑。如果没有内部定制化的要求,可以直接使用LFMultipleLivenessController。
1 遵守 LFLivenessDetectorDelegate 协议
@interface ViewController () <LFMultipleLivenessDelegate>
2 初始化参数设置
LFMultipleLivenessController是以json串作为初始化参数的,例子:
@"{\"outType\":\"singleImg\",\"Complexity\":1,\"sequence\":[\"BLINK\",\"MOUTH\",\"NOD\",\"YAW\"]};
//设置输出模式 singleImg , multiImg , video , YAW
NSString *outType = @"video";
//设置难易程度
LivefaceComplexity complexity = LIVE_COMPLEXITY_NORMAL;
//设置动作序列 BLINK  ,  MOUTH  ,  NOD  , YAW
NSArray *sequence = @[@"BLINK", @"MOUTH", @"NOD", @"YAW"];
NSDictionary *dictJson = @{@"sequence":sequence,
                            @"outType":outType,
                         @"Complexity":@(complexity)};
//转化为json字符串
NSString *strJson = [[NSString alloc] initWithData:[NSJSONSerialization dataWithJSONObject:dictJson options:NSJSONWritingPrettyPrinted error:nil] encoding:NSUTF8StringEncoding];
LFMultipleLivenessController * multipleLiveVC = [[LFMultipleLivenessController alloc] init];
multipleLiveVC.token = token;
[multipleLiveVC setJsonCommand:strJson];
| 参数设置 | 参数名 | 值说明 |
|---|---|---|
| 动作序列 | sequence | 眨眼:LIVE_BLINK 点头:LIVE_NOD 张嘴:LIVE_MOUTH 摇头:LIVE_YAW |
| 检测难易程度 | Complexity | 对应阈值:LIVE_COMPLEXITY_HELL,LIVE_COMPLEXITY_HARD,LIVE_COMPLEXITY_NORMAL,LIVE_COMPLEXITY_EASY(允许人脸丢失,人脸切换) |
| 输出类型 | outType | singleImg单图, multiImg多图 |
除了json, 声音的开关,可以设置bOpenPromptSound来控制。
3 present 活体检测视图控制器
UINavigationController *navigationController = [[UINavigationController alloc] initWithRootViewController:multipleLiveVC];
[navigationController setNavigationBarHidden:YES];
[self presentViewController:navigationController animated:YES completion:^{
        //如果需要自动开始,而不是按钮触发,调用下面这行代码
        //[multipleLiveVC restart];
}];
4 实现 LFMultipleLivenessDelegate 中的方法
//活体检测已经开始的回调.
- (void)LFMultiLivenessDidStart;
// 活体检测成功回调方法.
- (void)LFMultiLivenessDidSuccessfulGetData:(NSData *)encryTarData lfImages:(NSArray *)arrLFImage lfVideoData:(NSData *)lfVideoData;
// 活体检测失败回调方法.(可根据需要添加参数返回失败时的图片和视频)
- (void)LFMultiLivenessDidFailWithType:(LFMultipleLivenessError)iErrorType DetectionType:(LFDetectionType)iDetectionType DetectionIndex:(NSInteger)iIndex Data:(NSData *)encryTarData lfImages:(NSArray *)arrLFImage lfVideoData:(NSData *)lfVideoData;
// 取消活体检测指令回调方法.
- (void)LFMultiLivenessDidCancel;
LFLivefaceViewController调用流程
LFLivefaceViewController 是我们提供的活体检测SDK示例。可以根据界面提示,设置动作序列,以及是否打开提示音等操作。设置完成后,就可以开始进行检测。
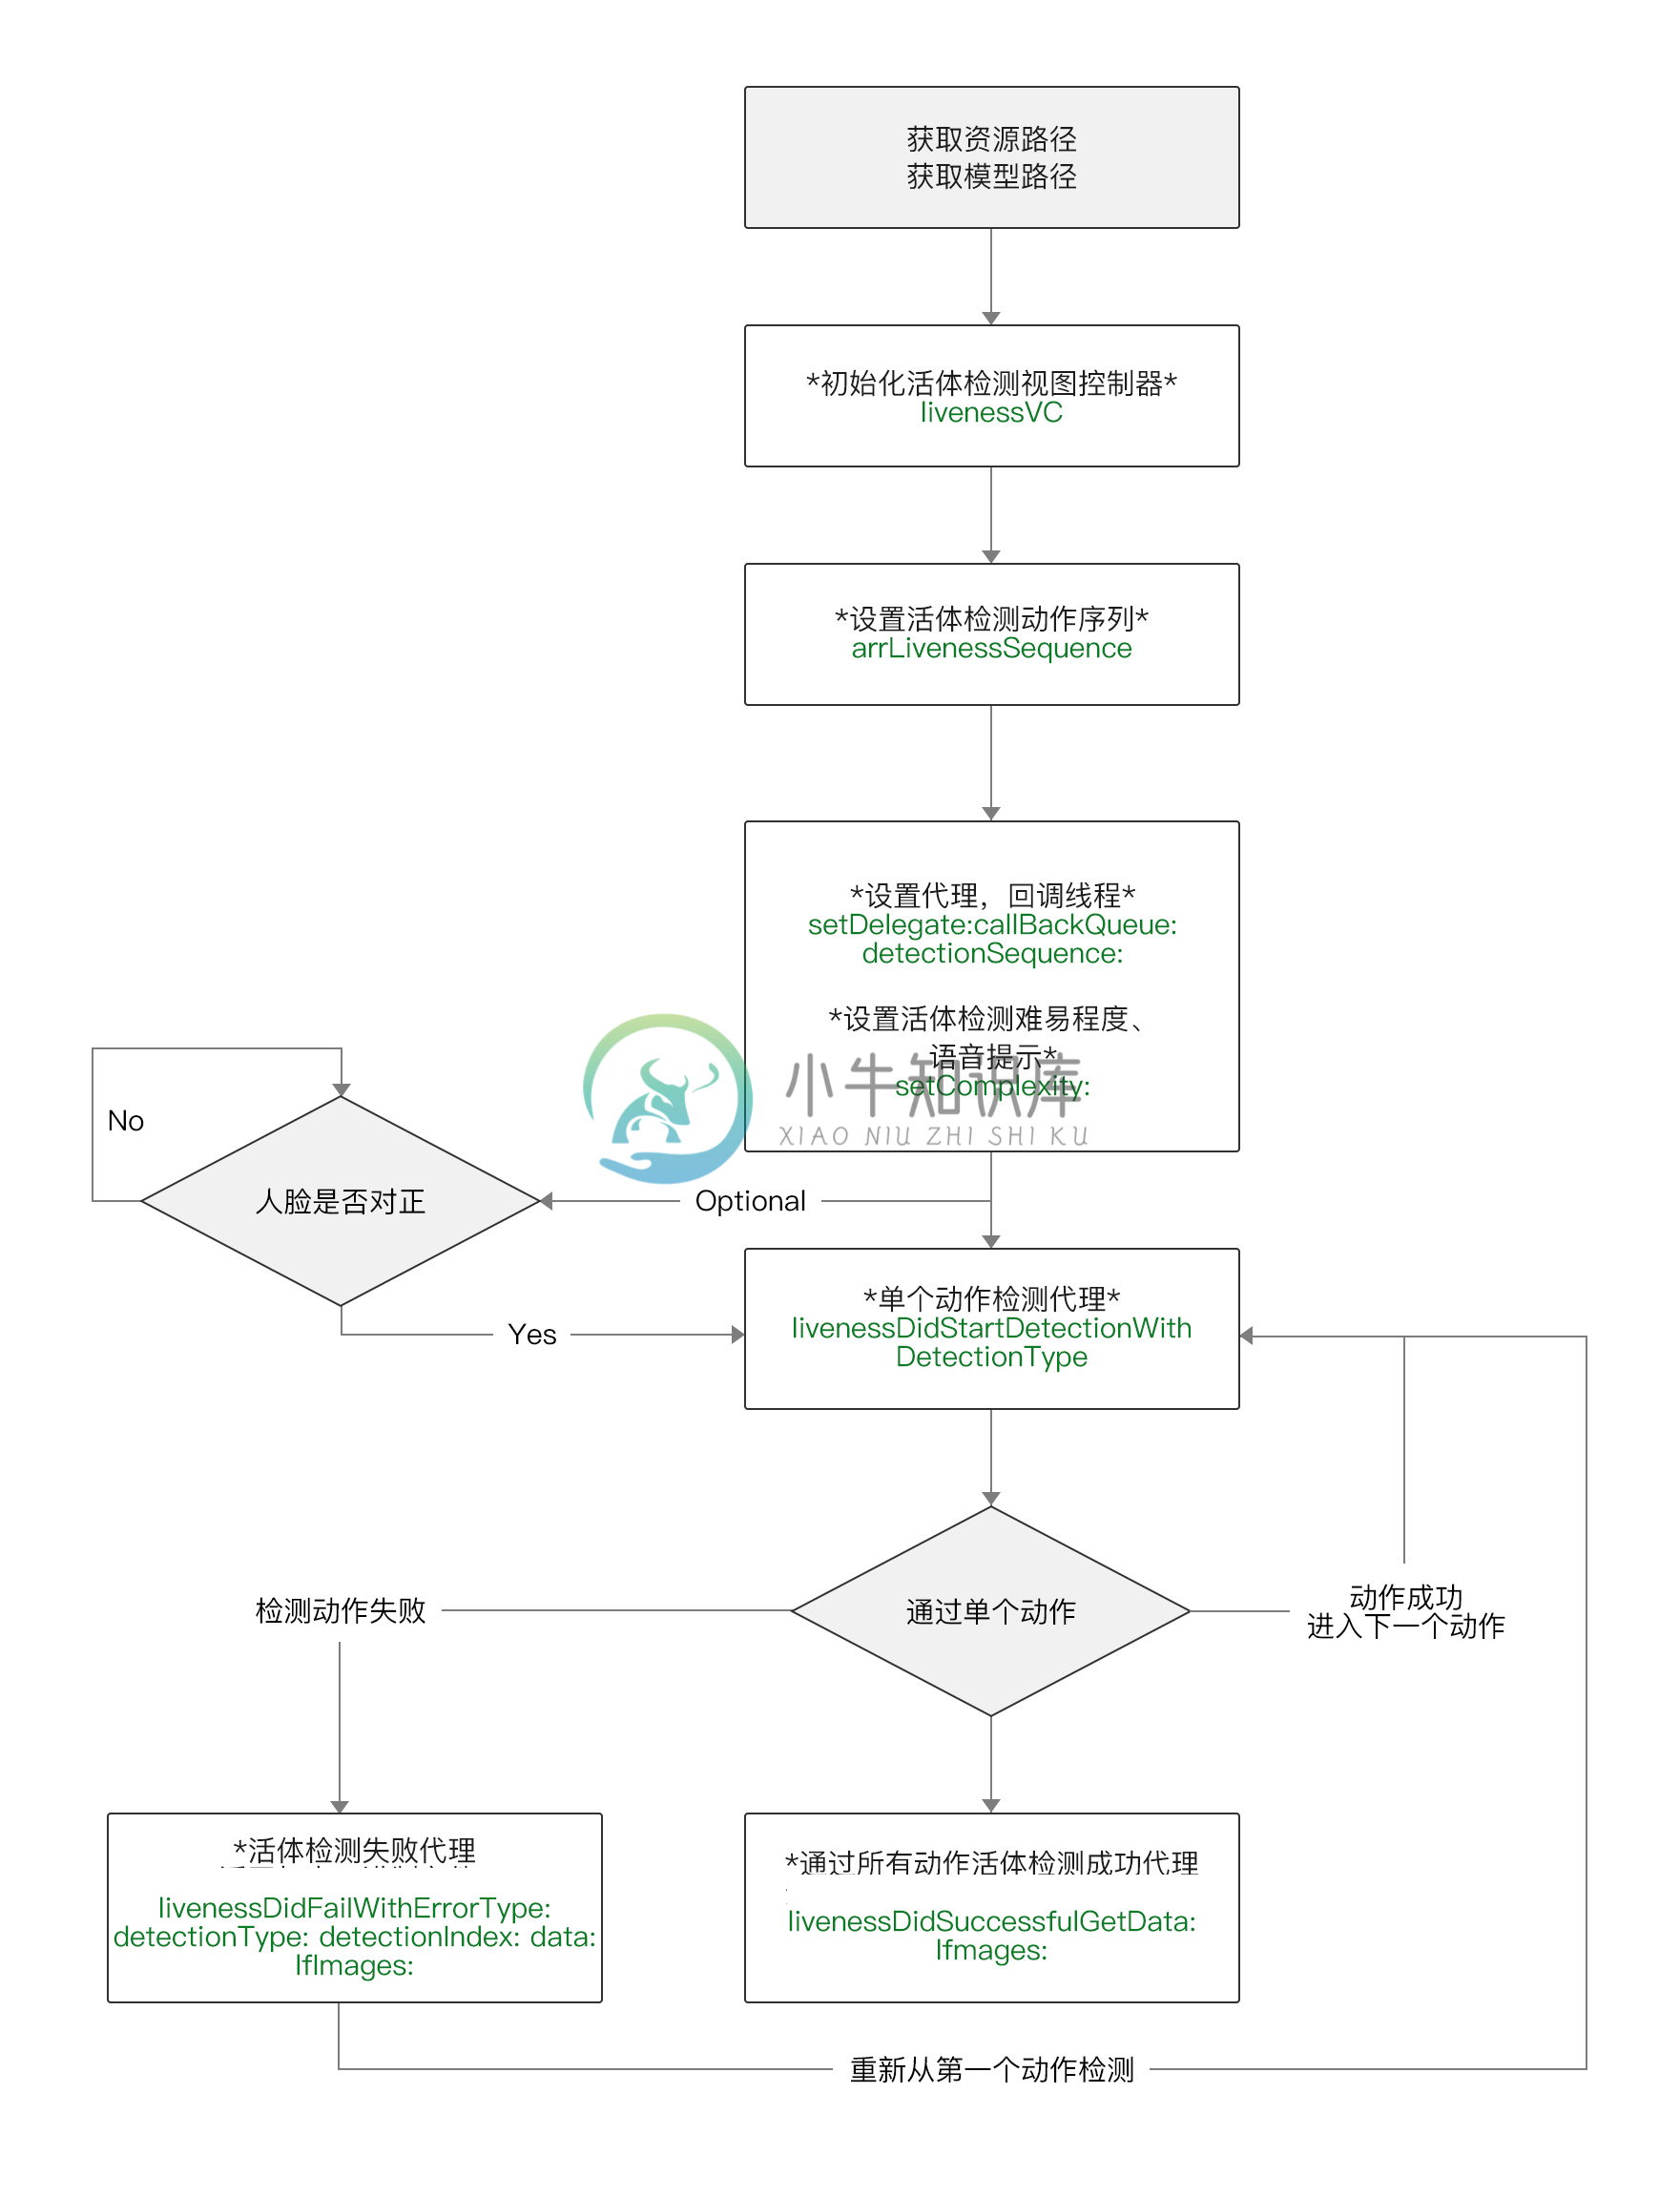
下图为接口调用说明图。

详细说明如下:
1 遵守 LFLivenessDetectorDelegate 协议
@interface ViewController () <LFLivenessDetectorDelegate>
2 获取资源路径
// 资源路径
NSString *strResourcesBundlePath = [[NSBundle mainBundle] pathForResource:@"lf_liveness_resource" ofType:@"bundle"];
3 初始化活体检测视图控制器
LFLivefaceViewController *livenessVC = [[LFLivefaceViewController alloc] initWithDuration:10.0f resourcesBundlePath:strResourcesBundlePath];
4 相关参数设置
你需要自己设置动作序列,设置难易程度,以及是否打开语音提示。SDK会根据您的设置,来进行活体检测。我们建议将 blink 放第一个检测,后面可以随意组合。
| 参数设置 | 值说明 |
|---|---|
| 动作序列 | 眨眼:LIVE_BLINK , 点头:LIVE_NOD , 张嘴:LIVE_MOUTH , 摇头:LIVE_YAW |
| 难易程度 | 简单模式: LIVE_COMPLEXITY_EASY , 正常模式:LIVE_COMPLEXITY_NORMAL , 困难模式: LIVE_COMPLEXITY_HARD , 地狱模式: LIVE_COMPLEXITY_HELL |
| 输出格式 | 单图:LIVE_OUTPUT_SINGLE_IMAGE ,多图:LIVE_OUTPUT_MULTI_IMAGE |
//可以根据实际需求自由组合,第一个动作需要为眨眼
NSArray *arrLivenessSequence = @[@(LIVE_BLINK) , @(LIVE_MOUTH) , @(LIVE_NOD) , @(LIVE_YAW)];
// 设置代理及回调线程
[livenessVC setDelegate:self callBackQueue:dispatch_get_main_queue() detectionSequence:arrLivenessSequence];
// 设置活体检测复杂度
[livenessVC setOutputType:LIVE_OUTPUT_SINGLE_IMAGE complexity:LIVE_COMPLEXITY_NORMAL];
// 设置默认语音提示状态,如不设置默认为开启
livenessVC.bVoicePrompt = YES;
6 校验Token 并present 活体检测视图控制器
detectVC.modalPresentationStyle = UIModalPresentationFullScreen;
[self.livefaceVC checkToken:self.token callback:^(NSString * _Nonnull token, NSDictionary * _Nonnull result) {
        NSNumber *checkResult = [result valueForKey:@"check_result"];
        if (checkResult.integerValue == 1) {
            [detectVC presentViewController:self animated:NO completion:^{
                [self restart];
            }];
        }
}];
6 实现 LFLivenessDetectorDelegate 中的方法
- (void)livenessDidStartDetectionWithDetectionType:(LivefaceDetectionType)iDetectionType
                                    detectionIndex:(int)iDetectionIndex;
{
    // 每个动作开始检测时会回调此方法
}

- (void)livenessTimeDidPast:(double)dPast durationPerModel:(double)dDurationPerModel
{
    // 检测开始后,当初始化检测器时如果Duration大于0则每帧都会回调此方法(示例程序中为10),dPast为当前动作已耗时,dDurationPerModel为每个动作设定的最大时间
}

// 活体检测成功的回调 , data为protobuf文件 , arrLFImage 为 LFImage 对象的数组, lfVideoData 为检测时的视频数据
- (void)livenessDidSuccessfulGetData:(NSData *)data
                            lfImages:(NSArray *)arrLFImage
                         lfVideoData:(NSData *)lfVideoData
{
// 活体检测失败的回调 , iErrorType为失败的错误类型 , iDetectionType为失败时检测类型 , iDetectionIndex为失败时检测类型所在检测序列中的位置(0为第一个)
- (void)livenessDidFailWithErrorType:(LivefaceErrorType)iErrorType
                       detectionType:(LivefaceDetectionType)iDetectionType
                      detectionIndex:(int)iDetectionIndex
                                data:(NSData *)data
                            lfImages:(NSArray *)arrLFImage
                         lfVideoData:(NSData *)lfVideoData
{
}

// 活体检测取消的回调 , iDetectionType为活体检测取消时的检测类型 , iDetectionIndex为取消时检测类型所在检测序列中的位置(0 为第一个)
- (void)livenessDidCancelWithDetectionType:(LivefaceDetectionType)iDetectionType detectionIndex:(int)iDetectionIndex
{
}

