处理文本 - 文本属性及布局
matplotlib.text.Text实例有各种属性,可以通过关键字参数配置文本命令(例如,title(),xlabel()和text())。
| 属性 | 值类型 | |
|---|---|---|
| alpha | 浮点 | |
| backgroundcolor | 任何 matplotlib 颜色 | |
| bbox | rectangle prop dict plus key ‘pad’ which is a pad in points | |
| clip_box | matplotlib.transform.Bbox 实例 | |
| clip_on | [True / False] | |
| clip_path | Path,Transform或Patch 实例 | |
| color | 任何 matplotlib 颜色 | |
| family | [ 'serif' / 'sans-serif' / 'cursive' / 'fantasy' / 'monospace' ] | |
| fontproperties | matplotlib.font_manager.FontProperties 实例 | |
| horizontalalignment or ha | [ 'center' / 'right' / 'left' ] | |
| label | 任何字符串 | |
| linespacing | 浮点 | |
| multialignment | ['left' / 'right' / 'center' ] | |
| name or fontname | 字符串,例如 ['Sans' / 'Courier' / 'Helvetica' ...] | |
| picker | [None / 浮点 / 布尔值 / 可调用对象]` | |
| position | (x,y) | |
| rotation | [ 角度制的角度 / ‘vertical’ / ‘horizontal’ | |
| size or fontsize | [ 点的尺寸 | 相对尺寸,例如 ['smaller', 'x-large' ] |
| style or fontstyle | [ 'normal' / 'italic' / 'oblique'] | |
| text | 字符串或任何可使用'%s'打印的东西 | |
| transform | matplotlib.transform 实例 | |
| variant | [ 'normal' / 'small-caps' ] | |
| verticalalignment or va | [ 'center' / 'top' / 'bottom' / 'baseline' ] | |
| visible | [True / False] | |
| weight or fontweight | [ 'normal' / 'bold' / 'heavy' / 'light' / 'ultrabold' / 'ultralight'] | |
| x | 浮点 | |
| y | 浮点 | |
| zorder | 任意数值 |
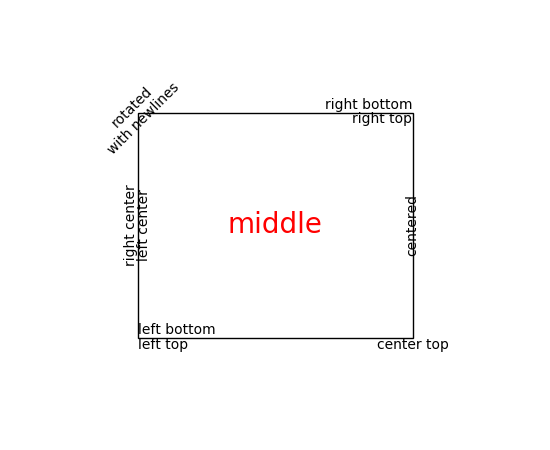
你可以使用对齐参数horizontalalignment,verticalalignment和multialignment来布置文本。 horizontalalignment控制文本的x位置参数表示文本边界框的左边,中间或右边。 verticalalignment控制文本的y位置参数表示文本边界框的底部,中心或顶部。 multialignment,仅对于换行符分隔的字符串,控制不同的行是左,中还是右对齐。 这里是一个使用text()命令显示各种对齐方式的例子。 在整个代码中使用transform = ax.transAxes,表示坐标相对于轴边界框给出,其中0,0是轴的左下角,1,1是右上角。
import matplotlib.pyplot as pltimport matplotlib.patches as patches# build a rectangle in axes coordsleft, width = .25, .5bottom, height = .25, .5right = left + widthtop = bottom + heightfig = plt.figure()ax = fig.add_axes([0,0,1,1])# axes coordinates are 0,0 is bottom left and 1,1 is upper rightp = patches.Rectangle((left, bottom), width, height,fill=False, transform=ax.transAxes, clip_on=False)ax.add_patch(p)ax.text(left, bottom, 'left top',horizontalalignment='left',verticalalignment='top',transform=ax.transAxes)ax.text(left, bottom, 'left bottom',horizontalalignment='left',verticalalignment='bottom',transform=ax.transAxes)ax.text(right, top, 'right bottom',horizontalalignment='right',verticalalignment='bottom',transform=ax.transAxes)ax.text(right, top, 'right top',horizontalalignment='right',verticalalignment='top',transform=ax.transAxes)ax.text(right, bottom, 'center top',horizontalalignment='center',verticalalignment='top',transform=ax.transAxes)ax.text(left, 0.5*(bottom+top), 'right center',horizontalalignment='right',verticalalignment='center',rotation='vertical',transform=ax.transAxes)ax.text(left, 0.5*(bottom+top), 'left center',horizontalalignment='left',verticalalignment='center',rotation='vertical',transform=ax.transAxes)ax.text(0.5*(left+right), 0.5*(bottom+top), 'middle',horizontalalignment='center',verticalalignment='center',fontsize=20, color='red',transform=ax.transAxes)ax.text(right, 0.5*(bottom+top), 'centered',horizontalalignment='center',verticalalignment='center',rotation='vertical',transform=ax.transAxes)ax.text(left, top, 'rotated\nwith newlines',horizontalalignment='center',verticalalignment='center',rotation=45,transform=ax.transAxes)ax.set_axis_off()plt.show()