5. 插件扩展 - 5.1 访问控制
# 访问控制
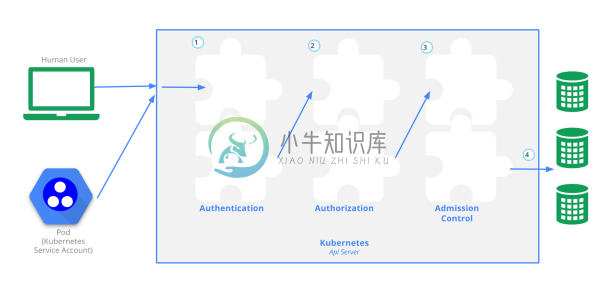
Kubernetes 对 API 访问提供了三种安全访问控制措施:认证、授权和 Admission Control。认证解决用户是谁的问题,授权解决用户能做什么的问题,Admission Control 则是资源管理方面的作用。通过合理的权限管理,能够保证系统的安全可靠。
Kubernetes 集群的所有操作基本上都是通过 kube-apiserver 这个组件进行的,它提供 HTTP RESTful 形式的 API 供集群内外客户端调用。需要注意的是:认证授权过程只存在 HTTPS 形式的 API 中。也就是说,如果客户端使用 HTTP 连接到 kube-apiserver,那么是不会进行认证授权的。所以说,可以这么设置,在集群内部组件间通信使用 HTTP,集群外部就使用 HTTPS,这样既增加了安全性,也不至于太复杂。
下图是 API 访问要经过的三个步骤,前面两个是认证和授权,第三个是 Admission Control。

认证
开启 TLS 时,所有的请求都需要首先认证。Kubernetes 支持多种认证机制,并支持同时开启多个认证插件(只要有一个认证通过即可)。如果认证成功,则用户的 username 会传入授权模块做进一步授权验证;而对于认证失败的请求则返回 HTTP 401。
[warning] Kubernetes 不管理用户
虽然 Kubernetes 认证和授权用到了 username,但 Kubernetes 并不直接管理用户,不能创建
user对象,
也不存储 username。但是 Kubernetes 提供了 Service Account,用来与 API 交互。
目前,Kubernetes 支持以下认证插件:
- X509 证书
- 静态 Token 文件
- 引导 Token
- 静态密码文件
- Service Account
- OpenID
- Webhook
- 认证代理
- OpenStack Keystone 密码
X509 证书
使用 X509 客户端证书只需要 API Server 启动时配置 --client-ca-file=SOMEFILE。在证书认证时,其 CN 域用作用户名,而组织机构域则用作 group 名。
创建一个客户端证书的方法为:
openssl req -new -key jbeda.pem -out jbeda-csr.pem -subj "/CN=jbeda/O=app1/O=app2"
静态 Token 文件
使用静态 Token 文件认证只需要 API Server 启动时配置 --token-auth-file=SOMEFILE。该文件为 csv 格式,每行至少包括三列 token,username,user id,后面是可选的 group 名,比如
token,user,uid,"group1,group2,group3"
客户端在使用 token 认证时,需要在请求头中加入 Bearer Authorization 头,比如
Authorization: Bearer 31ada4fd-adec-460c-809a-9e56ceb75269
引导 Token
引导 Token 是动态生成的,存储在 kube-system namespace 的 Secret 中,用来部署新的 Kubernetes 集群。
使用引导 Token 需要 API Server 启动时配置 --experimental-bootstrap-token-auth,并且 Controller Manager 开启 TokenCleaner --controllers=*,tokencleaner,bootstrapsigner。
在使用 kubeadm 部署 Kubernetes 时,kubeadm 会自动创建默认 token,可通过 kubeadm token list 命令查询。
静态密码文件
需要 API Server 启动时配置 --basic-auth-file=SOMEFILE,文件格式为 csv,每行至少三列 password, user, uid,后面是可选的 group 名,如
password,user,uid,"group1,group2,group3"
客户端在使用密码认证时,需要在请求头重加入 Basic Authorization 头,如
Authorization: Basic BASE64ENCODED(USER:PASSWORD)
Service Account
ServiceAccount 是 Kubernetes 自动生成的,并会自动挂载到容器的 /var/run/secrets/kubernetes.io/serviceaccount 目录中。
在认证时,ServiceAccount 的用户名格式为 system:serviceaccount:(NAMESPACE):(SERVICEACCOUNT),并从属于两个 group:system:serviceaccounts 和 system:serviceaccounts:(NAMESPACE)。
OpenID
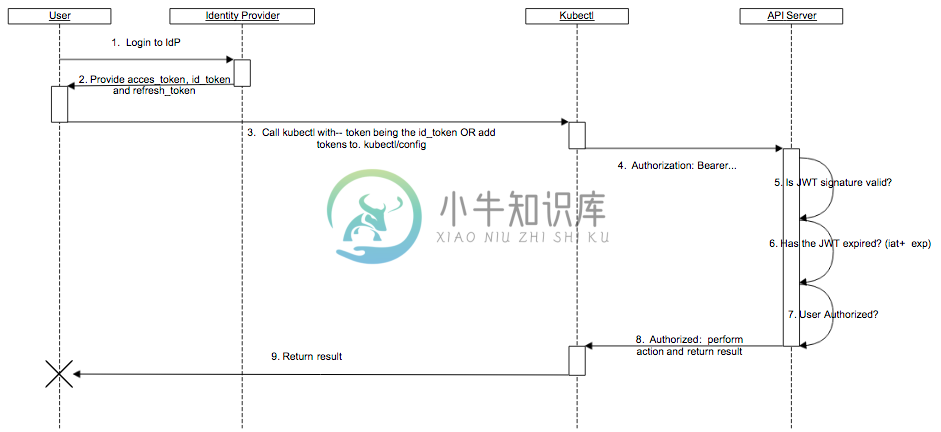
OpenID 提供了 OAuth2 的认证机制,是很多云服务商(如 GCE、Azure 等)的首选认证方法。

使用 OpenID 认证,API Server 需要配置
--oidc-issuer-url,如https://accounts.google.com--oidc-client-id,如kubernetes--oidc-username-claim,如sub--oidc-groups-claim,如groups--oidc-ca-file,如/etc/kubernetes/ssl/kc-ca.pem
Webhook
API Server 需要配置
# 配置如何访问 webhook server--authentication-token-webhook-config-file# 默认 2 分钟--authentication-token-webhook-cache-ttl
配置文件格式为
# clusters refers to the remote service.clusters:- name: name-of-remote-authn-servicecluster:# CA for verifying the remote service.certificate-authority: /path/to/ca.pem# URL of remote service to query. Must use 'https'.server: https://authn.example.com/authenticate# users refers to the API server's webhook configuration.users:- name: name-of-api-serveruser:# cert for the webhook plugin to useclient-certificate: /path/to/cert.pem# key matching the certclient-key: /path/to/key.pem# kubeconfig files require a context. Provide one for the API server.current-context: webhookcontexts:- context:cluster: name-of-remote-authn-serviceuser: name-of-api-severname: webhook
Kubernetes 发给 webhook server 的请求格式为
{"apiVersion": "authentication.k8s.io/v1beta1","kind": "TokenReview","spec": {"token": "(BEARERTOKEN)"}}
示例:kubernetes-github-authn 实现了一个基于 WebHook 的 github 认证。
认证代理
API Server 需要配置
--requestheader-username-headers=X-Remote-User--requestheader-group-headers=X-Remote-Group--requestheader-extra-headers-prefix=X-Remote-Extra-# 为了防止头部欺骗,证书是必选项--requestheader-client-ca-file# 设置允许的 CN 列表。可选。--requestheader-allowed-names
OpenStack Keystone 密码
需要 API Server 在启动时指定 --experimental-keystone-url=<AuthURL>,而 https 时还需要设置 --experimental-keystone-ca-file=SOMEFILE。
[warning] 不支持 Keystone v3
目前只支持 keystone v2.0,不支持 v3(无法传入 domain)。
匿名请求
如果使用 AlwaysAllow 以外的认证模式,则匿名请求默认开启,但可用 --anonymous-auth=false 禁止匿名请求。
匿名请求的用户名格式为 system:anonymous,而 group 则为 system:unauthenticated。
授权
授权主要是用于对集群资源的访问控制,通过检查请求包含的相关属性值,与相对应的访问策略相比较,API 请求必须满足某些策略才能被处理。跟认证类似,Kubernetes 也支持多种授权机制,并支持同时开启多个授权插件(只要有一个验证通过即可)。如果授权成功,则用户的请求会发送到准入控制模块做进一步的请求验证;对于授权失败的请求则返回 HTTP 403。
Kubernetes 授权仅处理以下的请求属性:
- user, group, extra
- API、请求方法(如 get、post、update、patch 和 delete)和请求路径(如
/api) - 请求资源和子资源
- Namespace
- API Group
目前,Kubernetes 支持以下授权插件:
- ABAC
- RBAC
- Webhook
- Node
[info] AlwaysDeny 和 AlwaysAllow
Kubernetes 还支持 AlwaysDeny 和 AlwaysAllow 模式,其中 AlwaysDeny 仅用来测试,而 AlwaysAllow 则
允许所有请求(会覆盖其他模式)。
ABAC 授权
使用 ABAC 授权需要 API Server 配置 --authorization-policy-file=SOME_FILENAME,文件格式为每行一个 json 对象,比如
{"apiVersion": "abac.authorization.kubernetes.io/v1beta1","kind": "Policy","spec": {"group": "system:authenticated","nonResourcePath": "*","readonly": true}}{"apiVersion": "abac.authorization.kubernetes.io/v1beta1","kind": "Policy","spec": {"group": "system:unauthenticated","nonResourcePath": "*","readonly": true}}{"apiVersion": "abac.authorization.kubernetes.io/v1beta1","kind": "Policy","spec": {"user": "admin","namespace": "*","resource": "*","apiGroup": "*"}}
RBAC 授权
见 RBAC 授权。
WebHook 授权
使用 WebHook 授权需要 API Server 配置 --authorization-webhook-config-file=SOME_FILENAME 和 --runtime-config=authorization.k8s.io/v1beta1=true,配置文件格式同 kubeconfig,如
# clusters refers to the remote service.clusters:- name: name-of-remote-authz-servicecluster:# CA for verifying the remote service.certificate-authority: /path/to/ca.pem# URL of remote service to query. Must use 'https'.server: https://authz.example.com/authorize# users refers to the API Server's webhook configuration.users:- name: name-of-api-serveruser:# cert for the webhook plugin to useclient-certificate: /path/to/cert.pem# key matching the certclient-key: /path/to/key.pem# kubeconfig files require a context. Provide one for the API Server.current-context: webhookcontexts:- context:cluster: name-of-remote-authz-serviceuser: name-of-api-servername: webhook
API Server 请求 Webhook server 的格式为
{"apiVersion": "authorization.k8s.io/v1beta1","kind": "SubjectAccessReview","spec": {"resourceAttributes": {"namespace": "kittensandponies","verb": "get","group": "unicorn.example.org","resource": "pods"},"user": "jane","group": ["group1","group2"]}}
而 Webhook server 需要返回授权的结果,允许 (allowed=true) 或拒绝(allowed=false):
{"apiVersion": "authorization.k8s.io/v1beta1","kind": "SubjectAccessReview","status": {"allowed": true}}
Node 授权
v1.7 + 支持 Node 授权,配合 NodeRestriction 准入控制来限制 kubelet 仅可访问 node、endpoint、pod、service 以及 secret、configmap、PV 和 PVC 等相关的资源,配置方法为
--authorization-mode=Node,RBAC --admission-control=...,NodeRestriction,...
注意,kubelet 认证需要使用 system:nodes 组,并使用用户名 system:node:<nodeName>。

