9.4 波浪效果(Wave Effect)
优质
小牛编辑
134浏览
2023-12-01
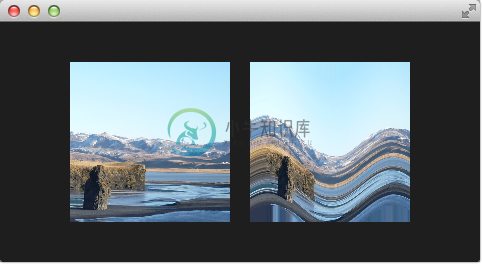
在这个更加复杂的例子中,我们使用片段着色器创建一个波浪效果。波浪的形成是基于sin曲线,并且它影响了使用的纹理坐标的颜色。
import QtQuick 2.0

Rectangle {
    width: 480; height: 240
    color: '#1e1e1e'

    Row {
        anchors.centerIn: parent
        spacing: 20
        Image {
            id: sourceImage
            width: 160; height: width
            source: "assets/coastline.jpg"
        }
        ShaderEffect {
            width: 160; height: width
            property variant source: sourceImage
            property real frequency: 8
            property real amplitude: 0.1
            property real time: 0.0
            NumberAnimation on time {
                from: 0; to: Math.PI*2; duration: 1000; loops: Animation.Infinite
            }

            fragmentShader: "
                varying highp vec2 qt_TexCoord0;
                uniform sampler2D source;
                uniform lowp float qt_Opacity;
                uniform highp float frequency;
                uniform highp float amplitude;
                uniform highp float time;
                void main() {
                    highp vec2 pulse = sin(time - frequency * qt_TexCoord0);
                    highp vec2 coord = qt_TexCoord0 + amplitude * vec2(pulse.x, -pulse.x);
                    gl_FragColor = texture2D(source, coord) * qt_Opacity;
                }"
        }
    }
}
波浪的计算是基于一个脉冲与纹理坐标的操作。我们使用一个基于当前时间与使用的纹理坐标的sin波浪方程式来实现脉冲。
highp vec2 pulse = sin(time - frequency * qt_TexCoord0);
离开了时间的因素,我们仅仅只有扭曲,而不是像波浪一样运动的扭曲。
我们使用不同的纹理坐标作为颜色。
highp vec2 coord = qt_TexCoord0 + amplitude * vec2(pulse.x, -pulse.x);
纹理坐标受我们的x脉冲值影响,结果就像一个移动的波浪。

如果我们没有在片段着色器中使用像素的移动,这个效果可以首先考虑使用顶点着色器来完成。

