
如何使用
使用步骤
使用JustAuth总共分三步(这三步也适合于JustAuth支持的任何一个平台):
- 申请注册第三方平台的开发者账号
- 创建第三方平台的应用,获取配置信息(
accessKey,secretKey,redirectUri) - 使用该工具实现授权登陆
使用方式
- 引入依赖
<dependency>
    <groupId>me.zhyd.oauth</groupId>
    <artifactId>JustAuth</artifactId>
    <version>${latest.version}</version>
</dependency>
获取最新版本:JustAuth (opens new window)
- 调用api
// 创建授权request
AuthRequest authRequest = new AuthGiteeRequest(AuthConfig.builder()
        .clientId("clientId")
        .clientSecret("clientSecret")
        .redirectUri("redirectUri")
        .build());
// 生成授权页面
authRequest.authorize("state");
// 授权登录后会返回code(auth_code(仅限支付宝))、state,1.8.0版本后,可以用AuthCallback类作为回调接口的参数
// 注:JustAuth默认保存state的时效为3分钟,3分钟内未使用则会自动清除过期的state
authRequest.login(callback);
注意
JustAuth从v1.14.0 (opens new window)开始默认集成了的simple-http (opens new window)作为HTTP通用接口(更新说明见JustAuth 1.14.0版本正式发布!完美解耦HTTP工具 (opens new window)),鉴于一般项目中都已经集成了HTTP工具,比如OkHttp3、apache HttpClient、hutool-http,因此为了减少不必要的依赖,从v1.14.0 (opens new window)开始JustAuth将不会默认集成hutool-http,如果开发者的项目是全新的或者项目内没有集成HTTP实现工具,请自行添加对应的HTTP实现类,备选依赖如下:
hutool-http 点击查看代码
<dependency>
  <groupId>cn.hutool</groupId>
  <artifactId>hutool-http</artifactId>
  <version>5.3.9</version>
</dependency>
httpclient 点击查看代码
<dependency>
  <groupId>org.apache.httpcomponents</groupId>
  <artifactId>httpclient</artifactId>
  <version>4.5.12</version>
</dependency>
okhttp 点击查看代码
<dependency>
  <groupId>com.squareup.okhttp3</groupId>
  <artifactId>okhttp</artifactId>
  <version>4.8.0</version>
</dependency>
使用国外平台
由于 Q 的限制,在使用国外平台时,需要额外配置 httpConfig,如下:
AuthRequest authRequest = new AuthGoogleRequest(AuthConfig.builder()
                .clientId("Client ID")
                .clientSecret("Client Secret")
                .redirectUri("应用回调地址")
                // 针对国外平台配置代理
                .httpConfig(HttpConfig.builder()
                        // Http 请求超时时间
                        .timeout(15000)
                        // host 和 port 请修改为开发环境的参数
                        .proxy(new Proxy(Proxy.Type.HTTP, new InetSocketAddress("127.0.0.1", 10080)))
                        .build())
                .build());
注意
使用代理时,必须开启全局代理! 开启全局代理! 开启全局代理!,不能只开启浏览器代理。
HttpConfig 配置说明
- timeout: http 请求超时时间
- proxy
- host: 本地一般为
127.0.0.1,如果部署到服务器,可以配置为公网 IP - port: 需要根据使用的
唯皮嗯软件修改,以我本地使用的某款工具为例,查看代理端口: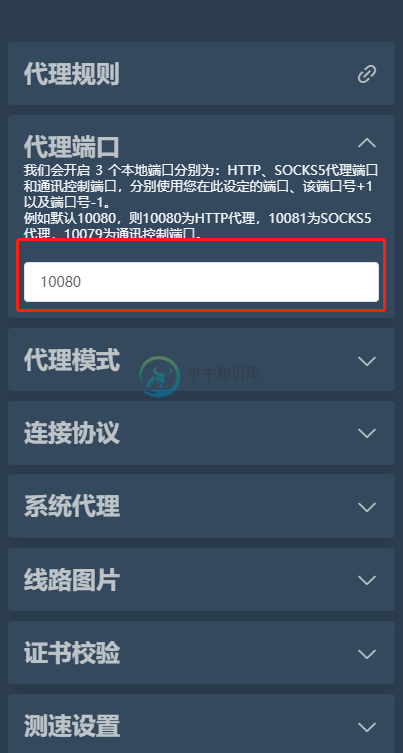
- host: 本地一般为
再比如以下参考: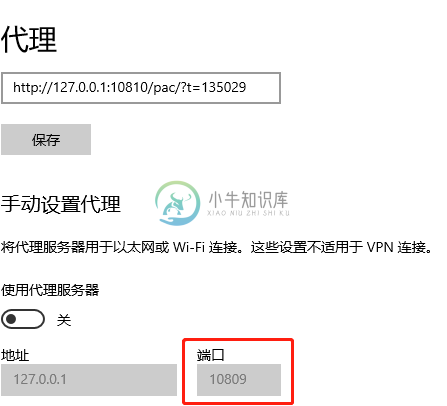
本地如果支持科学上网,就用自己本地的代理端口即可,如果不支持科学上网,可以去网上找一些免费的代理IP进行测试(请自行操作)。
友情提示,经测试,需要单独配置 httpConfig 的平台有:
- Github
- 其他待补充
API分解
JustAuth的核心就是一个个的request,每个平台都对应一个具体的request类,所以在使用之前,需要就具体的授权平台创建响应的request
// 创建授权request
AuthRequest authRequest = new AuthGiteeRequest(AuthConfig.builder()
        .clientId("clientId")
        .clientSecret("clientSecret")
        .redirectUri("redirectUri")
        .build());
获取授权链接
String authorizeUrl = authRequest.authorize("state");
获取到authorizeUrl后,可以手动实现redirect到authorizeUrl上
伪代码
/**
 *
 * @param source 第三方授权平台,以本例为参考,该值为gitee(因为上面声明的AuthGiteeRequest)
 */
@RequestMapping("/render/{source}")
public void renderAuth(@PathVariable("source") String source, HttpServletResponse response) throws IOException {
    AuthRequest authRequest = getAuthRequest(source);
    String authorizeUrl = authRequest.authorize(AuthStateUtils.createState());
    response.sendRedirect(authorizeUrl);
}
注:state建议必传!state在OAuth的流程中的主要作用就是保证请求完整性,防止CSRF风险,此处传的state将在回调时传回
登录(获取用户信息)
AuthResponse response = authRequest.login(callback);
授权登录后会返回code(auth_code(仅限支付宝)、authorization_code(仅限华为))、state,1.8.0版本后,用AuthCallback类作为回调接口的入参
伪代码
/**
 *
 * @param source 第三方授权平台,以本例为参考,该值为gitee(因为上面声明的AuthGiteeRequest)
 */
@RequestMapping("/callback/{source}")
public Object login(@PathVariable("source") String source, AuthCallback callback) {
    AuthRequest authRequest = getAuthRequest(source);
    AuthResponse response = authRequest.login(callback);
    return response;
}
注:第三方平台中配置的授权回调地址,以本文为例,在创建授权应用时的回调地址应为:[host]/callback/gitee
刷新token
注:refresh功能,并不是每个平台都支持
AuthResponse response = authRequest.refresh(AuthToken.builder().refreshToken(token).build());
伪代码
/**
 *
 * @param source 第三方授权平台,以本例为参考,该值为gitee(因为上面声明的AuthGiteeRequest)
 * @param token  login成功后返回的refreshToken
 */
@RequestMapping("/refresh/{source}")
public Object refreshAuth(@PathVariable("source") String source, String token){
    AuthRequest authRequest = getAuthRequest(source);
    return authRequest.refresh(AuthToken.builder().refreshToken(token).build());
}
取消授权
注:revoke功能,并不是每个平台都支持
AuthResponse response = authRequest.revoke(AuthToken.builder().accessToken(token).build());
伪代码
/**
 *
 * @param source 第三方授权平台,以本例为参考,该值为gitee(因为上面声明的AuthGiteeRequest)
 * @param token  login成功后返回的accessToken
 */
@RequestMapping("/revoke/{source}/{token}")
public Object revokeAuth(@PathVariable("source") String source, @PathVariable("token") String token) throws IOException {
    AuthRequest authRequest = getAuthRequest(source);
    return authRequest.revoke(AuthToken.builder().accessToken(token).build());
}
参考文章
- 实现Gitee授权登录 (opens new window)
- 实现Github授权登录 (opens new window)
- Spring Boot 快速集成第三方登录功能 (opens new window) : QQ、Github、微信、谷歌、微软、小米、企业微信
- 集成企业微信 (opens new window)
配套项目
- JustAuth-demo (opens new window):普通版springboot项目demo
- jFinal版 (opens new window): Jfinal集成JustAuth的demo by xkcoding (opens new window)
- ActFramework版 (opens new window): ActFramework 集成 JustAuth 的 demo by xkcoding (opens new window)
- Nutzboot版 (opens new window): NutzBoot集成JustAuth的demo by 蛋蛋 (opens new window)
- Blade版 (opens new window): Blade集成JustAuth的demo
SpringBoot插件
- justauth-spring-boot-starter (opens new window): Spring Boot 集成 JustAuth 的最佳实践 by xkcoding (opens new window)
- justauth-spring-security-starter (opens new window): JustAuth整合Spring security的 starter依赖 by luoqiz (opens new window)