
百度登录
1. 申请应用
1.1 登录百度开发者中心
- 注册百度开发者账号:百度Passport (opens new window)。如果已有则忽略该步骤,直接进入第二步。
- 登录百度开发者中心:百度开发者中心 (opens new window)
1.2 创建第三方授权应用
- 进入百度开发者控制台应用管理页面:应用管理 (opens new window)
- 单击“创建工程”,开始创建应用。


记录以下三个信息:API Key、Secret Key和应用回调地址,后面我们会用到。
注: API Key、Secret Key 在“基本信息”页面 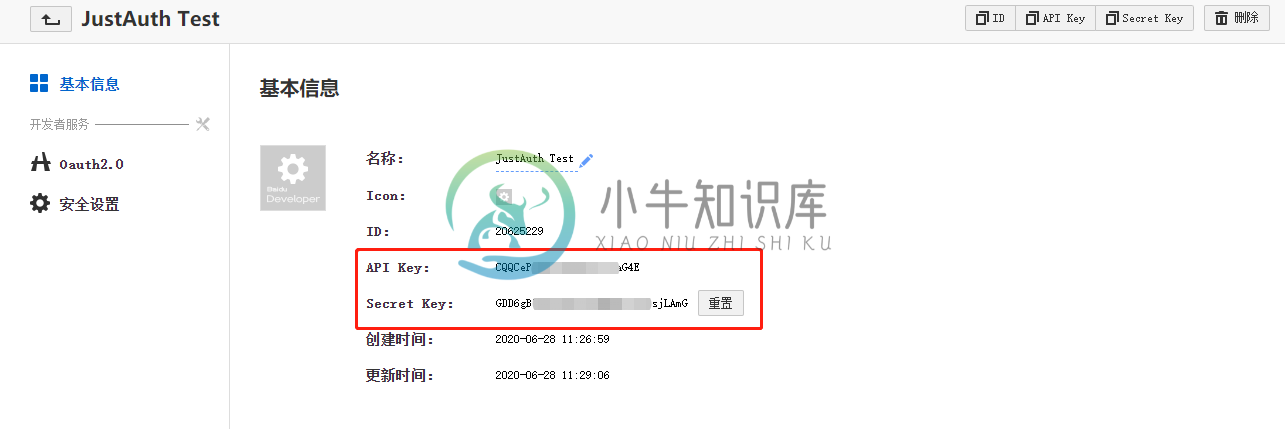
重要提示
“应用密钥”可保护你应用程序的安全,因此请确保其不会泄露!也不要与任何人共享你的“应用密钥”!!!
2. 集成JustAuth
2.1 引入依赖
<dependency>
  <groupId>me.zhyd.oauth</groupId>
  <artifactId>JustAuth</artifactId>
  <version>${latest.version}</version>
</dependency>
${latest.version}表示当前最新的版本,可以在这儿 (opens new window)获取最新的版本信息。
2.2 创建Request
AuthRequest authRequest = new AuthBaiduRequest(AuthConfig.builder()
                .clientId("Client ID")
                .clientSecret("Client Secret")
                .redirectUri("应用回调地址")
                .build());
2.3 生成授权地址
我们可以直接使用以下方式生成第三方平台的授权链接:
String authorizeUrl = authRequest.authorize(AuthStateUtils.createState());
这个链接我们可以直接后台重定向跳转,也可以返回到前端后,前端控制跳转。前端控制的好处就是,可以将第三方的授权页嵌入到iframe中,适配网站设计。
2.4 以上完整代码如下
import me.zhyd.oauth.config.AuthConfig;
import me.zhyd.oauth.request.AuthBaiduRequest;
import me.zhyd.oauth.model.AuthCallback;
import me.zhyd.oauth.request.AuthRequest;
import me.zhyd.oauth.utils.AuthStateUtils;
import org.springframework.web.bind.annotation.PathVariable;
import org.springframework.web.bind.annotation.RequestMapping;
import org.springframework.web.bind.annotation.RestController;

import javax.servlet.http.HttpServletResponse;
import java.io.IOException;


@RestController
@RequestMapping("/oauth")
public class RestAuthController {

    @RequestMapping("/render")
    public void renderAuth(HttpServletResponse response) throws IOException {
        AuthRequest authRequest = getAuthRequest();
        response.sendRedirect(authRequest.authorize(AuthStateUtils.createState()));
    }

    @RequestMapping("/callback")
    public Object login(AuthCallback callback) {
        AuthRequest authRequest = getAuthRequest();
        return authRequest.login(callback);
    }

    private AuthRequest getAuthRequest() {
        return new AuthBaiduRequest(AuthConfig.builder()
                .clientId("API Key")
                .clientSecret("Secret Key")
                .redirectUri("应用回调地址")
                .build());
    }
}
授权链接访问成功后会看到以下页面内容: 
点击“授权”即可完成 OAuth 登录。
3. 授权结果
注意
数据已脱敏
{
    "code":2000,
    "data":{
        "avatar":"http://himg.bdimg.com/sys/portrait/item/1ea2e5878cxxxe4b8bf4882.jpg",
        "gender":"MALE",
        "nickname":"凌***丿",
        "rawUserInfo":{
            "birthday":"2009-04-05",
            "openid":"oD0ag_m52Xxxxxx6wWP2Dbm1X",
            "sex":"1",
            "is_realname":"1",
            "portrait":"1ea2e5878cxxx4b8bf4882",
            "is_bind_mobile":"1",
            "blood":"2",
            "username":"凌***丿"
        },
        "source":"BAIDU",
        "token":{
            "accessToken":"121.7f063a00b80xxxP8H6YxcJqD.C3r33w",
            "expireIn":2592000,
            "refreshToken":"122.b8cff99fe00cbxxxxZt-xSF906TGkEmPvdEn.IUdj0g",
            "scope":"basic"
        },
        "username":"凌***丿",
        "uuid":"oD0ag_m52xxxWP2Dbm1X"
    }
}
3. 推荐
官方推荐使用 JustAuth-demo (opens new window) 示例项目进行测试。
使用步骤:
- clone: https://github.com/justauth/JustAuth-demo.git (opens new window)
- 将上面申请的应用信息填入到
RestAuthController#getAuthRequest方法的对应位置中:
- 启动项目,访问 http://localhost:8443 (opens new window)
- 选择对应的平台进行授权登录

- 登录完成后,可以访问http://localhost:8443/users (opens new window)查看已授权的用户

注意
- 如果直接使用 JustAuth-demo 项目进行测试,那么在配置测试应用的“回调地址”时要严格按照以下格式配置:
http://localhost:8443/oauth/callback/{平台名} - 平台名参考
JustAuthPlatformInfo枚举类names