Generate Excel
优质
小牛编辑
135浏览
2023-12-01
以下示例说明如何使用Spring Web MVC Framework生成Excel。 首先,让我们使用一个可用的Eclipse IDE,并坚持以下步骤,使用Spring Web Framework开发基于动态表单的Web应用程序。
| 步 | 描述 |
|---|---|
| 1 | 在Spring MVC - Hello World章节中解释,在cn.xnip包下创建一个名为TestWeb的项目。 |
| 2 | 在cn.xnip包下创建Java类UserExcelView和ExcelController。 |
| 3 | 从maven存储库页面下载Apache POI库Apache POI 。 把它放在你的CLASSPATH中。 |
| 4 | 最后一步是创建源文件和配置文件的内容并导出应用程序,如下所述。 |
ExcelController.java
package cn.xnip;
import java.util.HashMap;
import java.util.Map;
import javax.servlet.http.HttpServletRequest;
import javax.servlet.http.HttpServletResponse;
import org.springframework.web.servlet.ModelAndView;
import org.springframework.web.servlet.mvc.AbstractController;
public class ExcelController extends AbstractController {
   @Override
   protected ModelAndView handleRequestInternal(HttpServletRequest request,
      HttpServletResponse response) throws Exception {
      //user data
      Map<String,String> userData = new HashMap<String,String>();
      userData.put("1", "Mahesh");
      userData.put("2", "Suresh");
      userData.put("3", "Ramesh");
      userData.put("4", "Naresh");
      return new ModelAndView("UserSummary","userData",userData);
   }
}
UserExcelView.java
package cn.xnip;
import java.util.Map;
import javax.servlet.http.HttpServletRequest;
import javax.servlet.http.HttpServletResponse;
import org.apache.poi.hssf.usermodel.HSSFRow;
import org.apache.poi.hssf.usermodel.HSSFSheet;
import org.apache.poi.hssf.usermodel.HSSFWorkbook;
import org.springframework.web.servlet.view.document.AbstractExcelView;
public class UserExcelView extends AbstractExcelView {
   @Override
   protected void buildExcelDocument(Map<String, Object> model,
      HSSFWorkbook workbook, HttpServletRequest request, HttpServletResponse response)
      throws Exception {
      Map<String,String> userData = (Map<String,String>) model.get("userData");
      //create a wordsheet
      HSSFSheet sheet = workbook.createSheet("User Report");
      HSSFRow header = sheet.createRow(0);
      header.createCell(0).setCellValue("Roll No");
      header.createCell(1).setCellValue("Name");
      int rowNum = 1;
      for (Map.Entry<String, String> entry : userData.entrySet()) {
         //create the row data
         HSSFRow row = sheet.createRow(rowNum++);
         row.createCell(0).setCellValue(entry.getKey());
         row.createCell(1).setCellValue(entry.getValue());
      }
   }
}
TestWeb-servlet.xml
<beans xmlns = "http://www.springframework.org/schema/beans"
   xmlns:context = "http://www.springframework.org/schema/context"
   xmlns:xsi = "http://www.w3.org/2001/XMLSchema-instance"
   xmlns:mvc = "http://www.springframework.org/schema/mvc"
   xsi:schemaLocation = "
   http://www.springframework.org/schema/beans
   http://www.springframework.org/schema/beans/spring-beans-3.0.xsd
   http://www.springframework.org/schema/context
   http://www.springframework.org/schema/context/spring-context-3.0.xsd
   http://www.springframework.org/schema/mvc
   http://www.springframework.org/schema/mvc/spring-mvc-3.0.xsd">
   <bean class = "org.springframework.web.servlet.mvc.support.ControllerClassNameHandlerMapping" />
   <bean class = "cn.xnip.ExcelController" />
   <bean class = "org.springframework.web.servlet.view.XmlViewResolver">
      <property name = "location">
         <value>/WEB-INF/views.xml</value>
      </property>
   </bean>
</beans>
views.xml
<beans xmlns = "http://www.springframework.org/schema/beans"
   xmlns:context = "http://www.springframework.org/schema/context"
   xmlns:xsi = "http://www.w3.org/2001/XMLSchema-instance"
   xsi:schemaLocation = "
   http://www.springframework.org/schema/beans
   http://www.springframework.org/schema/beans/spring-beans-3.0.xsd
   http://www.springframework.org/schema/context
   http://www.springframework.org/schema/context/spring-context-3.0.xsd">
   <bean id = "UserSummary" class = "cn.xnip.UserExcelView"></bean>
</beans>
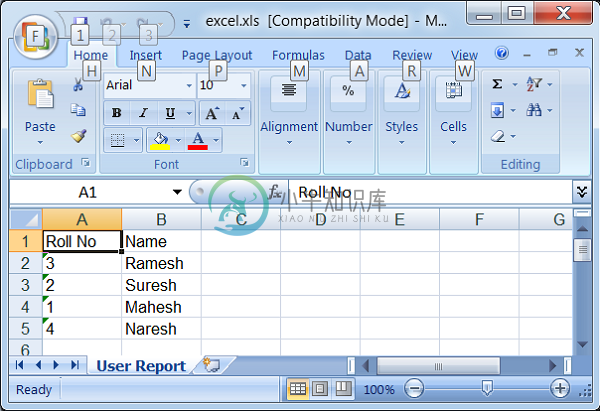
在这里,我们创建了一个ExcelController和一个ExcelView。 Apache POI库处理Microsoft Office文件格式,并将数据转换为Excel文档。
完成创建源文件和配置文件后,导出应用程序。 右键单击您的应用程序,使用Export → WAR File选项并将TestWeb.war文件保存在Tomcat的webapps文件夹中。
现在,启动Tomcat服务器并确保您可以使用标准浏览器从webapps文件夹访问其他网页。 尝试一个URL - http://localhost:8080/TestWeb/excel ,我们将看到以下屏幕。


