
Generate Session URL/Code/Transfer Code Dialog
Generate session URL/code dialog is used to generate a session URL, a file URL or a code template.
To open the dialog to generate the session URL or code, use:
- Session > Generate Session URL/Code command on the main window to generate session URL or code template for the current session. (preferred)
- Manage > Generate Session URL/Code command on the Login dialog to generate session URL or code template for the selected site.
To open the dialog to generate a file transfer code, use:
- Transfer Settings > Generate Code command on the Transfer Options dialog.
To open the dialog to generate the file URL, use:
- File(s) > File Names > Generate File URL command on main window to generate file URL for files selected in the remote file panel.
The dialog has three tabs. Each is described individually.
Use the URL tab to generate a session URL or a file URL. The tab is not available when generating a file transfer code.
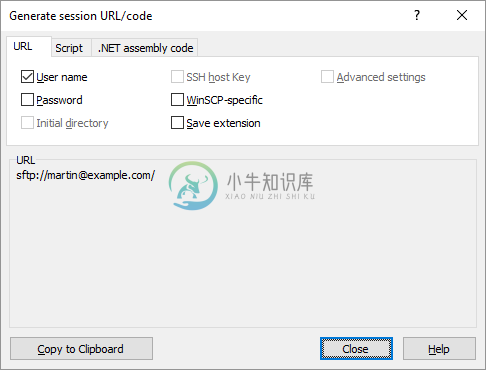
The generated URL always includes a protocol and a host name portions. Other parts can be included optionally.
Check the User name to include username into the URL. The option is not available when the dialog is opened from the Login dialog and the user name was not specified; or (rarely) when the current session did not require the user name.
Check the Password to include password into the URL. Make sure you protect an URL that includes the password appropriately. The option is not available when the dialog is opened from the Login dialog and the password was not specified; or when the current session does not use a password authentication; or when the password was not stored nor remembered.
Check the Initial directory to include an initial remote directory into the URL. When the dialog is opened from the Login dialog, Remote directory as specified on the Advanced site settings dialog is used. When opened from the main window, the current working remote directory is used. The option is not available when generating an URL for selected file(s) as a path to the file(s) is used instead.
Check the SSH host key to include an SSH host key fingerprint into the URL. The option is available for an SFTP and an SCP (SSH-based) sessions only. The option is not available, if no session was opened to the host as the host key is not known yet. Note that some (most) SSH clients need not understand a session URL that includes the host key fingerprint.
Check the WinSCP-specific to generate an WinSCP-specific URL. Note that you need to enable the option with the WebDAV protocol, if you want WinSCP to handle the URL, as WinSCP never registers for the http protocol.
Check the Save extension to include a save extension into the URL. As the extension is WinSCP-specific, the option WinSCP-specific should be selected along.
Check the Advanced settings to serialize all advanced site settings into the URL. As the generated syntax is WinSCP-specific, the option WinSCP-specific should be selected along.
The generated URL(s) is shown in the bottom box. When generating an URL for a site, only one URL is displayed. When generating an URL for a selected file(s), one URL per a file is displayed.
Use the Script tab to generate a WinSCP script template for the session or the file transfer.
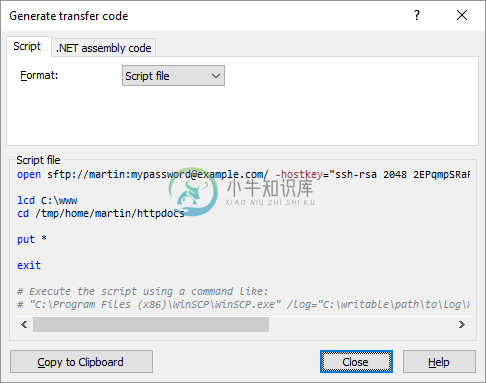
The script will include:
- the
opencommand with the session URL and all other switches needed to configure the session. - (When generating a code for a session) a placeholder text to be replaced with commands.
- (When generating a code for a file transfer) the
cdandlcdcommands to navigate to the source and destination folders of the transfer and theputorgetcommands to actually transfer the files (with all needed switches to setup any non-default transfer settings).- If you had all files selected in the source panel, a code to upload all files from the source directory will be generated.
- If you had only some files selected in the source panel, a code to upload only the selected files (but three at most) will be generated. If file names contain any file mask special characters, they will be escaped.
- the
exitcommand to end the script.
Use the Format to select a format of the script to generate:
- Script file – Generates a script file template that you execute using the
/scriptcommand-line switch. - Batch file – Generates a Windows batch file (
.bat) template that executes thewinscp.comwith the above commands, specified using the/commandcommand-line switch. Additionally the batch file enables session logging using the/logswitch and isolates the script run from a GUI configuration using the/ini=nulswitch. At the end, the batch file checks WinSCP exit code to choose further actions to take; and propagates the WinSCP exit code to a batch file exit code using theexit /bcommand. Make sure you keep the exact format of the multi-linewinscp.comcommand, as multi-line batch file commands are fragile. - Command-line – Generates a command-line for the
winscp.exe(but usable forwinscp.comtoo) with the above commands, session logging and configuration isolation (see the previous point). The command-line is suitable for task managers of all kinds, like Windows Scheduler or SSIS. Depending on your requirements, you may want prepend the/consoleswitch to make the script console visible, while the script is running. - PowerShell script – Generates a PowerShell script file (
.ps1) template that executes thewinscp.comwith the above commands, specified using the/commandcommand-line switch. Additionally the script file enables session logging using the/logswitch and isolates the script run from a GUI configuration using the/ini=nulswitch. At the end, the script file checks WinSCP exit code to choose further actions to take; and propagates the WinSCP exit code to a script exit code using theexitkeyword. Instead of runningwinscp.com, consider Using WinSCP .NET assembly from PowerShell.
In the Command-line (and possibly also in the Batch file), you should modify a path to a session log file in the /log switch.
The script will not include options to verify a host key or an untrusted certificate, if the session was not opened before yet. Open the session at least once, before generating the script.
You can click on script commands and switches and command-line switches to open their respective help pages.
Use the .NET assembly tab to generate a code template using WinSCP .NET assembly for the session or the file transfer.
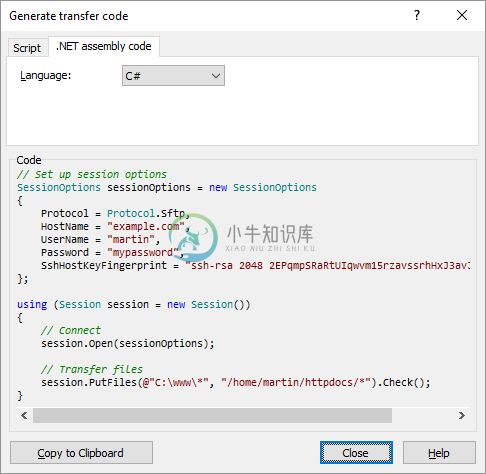
The code will:
- Set up
SessionOptionswith all properties needed to configure the session. - Create
Sessioninstance. - Open the session using
Session.Open - (When generating a code for a session) Include a placeholder text to be replaced with calls to
Sessionmethods. - (When generating a code for a file transfer) Transfer files using
Session.PutFilesorSession.GetFiles. TheTransferOptionsclass instance will be constructed and set up, if any non-default transfer settings are used. TheOperationResultBase.Checkmethod will be called on results of the methods to throw an exception on any error.- If you had all files selected in the source panel, a code to upload all files from the source directory will be generated.
- If you had only some files selected in the source panel, a code to upload only the selected files (but three at most) will be generated. If file names contain any file mask special characters, the
RemotePath.EscapeFileMaskmethod will be called to escape them.
- Dispose the
Sessioninstance.
Use the Language to select a language to generate the template for. Available languages are C#, VB.NET and PowerShell.
The code will not set properties to verify a host key (SessionOptions.SshHostKeyFingerprint) or an untrusted certificate (SessionOptions.TlsHostCertificateFingerprint), if the session was not opened before yet. Open the session at least once, before generating the code.
You can click on classes, methods and properties to open their respective help pages.
Use Copy to Clipboard to copy generated URL(s) or code to a clipboard.
WinSCP GUI cannot be aware of path limitations of your server. So even if your server requires you to start in a specific folder, WinSCP will not generate a code that will start in that folder. You need to add that manually. See How to connect to a server that does not allow an access to the root path?