Installation
This article contains detailed description of downloading and installing WinSCP. You may want to see simplified guide to the process instead.
Most users will prefer installing WinSCP for an easy setup.
Though note that, if you prefer so, you can use WinSCP executable as a portable application with its settings stored in an INI file and no installation required. This configuration is best for using WinSCP from a removable media.
You can obtain WinSCP from the WinSCP download page. You should save the installer to an easily accessible location such as your Microsoft Windows desktop or your My Documents folder.
WinSCP is also available from Microsoft Store.
- If you have WinSCP running, close it. The installer will not run if it finds any instance of WinSCP running.
- Open the installation program by double clicking on its icon.
- The WinSCP installer starts. Follow its instructions.
To upgrade WinSCP, download the newer version, and then install it. The installation will preserve your configuration, and – if necessary – upgrade it.
The new WinSCP version will be installed in your language, unless this particular localization is abandoned for a long time. The installation package contains all the translations that are actively maintained at the time of its release. Otherwise you must install the new translation manually, if available. Any translation from your previous WinSCP version will not work with the new version.
When upgrading Portable executable, just replace the executable files with the new version. New version can always read configuration from the old version.
You can check for rare backward incompatible changes.
In most cases, you may downgrade in the same way as upgrade (i.e. install the old version over the newer one). However safe way is to uninstall the newer version (while keeping your configuration) and only then install the old version.
Note that some of your configurations may be lost when downgrading. To make sure that you will be able to downgrade, you should backup your configuration before the upgrade.
To remove WinSCP, go to Control Panel > Programs > Uninstall a program. This works for the classic installation only. Microsoft Store installation cannot be removed this way.
On Windows 10, you can also use Settings > System > Apps & features. This works for either type of installations. In case you have both installations, to distinguish them, check the program name. The classic installation has a version number in its name (e.g. “WinSCP 5.19.4”), while the Store installation does not (on the other hand, it shows the author name – “Martin Prikryl”, and has Advanced options link and Move command).
During the removal, the uninstaller of the classic installation will ask, if you want to remove WinSCP configuration and other data stored on your computer. When uninstalling the Store installation, its configuration is removed unconditionally (but not the configuration of any previous classic installation).
WinSCP uses Inno Setup as installer. It lets you use optional command-line parameters to automate the installation.
You can use following parameters to automate the installation:
/LANG=language– Runs the installer using the specified language. For thelanguage, use the Code from translations page./SILENT– Runs the installer without any prompts (with the exception of installation mode selection and error messages). Default selections are used for destination folder, components, etc. To select the installation mode, use/ALLUSERSor/CURRENTUSER./VERYSILENT– As/SILENT, but without showing the progress window./ALLUSERS– Instructs installer to install in administrative install mode./CURRENTUSER– Instructs installer to install in non administrative install mode./NORESTART– Instructs installer not to reboot even if it’s necessary./LOG="filename"– Causes Setup to create a log file./LOADINF="filename"– Instructs Setup to load the settings from the specified file after having checked the command line. This file can be prepared using the/SAVEINFparameter./SAVEINF="filename"– Instructs Setup to save installation settings to the specified file./NOCLOSEAPPLICATIONS– Prevents Setup from closing applications using files that need to be updated by Setup.
See full list of Inno Setup setup command line parameters.
WinSCP uninstaller (unins000.exe in WinSCP installation directory) has the same parameters as above (except for /LOADINF and /SAVEINF). See full list of Inno Setup uninstaller command line parameters. When running uninstaller silently, configuration and other data stored on your computer are not removed.
Learn how to create a custom distribution of WinSCP.
Learn how a system administrator can restrict or enforce certain functionality of the application.
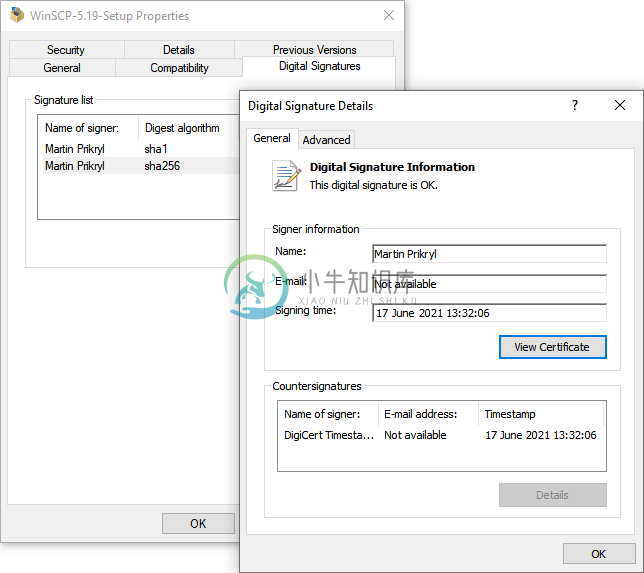
Optionally, as a security measure, you can verify an integrity of the WinSCP installer binary before installing.
In Windows File Explorer display Properties of the installer and verify a signature on the Digital Signatures tab. The installer should be signed by “Martin Prikryl”.
- The EV certificate used to sign the latest installers is valid from 2020-02-10 to 2023-02-17 and has the following SHA-1 thumbprint (hash):
fb845245cfbb0ee97e76c775348caa31d74bec4c - The certificate that was used to sign older installers was valid from 2016-11-17 to 2020-01-23 and has the following SHA-1 thumbprint (hash):
0b3d1c21773b6fd78fbf418a5ea2d91c0e5144d3
The certificate can also be displayed on the User Account Control prompt, when starting an installation for all users.
You can also verify file integrity manually. Find checksums of the installer binary in the release notes or on the installer download page. You can cross-check the checksum against a copy of the release notes on the SourceForge server. Use the certutil tool to calculate a SHA-256 checksum of the downloaded installer and compare it.
C:\...>certutil -hashfile WinSCP-5.19.4-Setup.exe SHA256
SHA256 hash of WinSCP-5.19.4-Setup.exe:
2da66af297a2b6c5b0b3e7fa4754e8c7b5fcc0cfff51a82ab16048d0962737ff
CertUtil: -hashfile command completed successfully.


