
Nginx Controller
Controller Agent
安装
选择
Infrastructure→Instances→Overview,点击Create Instance按钮在弹出的
ADD INSTANCE BY INSTALLING AGENT界面根据步骤说明配置 Controller Agent
wget --no-check-certificate https://nginx-controller.example.com:8443/1.4/install/controller/ -O install.sh
API_KEY='746994a889d9cd83aeeef8fb1a22535d' sh ./install.sh
等待几分钟后 Nginx Controller 会显示 Nginx plus 信息

配置 Metrics 收集
在 Nginx Plus 节点上编辑
/etc/nginx/conf.d/default.conf,开启 NGINX Plus API 访问
# enable /api/ location with appropriate access control in order
# to make use of NGINX Plus API

location /api/ {
    api write=on;
    allow 127.0.0.1;
    deny all;
}
Analytics
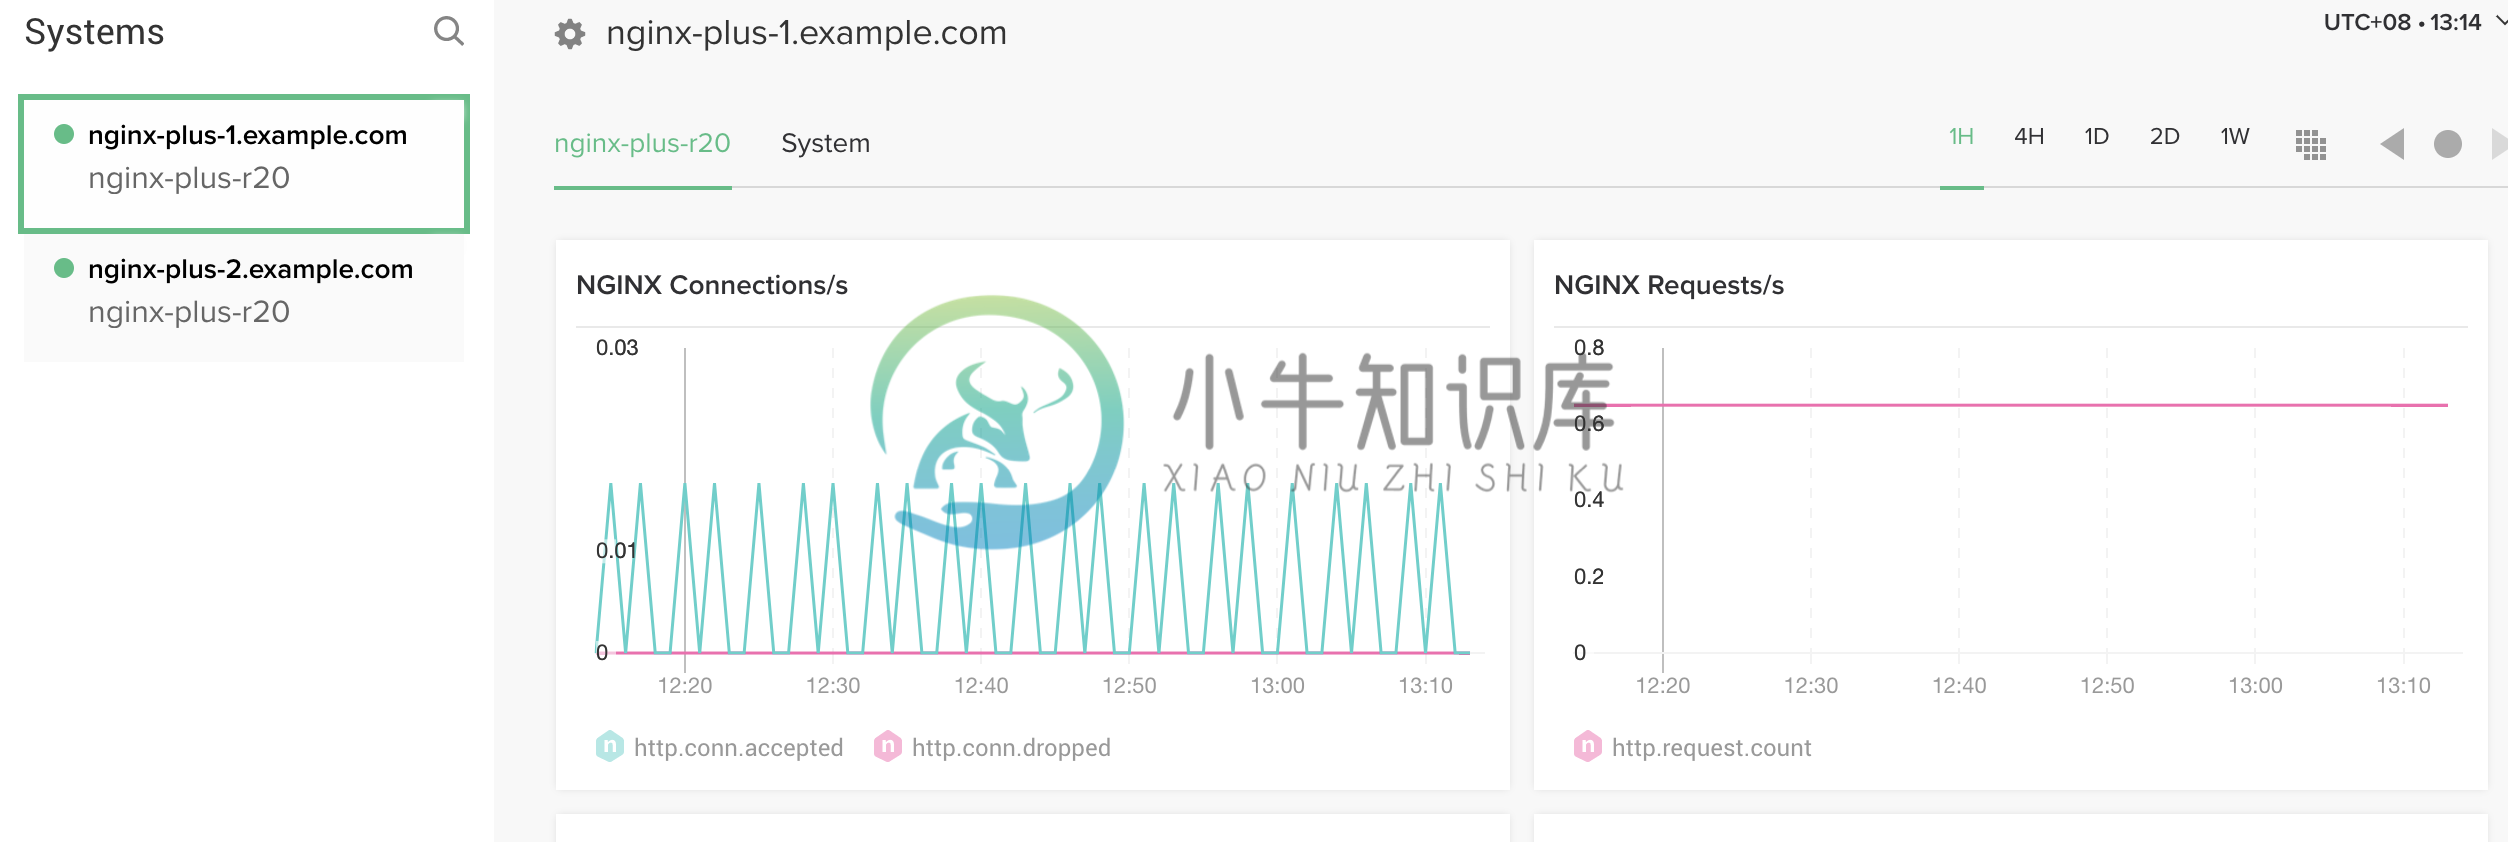
Metrics 展示
在 Nginx Controller 上选择
Platform→Agent,在Default Agent Settings界面配置 Metrics 收集方式
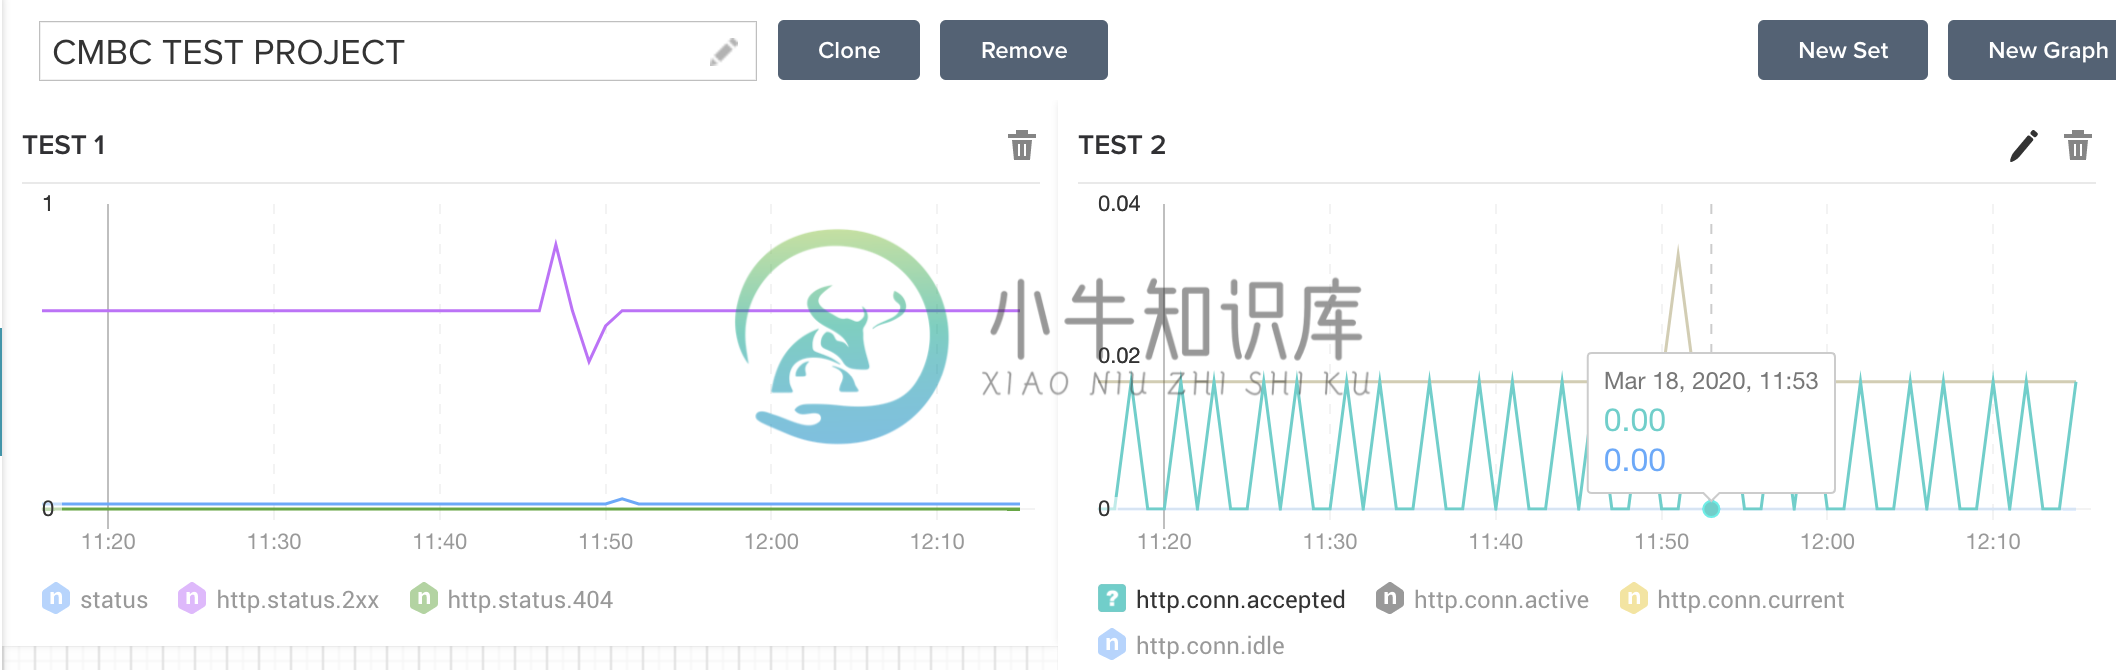
自定制 Dashboard
选择
Analytics→Dashboards→Create Dashboard设定 Dashboard 名称为
CMBC TEST PROJECT在新创建的 Dashboard 右上方点击
New Graph按钮,在EDIT GRAPH页面编辑:名称 -
TESTADD METRIC - 选择对应的参数,例如
nginx.http.conn.activeGET METRIC FROM - 选择对应节点
点击
Save按钮保存。
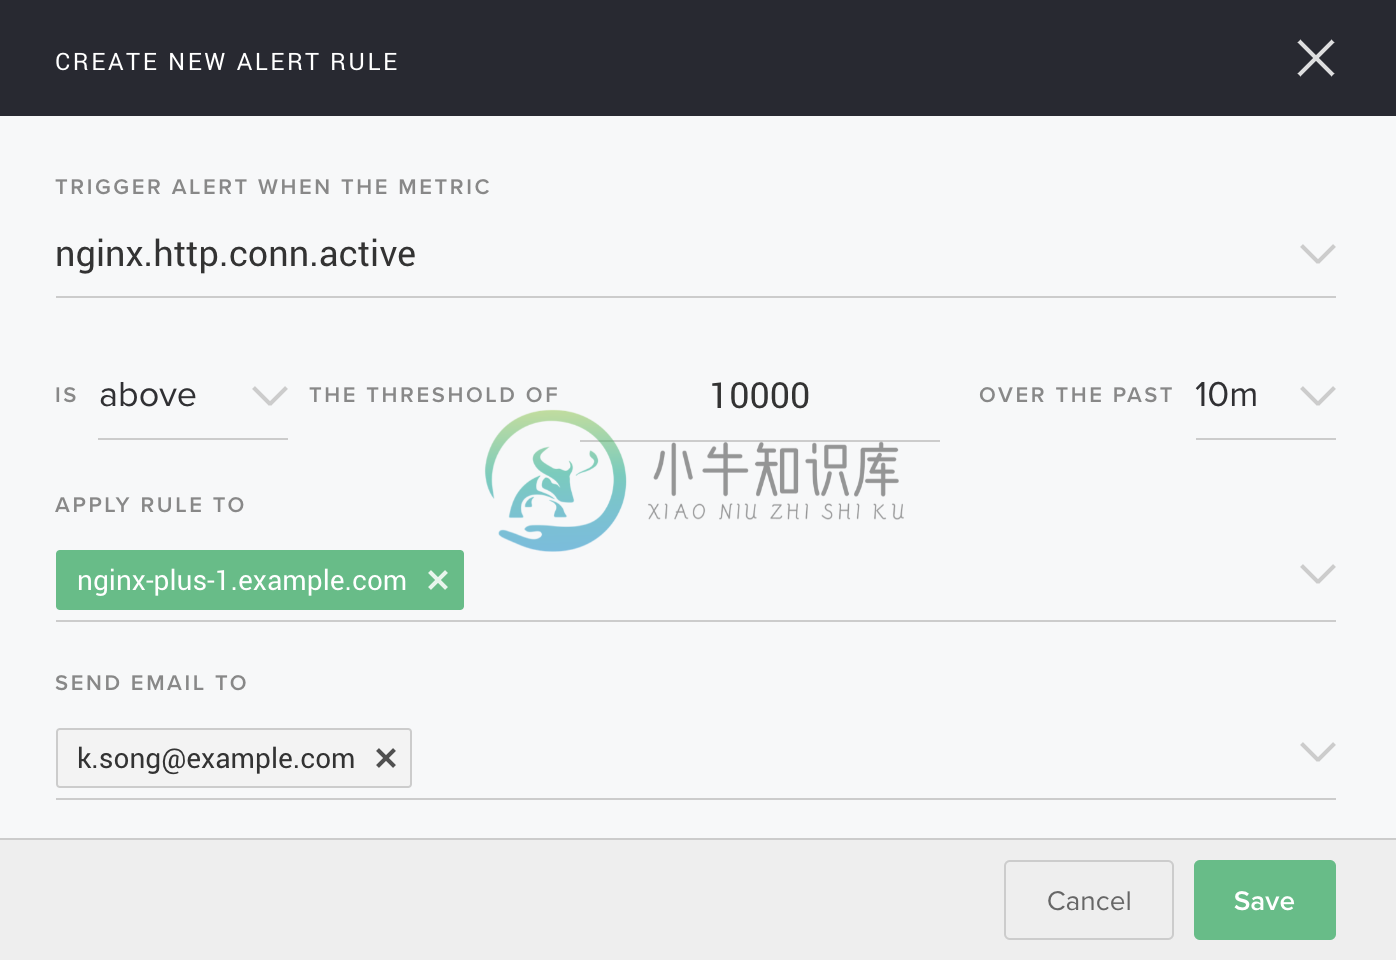
自定制 Alert
选择
Analytics→Alerts→New Alert在弹出的
CREATE NEW ALERT RULE界面,选择:TRIGGER ALERT WHEN THE METRIC - 选择对应的参数,例如
nginx.http.conn.activeIs - 在下拉菜单中选择
above,below,equal toTHE THRESHOLD OF - 填写具体数据,例如 10000
OVER THE PAST - 填写具体的时间,可以是几分钟到一天
APPLY RULE TO - 选择对应的 instance 节点
SEND EMAIL TO - 选择对应接收警告的邮件地址
Platform
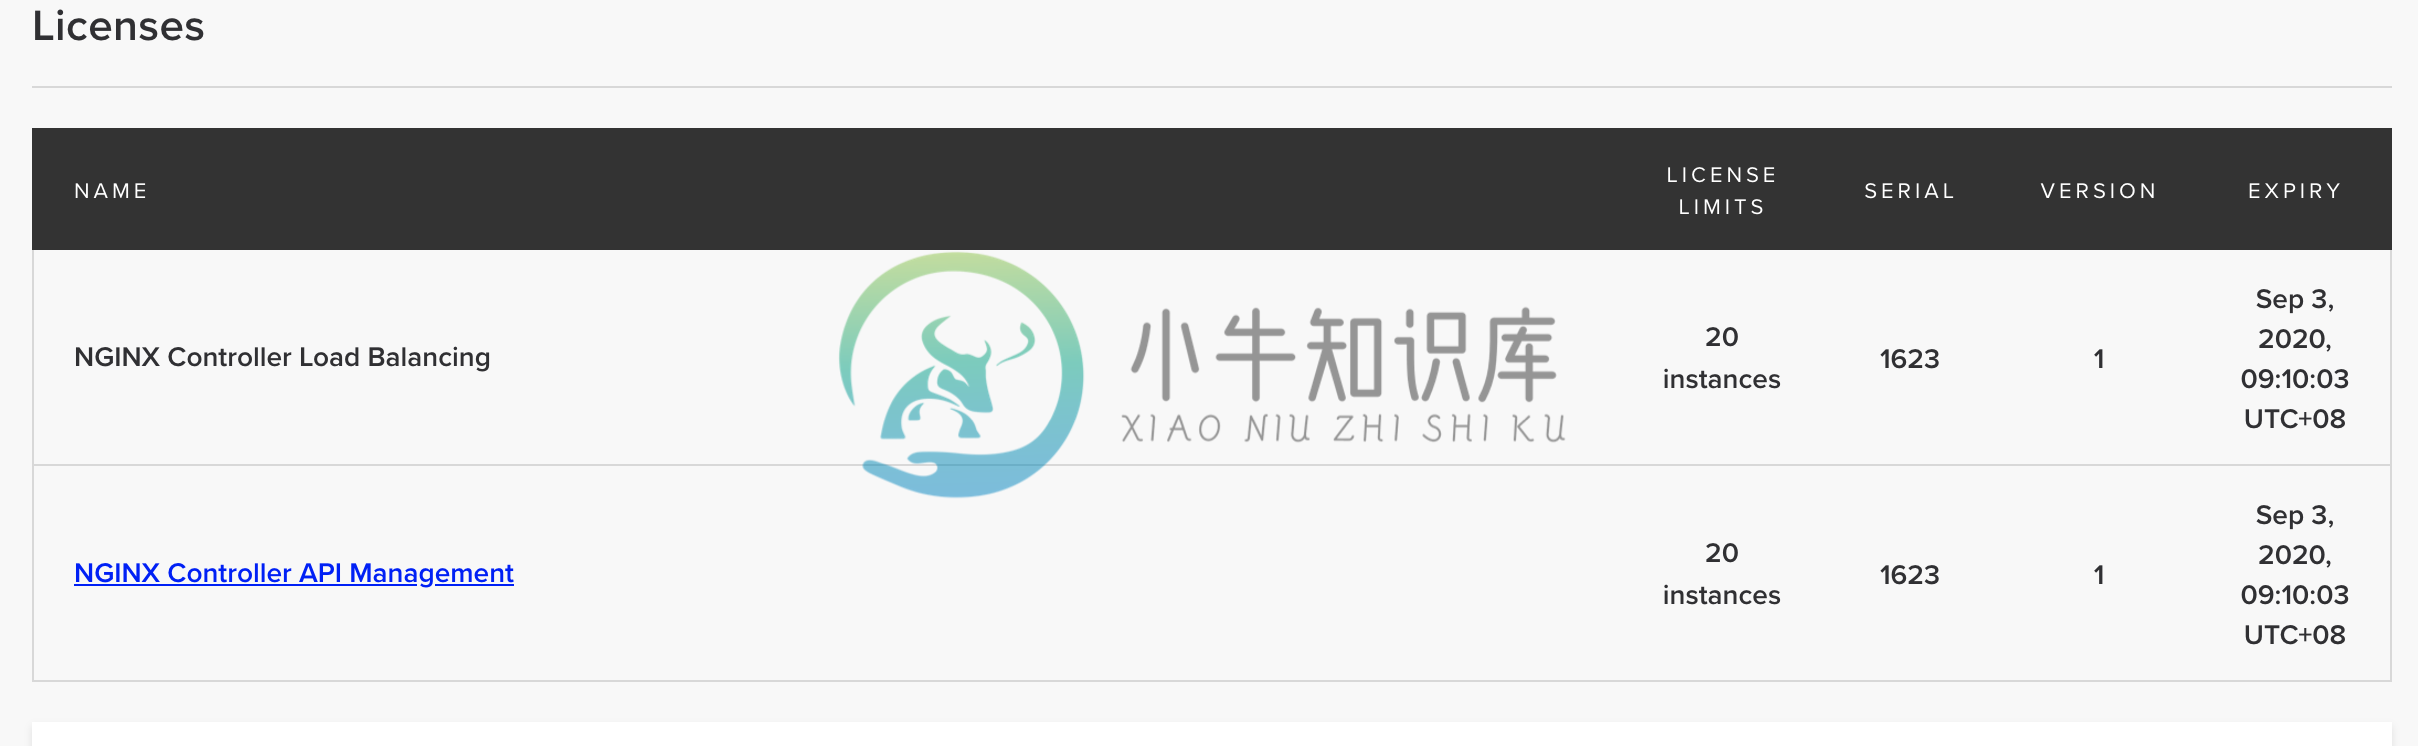
License
选择 Platform → Licenses,在 license 激活界面选择 controller_license.txt,即可激活,激活后界面如下:
用户和角色
Nginx Controller 安装过程会将管理员的邮箱作为一个超级管理员用户,例如 k.song@example.com。
Nginx Controller 默认有三种角色:admin,user,guest。可以自定义角色,自定制角色需要创建 Environment,通过自定制角色对 environment 进行更细粒度的控制。如下步骤为自定义一个 retail 项目的 dev 角色:
选择
Platform→Roles→Create Role在弹出的
Create Role页面填写Name -
retail-devDisplay Name -
Retail Developer Access
Services
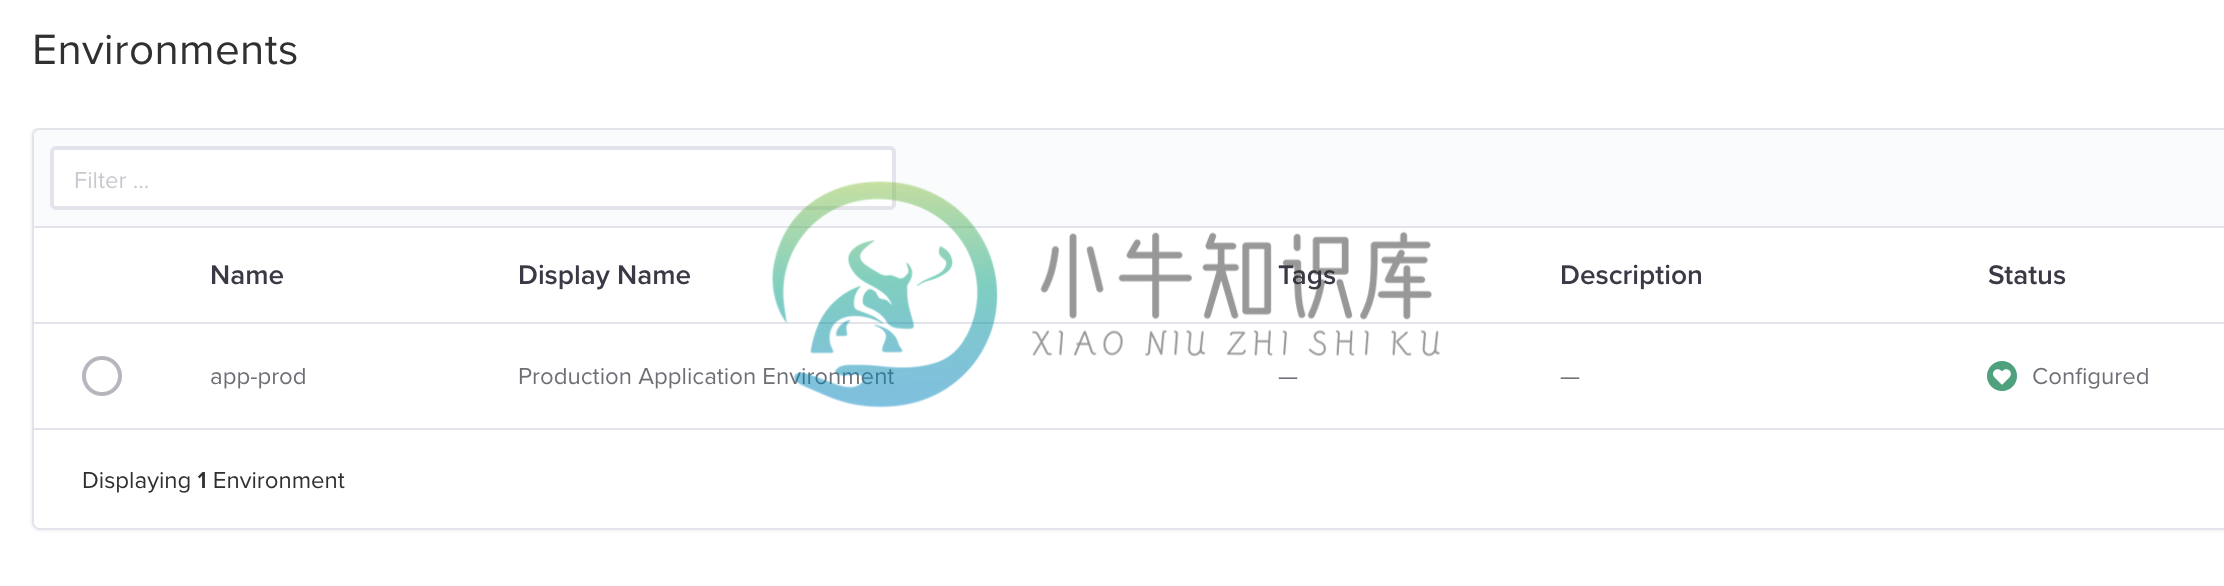
创建 Environment
1. 创建 Environment
选择
Services→Environments→Create Environment在 Edit Environment 页面输入:
Name - app-prod
Display Name - Production Application Environment
{
  "metadata": {
    "name": "dev",
    "displayName": "Development",
    "tags": [
      "dev"
    ]
  },
  "desiredState": {}
}
创建 Cert
1. 生产自签名证书openssl genrsa -out f5asc.com.key 2048
openssl req -new -key f5asc.com.key -out f5asc.com.csr -subj "/C=CN/ST=BJ/L=BJ/O=IT/OU=IT/CN=f5asc.com"
openssl x509 -req -days 3650 -in f5asc.com.csr -signkey f5asc.com.key -out f5asc.com.crt
openssl x509 -in f5asc.com.crt -noout -textcat f5asc.com.crt f5asc.com.key > f5asc.com.pem
openssl x509 -in f5asc.com.pem -noout -text3. 创建 Cert
选择
Services→Certs→Create Cert,在弹出的创建 Cert 界面,输入相应的内容:Name - f5asc.com.pem
Environment - Development
How would you like to add your key and certificates - 选择默认 Import PEM or PKCS12 files ,点击 Browse,选择f5asc.com.pem 文件
点击
Submit按钮提交,完成 Cert 创建。
{
"metadata": {
"name": "f5asc.com.pem"
},
"desiredState": {
"type": "PEM",
"privateKey": "-----BEGIN RSA PRIVATE KEY-----\nMIIEowIBAAKCAQEAxNqkseTHJI59UvTGd6ZL3w3bdDzJPvbTGUvJlSepDZYQsMta\nfEahh4w16egLc0toyykI9362GUmMtuWW98qjvatni+UN/BHJ0ZkPzw7HR9ZGCdYS\nY2sgSo5/vC/J6kseeIBaJAnkyJJoleBnmSyl9mVCaKwuf/wqB/bS0KHXUMbJrkob\niPEyYfrGo8/WVHC8jRGum4xDPJ7RZbao8HiSG0PlLAsVpAPQlqqe8kO9kiBulaWr\nab4dxaDjZmNay0/LLJyU57f81RCp68bB6tVl5hLQdRSG22Ner/AM+uz6m1kyCU9E\n0y1faQmPk/aKmQ5sRLnDdnN2VxWcM1gRXtkKlQIDAQABAoIBAQC0gUBPltY8YSPt\ns2FhSW18xLocZbirMaz0Hxhi2pEbUiVP18fK+QEYx6qQJySIvfcDg0cjml7j5RtQ\ngkniQT/PpaI3FvuxzaXfuZhTZtu4tXRXhKIr44kilHPwXWmqmuL/38HIFgJhIE8i\nTzjvrY8o1kUEsg2ZceIgl2VLxXsoJuFonIIFeMGkalicTXdQ4VF2M6yqs3YxvVVn\nqw/rtAo0TlIvr84RV1WxTL0k6FJWbGxU12rfaZ2hgU8jqRCx5C6/qGpsMrYar5Ag\nzPvB4T9lsp00KW3U9dgQz3c2O1WbvptDhDnvES0qwPBLBUf78Lx9CmzuZFi+Epou\ndFG01srpAoGBAPtavEizg7lKCj9QZ+xVSoNv8LiXYdZ06Gp1pFFMHMs5OFHL9bWO\nmCV0nD+ukUPQGVXf02yiMbNXKswVdfqPRSOiWCcRBrjV0MfteKbDX2/Np+X67j6W\nL30Jv7j/GzxSgIzlvKqo1OKFCR/UupylVqFv0Xox8ECY9U15AJePEqcDAoGBAMh+\nCyQuv3KUSe7XQskbqbpFMYL6Uxhz5RhjRLSrIc6rNVarnyldCsiIZXhU7UZ25S8L\nVDOoSV4W+4ueSbA93HTUb/US4Z2AiIDw0C/UFqSOGqmPYO8U2mZyiLs4vCD3igSy\n1qDMBlHzQIT2Qgrl0ZslcWGjy2ull2hGW2TzI6iHAoGAduAT2kJkUvZsYENT0xcH\ndaA0dejKkdWasfbPbs+Tcp2uQCk5HNPCqzw6RXf3Jd4+jTmdUWxoGwxnpjukH4sw\nxMib7mYECti8tEFgZWZTNZpLBN6nXJxE+1rn/MNSCzZtq7VfhEry2+rVROOkGj+r\n+A/dP3Bs0vBEW46VtBgrVycCgYAL+UsdDBWu+CA6PWzlqdtHHp7IXb7ctP83p6YQ\nzC+msh7rYDCPPdlJBKxatWe+T5d8acbLlv9auTCos/lepzMlXxKYploHGAgO+1LT\nqGz5wurguYlmfe5VM/3qgIbryRzbDvs2ezjdaBOwXSywje0owOG2nRunACq8tYb7\nznGQvQKBgGQdCqud8tTyH0LyLZTA9CuI68kS4nv3JHfZjJ8Y+cjGqt/HtafSklxB\nhVidgOo7flivt0GZhoPjIS6oJJ5wTe7M2t7dc+v1sZ9CWhvxpmq90/jlXsDqImNv\ngrJkkqkLzcjeeAGH0v+7i+qOJbh2f2Ndt8R5MRBH7jzZ++uQ0fCF\n-----END RSA PRIVATE KEY-----\n",
"publicCert": "-----BEGIN CERTIFICATE-----\nMIIDJjCCAg4CCQCv8fC8/170kTANBgkqhkiG9w0BAQsFADBVMQswCQYDVQQGEwJD\nTjELMAkGA1UECAwCQkoxCzAJBgNVBAcMAkJKMQswCQYDVQQKDAJJVDELMAkGA1UE\nCwwCSVQxEjAQBgNVBAMMCWY1YXNjLmNvbTAeFw0yMDExMDYxMjQxMTdaFw0zMDEx\nMDQxMjQxMTdaMFUxCzAJBgNVBAYTAkNOMQswCQYDVQQIDAJCSjELMAkGA1UEBwwC\nQkoxCzAJBgNVBAoMAklUMQswCQYDVQQLDAJJVDESMBAGA1UEAwwJZjVhc2MuY29t\nMIIBIjANBgkqhkiG9w0BAQEFAAOCAQ8AMIIBCgKCAQEAxNqkseTHJI59UvTGd6ZL\n3w3bdDzJPvbTGUvJlSepDZYQsMtafEahh4w16egLc0toyykI9362GUmMtuWW98qj\nvatni+UN/BHJ0ZkPzw7HR9ZGCdYSY2sgSo5/vC/J6kseeIBaJAnkyJJoleBnmSyl\n9mVCaKwuf/wqB/bS0KHXUMbJrkobiPEyYfrGo8/WVHC8jRGum4xDPJ7RZbao8HiS\nG0PlLAsVpAPQlqqe8kO9kiBulaWrab4dxaDjZmNay0/LLJyU57f81RCp68bB6tVl\n5hLQdRSG22Ner/AM+uz6m1kyCU9E0y1faQmPk/aKmQ5sRLnDdnN2VxWcM1gRXtkK\nlQIDAQABMA0GCSqGSIb3DQEBCwUAA4IBAQC138LcKNRDYNglxsPobvHPBULSaV65\nx1+JtWqVLDOQ5fq/M+ng0TyVqEe4BAfzSqiT/4PCVw/dI0c+Ufv+xRW7gjW8Z8Te\nxazNOn8OIWDFGHgF/uiWcH9GvjtysnSL6XtVahOunCT9nTvD+3aFD+zCv6cBQGrc\nvJYcfUrQ5zSIbALeS7ySz9/9wscDl/2FnBylZnNfP1VjGydYZ36Iu7ej2kCBLiHZ\nERaOan857soZs8Lb9IMn53fXcOtMR2XZ94NJwOC63gG9g9gcdVZMGQGdid4391JV\n/EovBg94eFML+PPqXDpTkIZWLGSzbLp1DoL0Ddpw0ClgtINkIljrlmiq\n-----END CERTIFICATE-----\n",
"password": "",
"caCerts": []
}
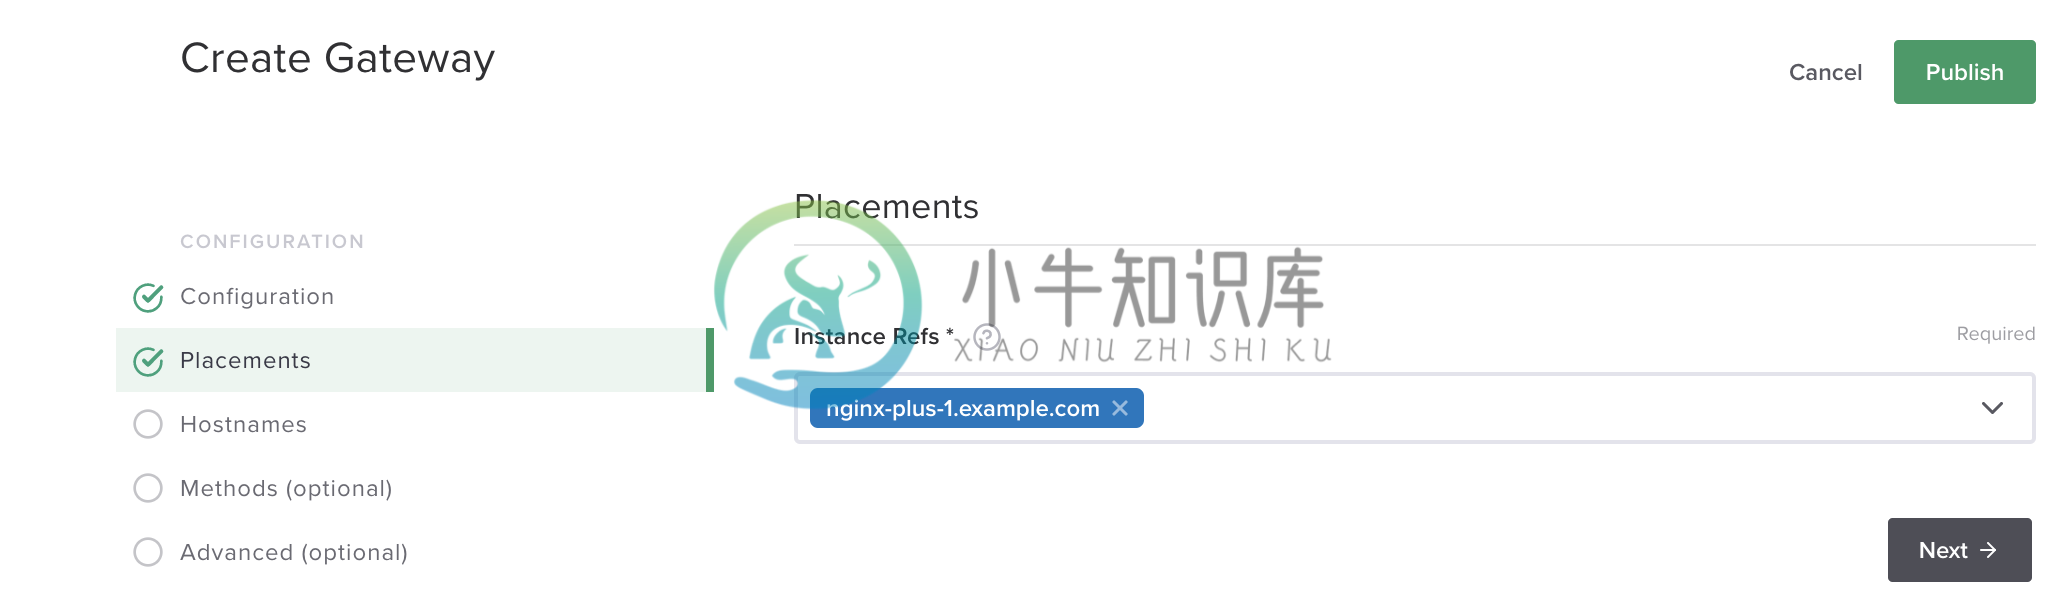
}创建 Gateway
本部分创建一个SSL 加密的 Gateway。
1. 创建 Gateway
选择
Services→Gateways→Create Gateway在 Configuration 页面配置
Name - f5asc.com.dev
Environment - 选择 Development
点击
Next,在 Placements 界面 Instance Refs 部分选择 nginx plus 实例
点击
Next,在 Hostnames 界面输入 hostnamehttps://f5asc.com,在Shared TLS Settings→Cert Reference选择证书 f5asc.com.pem,其他项保持默认点击
Next点击
Next到 API Spec 界面,点击右上角Submit按钮发布 GatewayGateway 的发布过程状态会从
configuring变为configured

{
  "metadata": {
    "name": "f5asc.com.dev",
    "tags": [
      "f5adc"
    ]
  },
  "desiredState": {
    "errorSetRef": {
      "ref": "/services/errorsets/default-json"
    },
    "ingress": {
      "uris": {
        "https://f5asc.com": {}
      },
      "methods": [
        "POST",
        "GET",
        "PUT",
        "DELETE",
        "PATCH",
        "HEAD",
        "TRACE",
        "OPTIONS",
        "CONNECT"
      ],
      "placement": {
        "instanceRefs": [
          {
            "ref": "/infrastructure/locations/vpc_beijing/instances/vpc_beijng_192.168.8.101"
          }
        ]
      },
      "tls": {
        "certRef": {
          "ref": "/services/environments/dev/certs/f5asc.com.pem"
        },
        "preferServerCipher": "DISABLED"
      }
    }
  }
} server {
server_name f5asc.com;
listen 443 ssl;
ssl_certificate /etc/controller-agent/configurator/auxfiles/ab93b87d-bbd2-45ef-8e28-6b20cca42475.crt;
ssl_certificate_key /etc/controller-agent/configurator/auxfiles/ab93b87d-bbd2-45ef-8e28-6b20cca42475.key;
ssl_session_cache shared:SSL:10m;
ssl_session_timeout 10m;
ssl_prefer_server_ciphers off;
status_zone server_0d303b7e8921e279f014685fe7631bbc;
set $f5_gateway f5asc.com.dev;
f5_metrics_marker gateway $f5_gateway;
set $f5_environment dev;
f5_metrics_marker environment $f5_environment;
error_page 400 = @400_default-json;
error_page 401 = @401_default-json;
error_page 402 = @402_default-json;
error_page 403 = @403_default-json;
error_page 404 = @404_default-json;
error_page 405 = @405_default-json;
error_page 406 = @406_default-json;
error_page 407 = @407_default-json;
error_page 408 = @408_default-json;
error_page 409 = @409_default-json;
error_page 410 = @410_default-json;
error_page 411 = @411_default-json;
error_page 412 = @412_default-json;
error_page 413 = @413_default-json;
error_page 414 = @414_default-json;
error_page 415 = @415_default-json;
error_page 416 = @416_default-json;
error_page 417 = @417_default-json;
error_page 422 = @422_default-json;
error_page 423 = @423_default-json;
error_page 424 = @424_default-json;
error_page 426 = @426_default-json;
error_page 428 = @428_default-json;
error_page 429 = @429_default-json;
error_page 431 = @431_default-json;
error_page 500 = @500_default-json;
error_page 501 = @501_default-json;
error_page 502 = @502_default-json;
error_page 503 = @503_default-json;
error_page 504 = @504_default-json;
error_page 505 = @505_default-json;
error_page 506 = @506_default-json;
error_page 507 = @507_default-json;
error_page 508 = @508_default-json;
error_page 510 = @510_default-json;
error_page 511 = @511_default-json;
error_page 418 = @418_default-json;
error_page 421 = @421_default-json;
error_page 425 = @425_default-json;
error_page 451 = @451_default-json;
error_page 495 = @495_default-json;
error_page 496 = @496_default-json;
error_page 497 = @497_default-json;
location @400_default-json {
f5_metrics_marker app $f5_app;
f5_metrics_marker component $f5_component;
f5_metrics_marker published_api $f5_published_api;
default_type application/json;
return 400 '{"status":400,"message":"Bad Request"}\n';
}
location @401_default-json {
f5_metrics_marker app $f5_app;
f5_metrics_marker component $f5_component;
f5_metrics_marker published_api $f5_published_api;
default_type application/json;
return 401 '{"status":401,"message":"Unauthorized"}\n';
}
location @402_default-json {
f5_metrics_marker app $f5_app;
f5_metrics_marker component $f5_component;
f5_metrics_marker published_api $f5_published_api;
default_type application/json;
return 402 '{"status":402,"message":"Payment Required"}\n';
}
location @403_default-json {
f5_metrics_marker app $f5_app;
f5_metrics_marker component $f5_component;
f5_metrics_marker published_api $f5_published_api;
default_type application/json;
return 403 '{"status":403,"message":"Forbidden"}\n';
}
location @404_default-json {
f5_metrics_marker app $f5_app;
f5_metrics_marker component $f5_component;
f5_metrics_marker published_api $f5_published_api;
default_type application/json;
return 404 '{"status":404,"message":"Not Found"}\n';
}
location @405_default-json {
f5_metrics_marker app $f5_app;
f5_metrics_marker component $f5_component;
f5_metrics_marker published_api $f5_published_api;
default_type application/json;
return 405 '{"status":405,"message":"Method Not Allowed"}\n';
}
location @406_default-json {
f5_metrics_marker app $f5_app;
f5_metrics_marker component $f5_component;
f5_metrics_marker published_api $f5_published_api;
default_type application/json;
return 406 '{"status":406,"message":"Not Acceptable"}\n';
}
location @407_default-json {
f5_metrics_marker app $f5_app;
f5_metrics_marker component $f5_component;
f5_metrics_marker published_api $f5_published_api;
default_type application/json;
return 407 '{"status":407,"message":"Proxy Authentication Required"}\n';
}
location @408_default-json {
f5_metrics_marker app $f5_app;
f5_metrics_marker component $f5_component;
f5_metrics_marker published_api $f5_published_api;
default_type application/json;
return 408 '{"status":408,"message":"Request Timeout"}\n';
}
location @409_default-json {
f5_metrics_marker app $f5_app;
f5_metrics_marker component $f5_component;
f5_metrics_marker published_api $f5_published_api;
default_type application/json;
return 409 '{"status":409,"message":"Conflict"}\n';
}
location @410_default-json {
f5_metrics_marker app $f5_app;
f5_metrics_marker component $f5_component;
f5_metrics_marker published_api $f5_published_api;
default_type application/json;
return 410 '{"status":410,"message":"Gone"}\n';
}
location @411_default-json {
f5_metrics_marker app $f5_app;
f5_metrics_marker component $f5_component;
f5_metrics_marker published_api $f5_published_api;
default_type application/json;
return 411 '{"status":411,"message":"Length Required"}\n';
}
location @412_default-json {
f5_metrics_marker app $f5_app;
f5_metrics_marker component $f5_component;
f5_metrics_marker published_api $f5_published_api;
default_type application/json;
return 412 '{"status":412,"message":"Precondition Failed"}\n';
}
location @413_default-json {
f5_metrics_marker app $f5_app;
f5_metrics_marker component $f5_component;
f5_metrics_marker published_api $f5_published_api;
default_type application/json;
return 413 '{"status":413,"message":"Request Entity Too Large"}\n';
}
location @414_default-json {
f5_metrics_marker app $f5_app;
f5_metrics_marker component $f5_component;
f5_metrics_marker published_api $f5_published_api;
default_type application/json;
return 414 '{"status":414,"message":"Request-URI Too Long"}\n';
}
location @415_default-json {
f5_metrics_marker app $f5_app;
f5_metrics_marker component $f5_component;
f5_metrics_marker published_api $f5_published_api;
default_type application/json;
return 415 '{"status":415,"message":"Unsupported Media Type"}\n';
}
location @416_default-json {
f5_metrics_marker app $f5_app;
f5_metrics_marker component $f5_component;
f5_metrics_marker published_api $f5_published_api;
default_type application/json;
return 416 '{"status":416,"message":"Requested Range Not Satisfiable"}\n';
}
location @417_default-json {
f5_metrics_marker app $f5_app;
f5_metrics_marker component $f5_component;
f5_metrics_marker published_api $f5_published_api;
default_type application/json;
return 417 '{"status":417,"message":"Expectation Failed"}\n';
}
location @418_default-json {
f5_metrics_marker app $f5_app;
f5_metrics_marker component $f5_component;
f5_metrics_marker published_api $f5_published_api;
default_type application/json;
return 418 '{"status":418,"message":"I\'m a teapot"}\n';
}
location @421_default-json {
f5_metrics_marker app $f5_app;
f5_metrics_marker component $f5_component;
f5_metrics_marker published_api $f5_published_api;
default_type application/json;
return 421 '{"status":421,"message":"Misdirected Request"}\n';
}
location @425_default-json {
f5_metrics_marker app $f5_app;
f5_metrics_marker component $f5_component;
f5_metrics_marker published_api $f5_published_api;
default_type application/json;
return 425 '{"status":425,"message":"Too Early"}\n';
}
location @451_default-json {
f5_metrics_marker app $f5_app;
f5_metrics_marker component $f5_component;
f5_metrics_marker published_api $f5_published_api;
default_type application/json;
return 451 '{"status":451,"message":"Unavailable For Legal Reasons"}\n';
}
location @495_default-json {
f5_metrics_marker app $f5_app;
f5_metrics_marker component $f5_component;
f5_metrics_marker published_api $f5_published_api;
default_type application/json;
return 495 '{"status":495,"message":"Client certificate authentication error"}\n';
}
location @496_default-json {
f5_metrics_marker app $f5_app;
f5_metrics_marker component $f5_component;
f5_metrics_marker published_api $f5_published_api;
default_type application/json;
return 496 '{"status":496,"message":"Client certificate not presented"}\n';
}
location @497_default-json {
f5_metrics_marker app $f5_app;
f5_metrics_marker component $f5_component;
f5_metrics_marker published_api $f5_published_api;
default_type application/json;
return 497 '{"status":497,"message":"HTTP request was sent to mutual TLS port"}\n';
}
location / {
set $f5_app '';
set $f5_component '';
set $f5_published_api '';
return 404;
}
}创建 App
1. 创建 App
选择
Services→Apps→Create App在 Create App 页面输入
Name - app-dev
Environment - 选择 Development
点击 Submit 按钮, 完成创建
{
  "metadata": {
    "name": "app-dev",
    "displayName": "",
    "description": "",
    "tags": [
      "app",
      "dev"
    ]
  },
  "desiredState": {}
}
3. 查看 App,并创建 Component
选择
Services→Apps→Overview,在 App 列表中选择app-dev→View
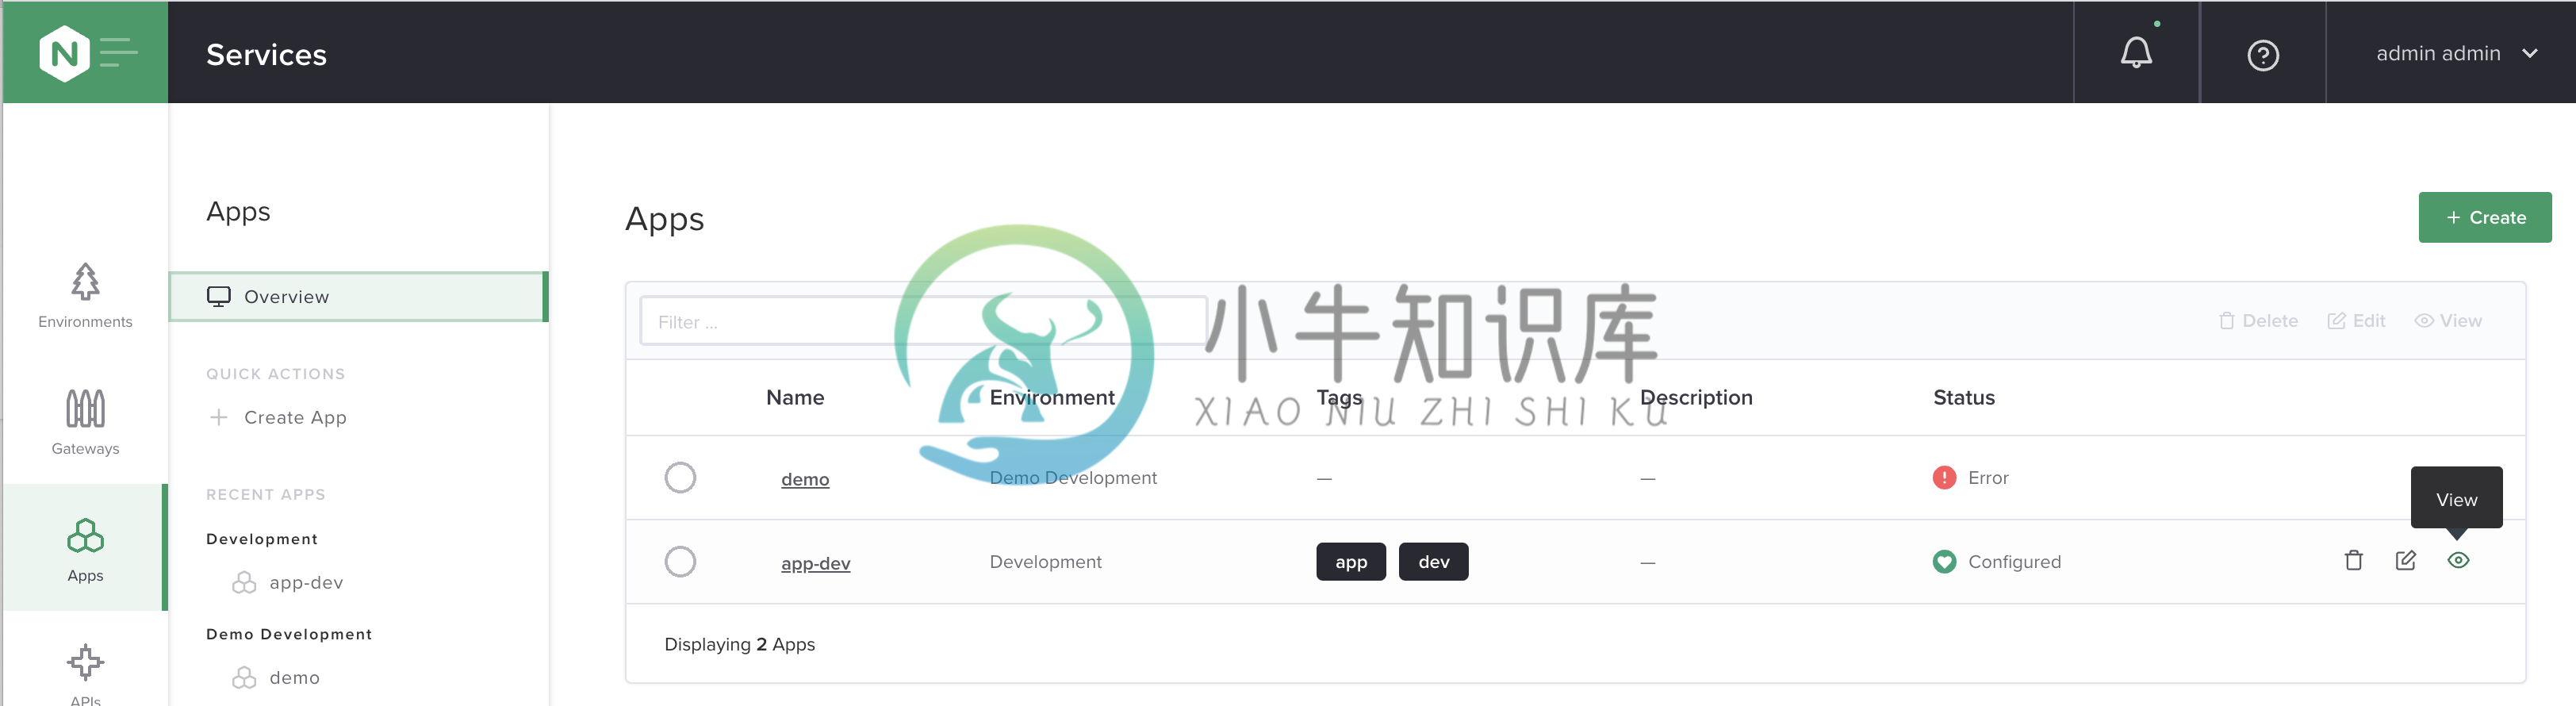
点击右上角
Create Component按钮在 Create App Component 配置页面开始相关的配置
Name - fruits
Display Name - Fruit App Service
点击
Next,在 Gateway Refs 界面选择一个 Gateway,例如 f5asc.com.dev点击
Next,在 URIs 部分添加:URI -
/apiMatch Method -
PREFIX
点击
Next在 Methods 界面选择:Methods - GET
点击
Next,在 Advanced 界面使用默认配置点击
Next到 Workload Groups 界面,配置Workload Group Name - fruit-backend
Location References - vpc_beijing
LOAD BALANCING METHOD - LEAST_CONNECTIONS
BACKEND WORKLOAD URIS
点击
Add Backend Workload URI,配置 URI 为 http://192.168.7.10:8080,点击 DONE 按钮完成添加点击
Add Backend Workload URI,配置 URI 为 http://192.168.7.11:8080,点击 DONE 按钮完成添加
点击 DONE 按钮 完成 Workload Groups创建
点击
Next,进入 Monitoring 界面,使用默认配置点击
Next,进入 Advanced 界面,使用默认配置点击
Next,进入 URI Rewrites 界面,使用默认配置点击
Next,进入 Header Modifications 界面,使用默认配置点击
Next,进入 API Spec 界面,点击右上角 Submit 按钮
{
  "metadata": {
    "name": "fruits",
    "displayName": "Fruit App Service",
    "tags": []
  },
  "desiredState": {
    "errorSetRef": {
      "ref": "/services/errorsets/default-json"
    },
    "ingress": {
      "gatewayRefs": [
        {
          "ref": "/services/environments/dev/gateways/f5asc.com.dev"
        }
      ],
      "methods": [
        "GET"
      ],
      "uris": {
        "/api": {
          "matchMethod": "PREFIX"
        }
      }
    },
    "backend": {
      "ntlmAuthentication": "DISABLED",
      "preserveHostHeader": "DISABLED",
      "workloadGroups": {
        "fruit-backend": {
          "locationRefs": [
            {
              "ref": "/infrastructure/locations/vpc_beijing"
            }
          ],
          "loadBalancingMethod": {
            "type": "LEAST_CONNECTIONS"
          },
          "uris": {
            "http://192.168.7.10:8080": {
              "isBackup": false,
              "isDown": false,
              "isDrain": false
            },
            "http://192.168.7.11:8080": {
              "isBackup": false,
              "isDown": false,
              "isDrain": false
            }
          }
        }
      }
    },
    "logging": {
      "errorLog": "DISABLED",
      "accessLog": {
        "state": "DISABLED"
      }
    },
    "security": {}
  }
} upstream fruit-backend_http_91d6858c-b458-4dda-be7a-50309ffcae57 {
zone fruit-backend_http_91d6858c-b458-4dda-be7a-50309ffcae57 64k;
least_conn;
server 192.168.7.10:8080;
server 192.168.7.11:8080;
keepalive 64;
keepalive_requests 100;
keepalive_timeout 60s;
}
server {
...
location /api {
if ($request_method !~ '^GET$') {
return 405;
}
error_log /dev/null;
access_log off;
set $f5_app app-dev;
f5_metrics_marker app $f5_app;
set $f5_component fruits;
f5_metrics_marker component $f5_component;
set $f5_published_api '';
f5_metrics_marker published_api $f5_published_api;
proxy_set_header X-Forwarded-For $remote_addr;
proxy_set_header Host $host;
proxy_set_header Connection '';
proxy_http_version 1.1;
proxy_pass http://fruit-backend_http_91d6858c-b458-4dda-be7a-50309ffcae57;
}
}$ curl -k https://f5asc.com/api/fruits
[{"id":1,"name":"Cherry"},{"id":2,"name":"Apple"},{"id":3,"name":"Banana"}]7. 创建 Component foo
选择
Services→Apps→Overview,在 App 列表中选择app-dev→View

点击右上角
Create Component按钮在 Create App Component 配置页面开始相关的配置
Name - foo
Display Name - Foo App Service
点击
Next,在 Gateway Refs 界面选择一个 Gateway,例如 f5asc.com.dev点击
Next,在 URIs 部分添加:URI -
/fooMatch Method -
PREFIX
点击
Next在 Methods 界面选择:Methods - GET
点击
Next,在 Advanced 界面使用默认配置点击
Next到 Workload Groups 界面,配置Workload Group Name - foo-backend
Location References - vpc_beijing
LOAD BALANCING METHOD - ROUND_ROBIN
BACKEND WORKLOAD URIS
点击
Add Backend Workload URI,配置 URI 为 http://192.168.7.10:8080,点击 DONE 按钮完成添加点击
Add Backend Workload URI,配置 URI 为 http://192.168.7.11:8080,点击 DONE 按钮完成添加
点击 DONE 按钮 完成 Workload Groups 创建
点击
Next,进入 Monitoring 界面,使用默认配置点击
Next,进入 Advanced 界面,使用默认配置点击
Next,进入 URI Rewrites 界面,使用默认配置点击
Next,进入 Header Modifications 界面,使用默认配置点击
Next,进入 API Spec 界面,点击右上角 Submit 按钮
{
  "metadata": {
    "name": "foo",
    "displayName": "Foo App Service",
    "tags": []
  },
  "desiredState": {
    "errorSetRef": {
      "ref": "/services/errorsets/default-json"
    },
    "ingress": {
      "gatewayRefs": [
        {
          "ref": "/services/environments/dev/gateways/f5asc.com.dev"
        }
      ],
      "methods": [
        "GET"
      ],
      "uris": {
        "/foo": {
          "matchMethod": "REGEX"
        }
      }
    },
    "backend": {
      "ntlmAuthentication": "DISABLED",
      "preserveHostHeader": "DISABLED",
      "workloadGroups": {
        "foo-backend": {
          "locationRefs": [
            {
              "ref": "/infrastructure/locations/vpc_beijing"
            }
          ],
          "loadBalancingMethod": {
            "type": "LEAST_CONNECTIONS"
          },
          "uris": {
            "http://192.168.7.10:8080": {
              "isBackup": false,
              "isDown": false,
              "isDrain": false
            },
            "http://192.168.7.11:8080": {
              "isBackup": false,
              "isDown": false,
              "isDrain": false
            }
          }
        }
      }
    },
    "logging": {
      "errorLog": "DISABLED",
      "accessLog": {
        "state": "DISABLED"
      }
    },
    "security": {}
  }
} upstream foo-backend_http_d530af63-e128-453b-bd3a-9db4ac8cb3bc {
zone foo-backend_http_d530af63-e128-453b-bd3a-9db4ac8cb3bc 64k;
server 192.168.7.10:8080;
server 192.168.7.11:8080;
keepalive 64;
keepalive_requests 100;
keepalive_timeout 60s;
}
server {
...
location ~* /foo {
if ($request_method !~ '^GET$') {
return 405;
}
error_log /dev/null;
access_log off;
set $f5_app app-dev;
f5_metrics_marker app $f5_app;
set $f5_component foo;
f5_metrics_marker component $f5_component;
set $f5_published_api '';
f5_metrics_marker published_api $f5_published_api;
proxy_set_header X-Forwarded-For $remote_addr;
proxy_set_header Host $host;
proxy_set_header Connection '';
proxy_http_version 1.1;
proxy_pass http://foo-backend_http_d530af63-e128-453b-bd3a-9db4ac8cb3bc;
}
}$ curl -k https://f5asc.com/foo
F5 Demo App
Request URI: /foo
Server IP: 10.244.1.110
Server Port: 8080
Server Hostname: app-v1-ff65997d6-qlh9c
Client IP: 192.168.8.102
Client Port: 49638
Client Hostname: 192.168.8.102
Session: 84B7CB33920A3A097EE29DC6FA71431F
Cookies:
Request Headers: {host=[f5asc.com], accept=[*/*], user-agent=[curl/7.29.0]}