1.5.5 使用Fuse
在 TrainJob 中使用 FDS FUSE
上一节介绍了两种在Cloud-ML中使用FDS的方法,这两种方法还是不够灵活。本节介绍在Cloud-ML中使用FDS FUSE。FDS FUSE是一种基于FUSE的文件系统,允许挂载FDS的bucket到本地文件系统。用户读写本地文件,FUSE会自动同步文件修改到远端FDS上。 我们还是使用上节的MNIST例子,使用Tensorflow框架。
步骤
在FDS创建目录
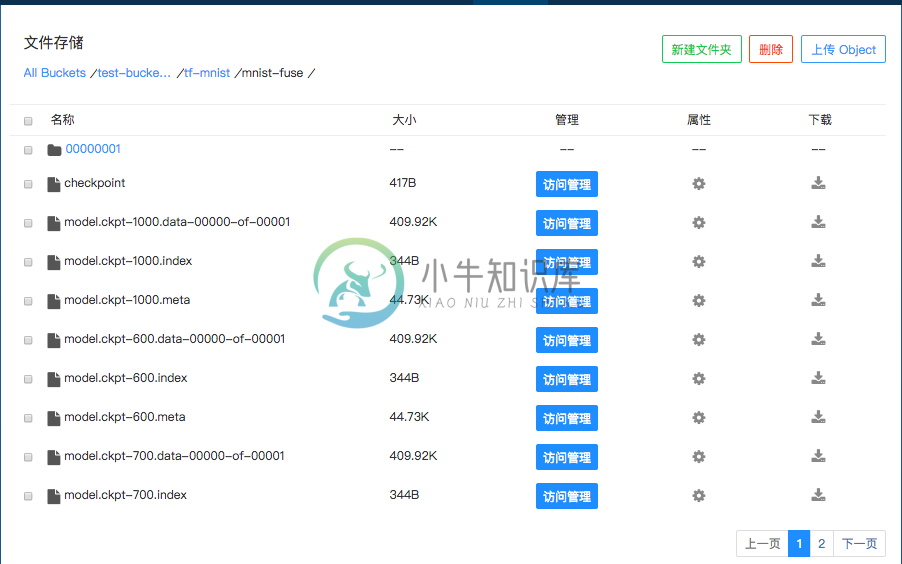
假设我们要将训练的Checkpoints和最终训练的模型保存到下面目录:
test-bucket-xg/tf-mnist/mnist-fuse
如下图所示: 
在代码中指定路径
在代码中指定FDS的路径,如下图示:
dataset_path  = "/fds/tf-mnist/dataset"
checkpoint_path  = "/fds/tf-mnist/mnist-fuse"
export_path  = "/fds/tf-mnist/mnist-fuse"
其中,/fds 这个目录是Cloud-ML在Docker镜像中创建的FDS的挂载地址,可以理解为容器里面FDS的根目录; dataset目录存放数据文件(见上节介绍,是转换成的TFRecord格式);
mnist-fuse存放训练Checkpoints和训练结果模型;
完整的训练代码请参考附录1,在代码中使用FUSE。
接下来将代码打包上传到FDS,可以开始提交任务进行训练。
提交任务时指定FDS地址
提交任务时候需要告诉Cloud-ML平台需要使用FUSE。命令如下:
cloudml jobs submit -n tf-fuse -m trainer.task -u fds://test-bucket-xg/tf-mnist/tf_fuse_test-1.0.tar.gz -c 4 -M 8G -g 1 -fe cnbj2.fds.api.xiaomi.com -fb test-bucket-xg -fc "ls -al /fds/tf-mnist/mnist-fuse"
这里面有三个新参数:
-fe: 指定FDS的Endpoint, 缺省情况下会使用c3的fds;
-fb: 指定FDS的Bucket;
-fc: 是一个后置命令,表示在训练结束后执行“”中的命令。这儿,我们执行完成之后检查一下“/fds”目录下是否有我们指定的内容。更多后置命令的介绍可参考后面高级功能介绍。
训练结果
训练完成后,我们检查结果文件是否都存在,下面是我们示例程序运行的结果:

Cloud-ML提供了ModelService和Tensorboard的功能,可以对这些结果进行下一步操作,请移步相关文档。
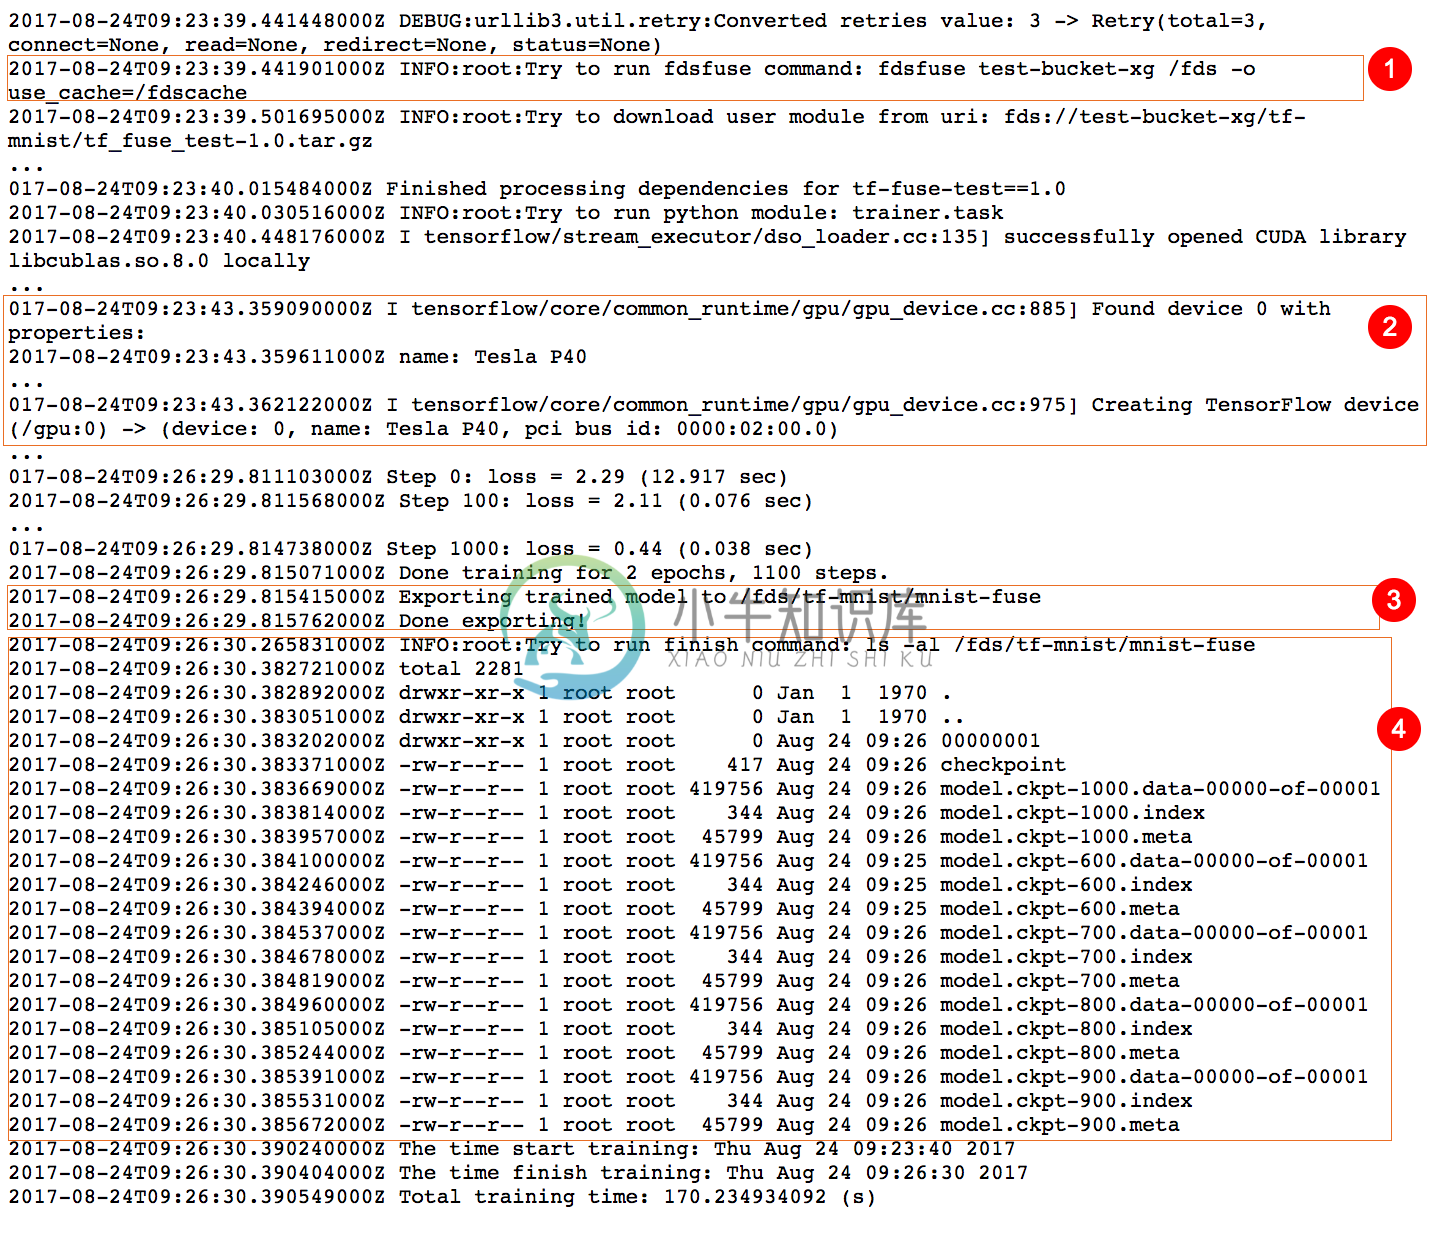
同时我们看一下Log的输出: 
其中,
- 使用
fdsfuse命令将test-bucket-xg挂载到/fds上; -g参数表明该训练使用了一个Tesla P40的GPU;- 结果写入到我们指定的目录中;
- 后置命令输出当前
ls -al /fds/tf-mnist/mnist-fuse的内容。
附录1,在代码中使用FUSE
# Copyright 2015 The TensorFlow Authors. All Rights Reserved.
#
# Licensed under the Apache License, Version 2.0 (the "License");
# you may not use this file except in compliance with the License.
# You may obtain a copy of the License at
#
#     http://www.apache.org/licenses/LICENSE-2.0
#
# Unless required by applicable law or agreed to in writing, software
# distributed under the License is distributed on an "AS IS" BASIS,
# WITHOUT WARRANTIES OR CONDITIONS OF ANY KIND, either express or implied.
# See the License for the specific language governing permissions and
# limitations under the License.
# ==============================================================================

"""Train and Eval the MNIST network.

This version is like fully_connected_feed.py but uses data converted
to a TFRecords file containing tf.train.Example protocol buffers.
See tensorflow/g3doc/how_tos/reading_data.md#reading-from-files
for context.

YOU MUST run convert_to_records before running this (but you only need to
run it once).
"""
from __future__ import absolute_import
from __future__ import division
from __future__ import print_function

import os.path
import time

import numpy
import tensorflow as tf
from tensorflow.python.platform import gfile
from tensorflow.contrib.session_bundle import exporter

from tensorflow.examples.tutorials.mnist import mnist
#from tensorflow.contrib.session_bundle import exporter

dataset_path  = "/fds/tf-mnist/dataset"
checkpoint_path  = "/fds/tf-mnist/mnist-fuse"
export_path  = "/fds/tf-mnist/mnist-fuse"

# Basic model parameters as external flags.
flags = tf.app.flags
FLAGS = flags.FLAGS
flags.DEFINE_float('learning_rate', 0.01, 'Initial learning rate.')
flags.DEFINE_integer('num_epochs', 2, 'Number of epochs to run trainer.')
flags.DEFINE_integer('hidden1', 128, 'Number of units in hidden layer 1.')
flags.DEFINE_integer('hidden2', 32, 'Number of units in hidden layer 2.')
flags.DEFINE_integer('batch_size', 100, 'Batch size.')
flags.DEFINE_string('train_dir', dataset_path,
                    'Directory with the training data.')
flags.DEFINE_string('checkpoint_dir', checkpoint_path,
                    'Directory for periodic checkpoints.')
flags.DEFINE_string('export_dir', export_path,
                    'Directory to export the final trained model.')
flags.DEFINE_integer('export_version', 1, 'Export version')

# Constants used for dealing with the files, matches convert_to_records.
TRAIN_FILE = 'train.tfrecords'
VALIDATION_FILE = 'validation.tfrecords'


def read_and_decode(filename_queue):
  reader = tf.TFRecordReader()
  _, serialized_example = reader.read(filename_queue)
  features = tf.parse_single_example(
      serialized_example,
      # Defaults are not specified since both keys are required.
      features={
          'image_raw': tf.FixedLenFeature([], tf.string),
          'label': tf.FixedLenFeature([], tf.int64),
      })

  # Convert from a scalar string tensor (whose single string has
  # length mnist.IMAGE_PIXELS) to a uint8 tensor with shape
  # [mnist.IMAGE_PIXELS].
  image = tf.decode_raw(features['image_raw'], tf.uint8)
  image.set_shape([mnist.IMAGE_PIXELS])

  # OPTIONAL: Could reshape into a 28x28 image and apply distortions
  # here.  Since we are not applying any distortions in this
  # example, and the next step expects the image to be flattened
  # into a vector, we don't bother.

  # Convert from [0, 255] -> [-0.5, 0.5] floats.
  image = tf.cast(image, tf.float32) * (1. / 255) - 0.5

  # Convert label from a scalar uint8 tensor to an int32 scalar.
  label = tf.cast(features['label'], tf.int32)

  return image, label


def inputs(train, batch_size, num_epochs):
  """Reads input data num_epochs times.

  Args:
    train: Selects between the training (True) and validation (False) data.
    batch_size: Number of examples per returned batch.
    num_epochs: Number of times to read the input data, or 0/None to
       train forever.

  Returns:
    A tuple (images, labels), where:
    * images is a float tensor with shape [batch_size, mnist.IMAGE_PIXELS]
      in the range [-0.5, 0.5].
    * labels is an int32 tensor with shape [batch_size] with the true label,
      a number in the range [0, mnist.NUM_CLASSES).
    Note that an tf.train.QueueRunner is added to the graph, which
    must be run using e.g. tf.train.start_queue_runners().
  """
  if not num_epochs: num_epochs = None
  filename = os.path.join(FLAGS.train_dir,
                          TRAIN_FILE if train else VALIDATION_FILE)

  with tf.name_scope('input'):
    filename_queue = tf.train.string_input_producer(
        [filename], num_epochs=num_epochs)

    # Even when reading in multiple threads, share the filename
    # queue.
    image, label = read_and_decode(filename_queue)

    # Shuffle the examples and collect them into batch_size batches.
    # (Internally uses a RandomShuffleQueue.)
    # We run this in two threads to avoid being a bottleneck.
    images, sparse_labels = tf.train.shuffle_batch(
        [image, label], batch_size=batch_size, num_threads=2,
        capacity=1000 + 3 * batch_size,
        # Ensures a minimum amount of shuffling of examples.
        min_after_dequeue=1000)

    return images, sparse_labels


def run_training():
  """Train MNIST for a number of steps."""
  gfile.MkDir(FLAGS.checkpoint_dir)

  # Tell TensorFlow that the model will be built into the default Graph.
  with tf.Graph().as_default():
    # Input images and labels.
    images, labels = inputs(train=True, batch_size=FLAGS.batch_size,
                            num_epochs=FLAGS.num_epochs)

    # Build a Graph that computes predictions from the inference model.
    logits = mnist.inference(images,
                             FLAGS.hidden1,
                             FLAGS.hidden2)

    # Add to the Graph the loss calculation.
    loss = mnist.loss(logits, labels)
    # Add to the Graph the predict

    # Add to the Graph operations that train the model.
    train_op = mnist.training(loss, FLAGS.learning_rate)

    # The op for initializing the variables.
    #init_op = tf.initialize_all_variables()
    init_op = tf.group(tf.initialize_all_variables(), tf.initialize_local_variables())

    # Create a session for running operations in the Graph.
    sess = tf.Session()

    # Create checkpoint saver
    saver = tf.train.Saver()

    # Initialize the variables (the trained variables and the
    # epoch counter).
    sess.run(init_op)

    # Start input enqueue threads.
    coord = tf.train.Coordinator()
    threads = tf.train.start_queue_runners(sess=sess, coord=coord)

    try:
      step = 0
      while not coord.should_stop():
        start_time = time.time()

        # Run one step of the model.  The return values are
        # the activations from the `train_op` (which is
        # discarded) and the `loss` op.  To inspect the values
        # of your ops or variables, you may include them in
        # the list passed to sess.run() and the value tensors
        # will be returned in the tuple from the call.
        _, loss_value = sess.run([train_op, loss])

        duration = time.time() - start_time

        # Print an overview fairly often.
        if step % 100 == 0:
          saver.save(sess, FLAGS.checkpoint_dir + '/model.ckpt',
                     global_step=step)
          print('Step %d: loss = %.2f (%.3f sec)' % (step, loss_value,
                                                     duration))
        step += 1
    except tf.errors.OutOfRangeError:
      print('Done training for %d epochs, %d steps.' % (FLAGS.num_epochs, step))
    finally:
      # When done, ask the threads to stop.
      coord.request_stop()

    # Wait for threads to finish.
    coord.join(threads)
    print('Exporting trained model to ' + FLAGS.export_dir)
    # NOTE this format is depreceted, please refer to tensorflow_serving for
    # more examples
    saver = tf.train.Saver(sharded=True)
    model_exporter = exporter.Exporter(saver)
    signature = exporter.classification_signature(input_tensor=images,
                                                  scores_tensor=logits)
    model_exporter.init(sess.graph.as_graph_def(),
                        default_graph_signature=signature)
    model_exporter.export(FLAGS.export_dir, tf.constant(FLAGS.export_version),
                          sess)
    print('Done exporting!')
    sess.close()


def main(_):
  run_training()


if __name__ == '__main__':
  tf.app.run()

