
iOS开发之手动布局子视图

手动布局子视图;
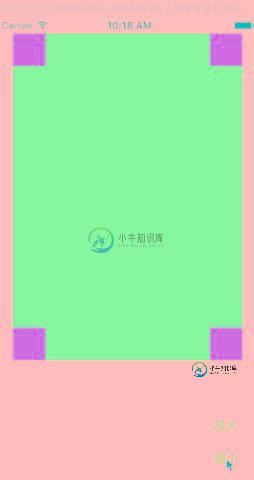
下面先看下效果图,我们今天要实现的效果:
这里我们默认用storyboard启动:
首先我们要在白色的屏幕上面创建一个父视图SuperView(蓝色的背景),在父视图里面创建四个小视图(橘黄色的背景)
下面看代码,
在SuperView.h文件里面:
#import <UIKit/UIKit.h>

@interface SuperView : UIView{

 UIView * _view01;
 UIView * _view02;
 UIView * _view03;
 UIView * _view04;

}

//声明创建视图函数
-(void) createSubViews;

@end

在SuperView.m文件里面:


#import "SuperView.h"

@interface SuperView ()

@end

@implementation SuperView

-(void) createSubViews{

 //左上角视图
 _view01 = [[UIView alloc] init];
 _view01.frame=CGRectMake(0, 0, 40, 40);

 //右上角视图
 _view02 = [[UIView alloc] init];
 _view02.frame=CGRectMake(self.bounds.size.width-40, 0, 40, 40);

 //右下角视图
 _view03 = [[UIView alloc] init];
 _view03.frame=CGRectMake(self.bounds.size.width-40, self.bounds.size.height-40, 40, 40);

 //左下角视图
 _view04 = [[UIView alloc] init];
 _view04.frame=CGRectMake(0, self.bounds.size.height-40, 40, 40);

 _view01.backgroundColor=[UIColor orangeColor];
 _view02.backgroundColor=[UIColor orangeColor];
 _view03.backgroundColor=[UIColor orangeColor];
 _view04.backgroundColor=[UIColor orangeColor];

 [self addSubview:_view01];
 [self addSubview:_view02];
 [self addSubview:_view03];
 [self addSubview:_view04];

}

//当需要重新布局时调用此函数
//通过此函数重新设定子视图的位置
//手动调整子视图的位置
-(void)layoutSubviews{

 [UIView beginAnimations:nil context:nil];
 [UIView setAnimationDuration:1];

 _view01.frame=CGRectMake(0, 0, 40, 40);
 _view02.frame=CGRectMake(self.bounds.size.width-40, 0, 40, 40);
 _view03.frame=CGRectMake(self.bounds.size.width-40, self.bounds.size.height-40, 40, 40);
 _view04.frame=CGRectMake(0, self.bounds.size.height-40, 40, 40);

 [UIView commitAnimations];

}


@end
在ViewController.m文件里面:
#import "ViewController.h"
#import "SuperView.h"

@interface ViewController ()

@end

@implementation ViewController

- (void)viewDidLoad {
 [super viewDidLoad];
 // Do any additional setup after loading the view, typically from a nib.

 //创建一个父视图
 SuperView * sView = [[SuperView alloc]init];
 sView.frame = CGRectMake(20, 20, 180, 280);

 //父视图调用函数创建四个小视图
 [sView createSubViews];

 sView.backgroundColor = [UIColor blueColor];
 [self.view addSubview:sView];

 UIButton * btn01 = [UIButton buttonWithType:UIButtonTypeRoundedRect];
 btn01.frame = CGRectMake(240, 480, 80, 40);
 [btn01 setTitle:@"放大" forState:UIControlStateNormal];
 [btn01 addTarget:self action:@selector(pressLarge) forControlEvents:UIControlEventTouchUpInside];
 [self.view addSubview:btn01];

 UIButton * btn02 = [UIButton buttonWithType:UIButtonTypeRoundedRect];
 btn02.frame = CGRectMake(240, 520, 80, 40);
 [btn02 setTitle:@"缩小" forState:UIControlStateNormal];
 [btn02 addTarget:self action:@selector(pressSmall) forControlEvents:UIControlEventTouchUpInside];
 [self.view addSubview:btn02];

 sView.tag = 101;


}

//放大父视图
-(void) pressLarge{
 SuperView * sView = (SuperView*)[self.view viewWithTag:101];
 [UIView beginAnimations:nil context:nil];
 [UIView setAnimationDuration:1];
 sView.frame=CGRectMake(20, 20, 280, 400);
 [UIView commitAnimations];

}

//缩小父视图

-(void) pressSmall{
 SuperView * sView = (SuperView*)[self.view viewWithTag:101];
 [UIView beginAnimations:nil context:nil];
 [UIView setAnimationDuration:1];
 sView.frame=CGRectMake(20, 20, 180, 280);
 [UIView commitAnimations];
}


- (void)didReceiveMemoryWarning {
 [super didReceiveMemoryWarning];
 // Dispose of any resources that can be recreated.
}

@end
以上代码书写完毕,就达到了上面视图的效果,希望对大家的学习有所帮助,也希望大家多多支持小牛知识库。
-
布局样式 Weex支持盒模型和Flexbox布局,都是基于CSS的标准来实现的,但远没有传统CSS那幺灵活和好用,也许是受限于android 和iOS 平台原生层面布局能力的影响。在使用 buiweex的 样式之前,请先了解 【通用样式】 【文本样式】 Flex布局 弹性盒子 框架提供了一组class,分别是 flex1 ~ flex12,定义 flex成员可以占用容器剩余空间的大小。注意区别于w
-
我遇到了自动布局的问题,似乎无法找到应该很容易实现的答案。 我有以下视图层次结构: 标签上的前导/尾随限制使它们在更薄的设备上更高(iPhone 4s vs iPhone 6)。 为了让UIScrollview正常工作,我需要在UIScrollView内部设置UIView的高度约束,以避免出现“不明确的高度”警告。 但在iPhone 4s上运行时,UIView不够高,无法容纳它的子视图。 到目前为
-
本文向大家介绍iOS开发之手势识别,包括了iOS开发之手势识别的使用技巧和注意事项,需要的朋友参考一下 一、UIGestureRecognizer简单介绍 我们已经学习了触摸事件处理,但触摸事件处理起来很麻烦,每个触摸事件处理都需要实现3个touches方法,比较繁琐,实际上我们可以使用更加简单的触摸事件处理操作,那就是 手势识别UIGestureRecognizer 。 手势识别操作基类UIGe
-
我试图在代码中生成一个视图。这是我的视图对象的层次结构 UIScrollView UIView UIButton 滚动视图应该与窗口大小相同。按钮应该尽可能大。我使用iOS自动布局,所以我所有对象的约束字符串如下所示 我还为每个对象将translatesautorexingmaskintoconstraints设置为NO。 问题是按钮只获得默认的按钮大小。其父视图对象(UIView)仅获取其子视图
-
本文向大家介绍Android开发之TableLayout表格布局,包括了Android开发之TableLayout表格布局的使用技巧和注意事项,需要的朋友参考一下 表格布局模型以行列的形式管理子控件,每一行为一个TableRow的对象,当然也可以是一个View的对象。TableRow可以添加子控件,每添加一个为一列。 TableLayout属性: android:collapseColumns:将
-
本文向大家介绍iOS开发之手势识别实例,包括了iOS开发之手势识别实例的使用技巧和注意事项,需要的朋友参考一下 感觉有必要把iOS开发中的手势识别做一个小小的总结。下面会先给出如何用storyboard给相应的控件添加手势,然后在用纯代码的方式给我们的控件添加手势,手势的用法比较简单。和button的用法类似,也是目标 动作回调,话不多说,切入今天的正题。 总共有六种手势识别:轻击手势(TapGe