前端 - 如何优雅地实现图片局部预览组件?
如何优雅地实现图片局部预览组件?
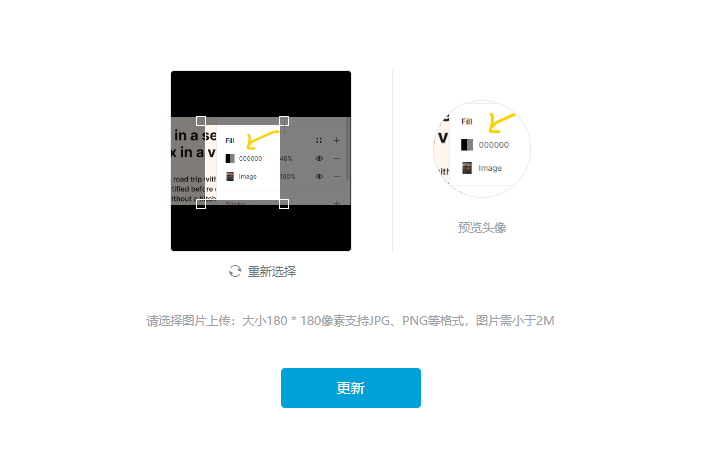
下面是bilibili用户头像上传的界面,左侧我们可以通过移动选择框和缩放选择框来选择图片的某一部分,右侧是头像预览。

我自己尝试使用react+tailwindcss来实现了一下,但是实现的并不太理想。
- 通过四个角来缩放的效果并不好。有时候没有反应,有时候又突然之间变换很大。
- 应该是当我按下鼠标之后,抬起鼠标之前,才能移动和缩放选择框。但是有时候,抬起了依然可以移动选择框。
- 鼠标移动操作的速度一快,就会出现一些意料之外的效果(如前两条所示)。
- 性能也不太好,处理了太多的
mousemove事件了(可以考虑加上防抖?)。
可以在我实现的基础上给出一些改进建议或者直接重新给出一个新的方案。希望可以尽可能详细,有完整的代码,最终的效果可以交互。
简要说明一下我的实现思路:
HTML结构
image和选择框为兄弟元素。它们的父元素为相对定位,选择框为绝对定位。父元素的宽度固定,image的最大宽度为100%,父元素的高度由image的大小决定。选择框中有四个元素,分别表示四个角上的小方框,采用的也是绝对定位
<div className="w-52 h-52 bg-gray-50 flex flex-col justify-center items-center"> <div className="relative"> <img src={imgSrc} ref={imgRef} /> <div className="absolute w-24 h-24 border-red-100 bg-transparent border-2 hover:cursor-move" style={{ left: selector.x + "px", top: selector.y + "px", width: selector.width + "px", height: selector.height + "px", }} ref={selectorRef} onMouseDown={handleMouseDown} onMouseUp={handleMouseUp} onMouseMove={handleMouseMove} > <div className="absolute w-2 h-2 border-red-100 bg-transparent border-2 -top-2 -left-2 cursor-nwse-resize" onMouseDown={() => setPress({ ...press, topLeft: true })} ></div> <div className="absolute w-2 h-2 border-red-100 bg-transparent border-2 -top-2 -right-2 cursor-nesw-resize" onMouseDown={() => setPress({ ...press, topRight: true })} ></div> <div className="absolute w-2 h-2 border-red-100 bg-transparent border-2 -bottom-2 -left-2 cursor-nesw-resize" onMouseDown={() => setPress({ ...press, bottomLeft: true })} ></div> <div className="absolute w-2 h-2 border-red-100 bg-transparent border-2 -bottom-2 -right-2 cursor-nwse-resize" onMouseDown={() => setPress({ ...press, bottomRight: true })} ></div> </div> </div> </div>状态
- 鼠标是否在选择框中按下。用一个对象来记录,并设置了5个属性,以区分按下的位置。根据按下的位置不同,鼠标移动操作时的行为也不同,是移动选择框还是缩放选择框,缩放的话该怎么缩放。
- 鼠标的位置。通过记录相邻两次鼠标的位置并计算其差值来决定选择框应移动多远的距离。
imagRef用来获取图片渲染之后的width、height、naturalWdith、naturalHeight,在计算图片缩放比例、选择框越界判断的时候有用。selectorRef获取选择框的width和height。
const [press, setPress] = React.useState({ topLeft: false, topRight: false, bottomLeft: false, bottomRight: false, other: false, }); const [mousPosition, setMousePosition] = React.useState(null); const [selector, setSelector] = React.useState({ x: 0, y: 0, width: null, height: null, }); const imgRef = React.useRef(); const selectorRef = React.useRef();事件处理函数
mouseDownUp重置press状态。mouseDownKey设置对应的press状态,设置鼠标的位置。主要逻辑在
mouseMove上。- 根据按下位置的不同,更新选择框的位置和大小。
- 防止选择框越界。
- 这里的
onChange函数主要用来设置一些用于在canvas上绘制图片时所需的信息(drawImage(img, x, y, sw, sh, dx, dy, dw, dh)。 - 设置鼠标的位置。
function handleMouseMove(event) { if (Object.values(press).every((e) => !e)) return; const { clientX, clientY } = event; const offsetX = clientX - mousPosition.x; const offsetY = clientY - mousPosition.y; let newX; let newY; let newWidth; let newHeight; if (press.topLeft) { console.log('press top left'); // bottom right don't change newX = selector.x + offsetX; newY = selector.y + offsetY; newWidth = selector.width - offsetX; newHeight = selector.height - offsetY; if (newWidth <= 0 || newHeight <= 0) { setPress({ ...press, topLeft: false, bottomRight: true, }); } } else if (press.topRight) { newX = selector.x; newY = selector.y + offsetY; newWidth = selector.width + offsetX; newHeight = selector.height - offsetY; if (newWidth <= 0 || newHeight <= 0) { setPress({ ...press, topRight: false, bottomLeft: true, }); } } else if (press.bottomLeft) { newX = selector.x + offsetX; newY = selector.y; newWidth = selector.width - offsetX; newHeight = selector.height + offsetY; if (newWidth <= 0 || newHeight <= 0) { setPress({ ...press, bottomLeft: false, topRight: true, }); } } else if (press.bottomRight) { newX = selector.x; newY = selector.y; newWidth = selector.width + offsetX; newHeight = selector.height + offsetY; if (newWidth <= 0 || newHeight <= 0) { setPress({ ...press, bottomRight: false, topLeft: true, }); } } else { newX = selector.x + offsetX; newY = selector.y + offsetY; newHeight = selector.height; newWidth = selector.width; } if (newX + selector.width > imgRef.current.width) newX = imgRef.current.width - selector.width; if (newX < 0) newX = 0; if (newY + selector.height > imgRef.current.height) newY = imgRef.current.height - selector.height; if (newY < 0) newY = 0; if (newHeight < 0) newHeight = 0; if (newWidth < 0) newWidth = 0; setSelector({ ...selector, x: newX, y: newY, width: newWidth, height: newHeight, }); onChange( imgRef.current, newX * imgRef.current.xScale, newY * imgRef.current.yScale, selector.width * imgRef.current.xScale, selector.height * imgRef.current.yScale ); setMousePosition({ x: clientX, y: clientY }); }- stackblitz
- github
共有1个答案
粗略看一下,提几个建议:
- 图片增加不可选中样式
user-select: none; - press应该用
useRef而不是useState - mouse相关事件需要增加阻止事件冒泡
...
感觉你对React很不熟
-
如图:表格内显示出图片链接,鼠标悬停链接弹出图片,现在希望点击图片能够实现一些预览操作:放大、缩小。 UI 点击图片后,报错:
-
本文向大家介绍js本地图片预览实现代码,包括了js本地图片预览实现代码的使用技巧和注意事项,需要的朋友参考一下 本文实例为大家分享了js本地图片预览实例,供大家参考,具体内容如下 以上就是本文的全部内容,希望对大家的学习有所帮助,也希望大家多多支持呐喊教程。
-
本文向大家介绍js实现前端图片上传即时预览功能,包括了js实现前端图片上传即时预览功能的使用技巧和注意事项,需要的朋友参考一下 现在,在实现前端图片即时预览,可以说是一件很简单的事情了。 我们只需要用file对象和FileReader对象,既可以轻松实现,无需下载类库。 HTML代码 先来说说input,input这个元素,具有一个files属性,该属性是一个filelist对象,是file对象的
-
本文向大家介绍Javascript图片上传前的本地预览实例,包括了Javascript图片上传前的本地预览实例的使用技巧和注意事项,需要的朋友参考一下 图片的上传预览功能主要用于图片上传前的一个效果的预览,目前主流的方法主要有js,jquery与flash实现,但我们一般都会使用js来实现图片上传预览功能,下面来看一个例子。 原理: 分为两步:当上传图片的input被触发并选择本地图片之后获取要上
-
本文向大家介绍jQuery实现本地预览上传图片功能,包括了jQuery实现本地预览上传图片功能的使用技巧和注意事项,需要的朋友参考一下 本文实例介绍了基于JQUERY扩展,图片上传预览插件,目前兼容浏览器(IE 谷歌 火狐) 不支持safari,分享给大家供大家参考,具体内容如下 HTML代码: js代码: 直接上第二段代码,jquery js实现上传图片之前预览本地图片 以上就是本文的全部内容,
-
本文向大家介绍纯JS实现本地图片预览的方法,包括了纯JS实现本地图片预览的方法的使用技巧和注意事项,需要的朋友参考一下 本文实例讲述了纯JS实现本地图片预览的方法。分享给大家供大家参考。具体如下: 刚突然看到,网上已经有很多类似的代码,但没找到一个合适的。就拿自己以前写的写了一个。代码比较简洁,引用了一个我之前写的js.方法可以单独剥离出来使用,未测太多兼容。本机浏览器基本都支持(IE,FF,Ch

