
导航抽屉无法放在状态栏下方(android studio)[重复]

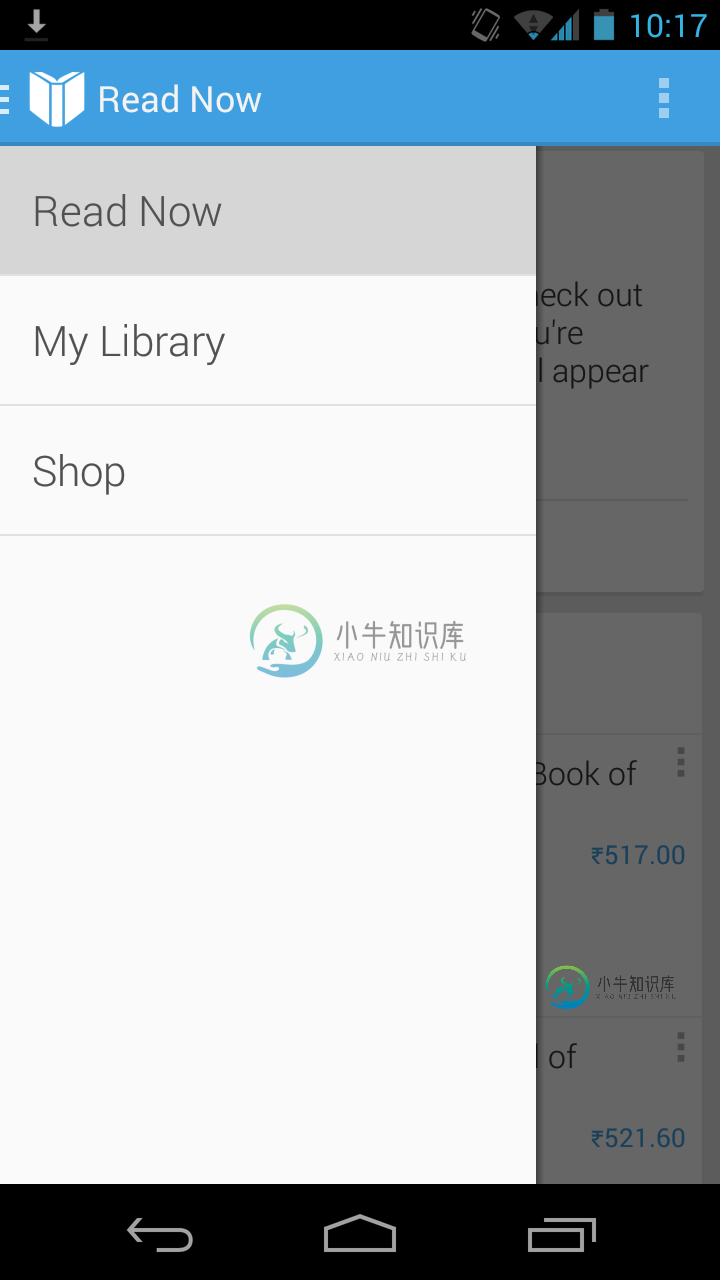
我正在android studio中开发一个应用程序。我正在尝试创建一个导航抽屉,它正好位于状态栏下方。出于某种原因,导航栏显示在应用程序栏下方,而不是像下图中那样:
导航抽屉1
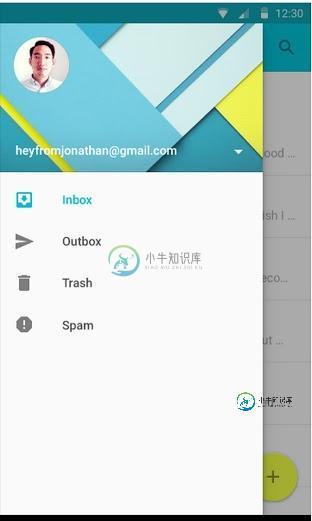
我希望它看起来像这样:
导航
这是我的xml代码:
<LinearLayout
xmlns:android="http://schemas.android.com/apk/res/android"
xmlns:app="http://schemas.android.com/apk/res-auto"
android:layout_width="match_parent"
android:layout_height="match_parent"
android:fitsSystemWindows="true"
android:orientation="vertical"
>


<android.support.v7.widget.Toolbar
    xmlns:android="http://schemas.android.com/apk/res/android"
    android:layout_width="match_parent"
    android:layout_height="wrap_content"

    android:background="#ff4000"
    android:id="@+id/toolbar"
    android:theme="@style/ThemeOverlay.AppCompat.Dark.ActionBar"
    app:title="Home"
    />

<android.support.v4.widget.DrawerLayout
    xmlns:android="http://schemas.android.com/apk/res/android"
    xmlns:app="http://schemas.android.com/apk/res-auto"

    android:layout_height="match_parent"
    android:layout_gravity="start"

    android:layout_width="match_parent"
    android:id="@+id/drawerLayout"
    >


<FrameLayout
    android:orientation="vertical"
    android:layout_width="match_parent"
    android:layout_height="match_parent"

    android:id="@+id/containerView">
 </FrameLayout>


<android.support.design.widget.NavigationView

    xmlns:android="http://schemas.android.com/apk/res/android"
    xmlns:app="http://schemas.android.com/apk/res-auto"
    android:layout_width="wrap_content"
    android:layout_height="match_parent"

    android:fitsSystemWindows="true"
    android:layout_gravity="start"
    android:background="#FFFFFF"
    app:headerLayout="@layout/navigation_drawer_header"
    android:id="@+id/shitstuff"
    app:itemTextColor="@color/black"
    app:menu="@menu/drawermenu"
    android:layout_marginTop="-24dp"


    />


</android.support.v4.widget.DrawerLayout>

</LinearLayout>
任何帮助都将是伟大的!谢谢!
共有3个答案

活动主导航。xml
<?xml version="1.0" encoding="utf-8"?>
<android.support.v4.widget.DrawerLayout
    xmlns:android="http://schemas.android.com/apk/res/android"
    xmlns:app="http://schemas.android.com/apk/res-auto"
    xmlns:tools="http://schemas.android.com/tools"
    android:id="@+id/drawer_layout"
    android:layout_width="match_parent"
    android:layout_height="match_parent"
    android:fitsSystemWindows="true"
    tools:context=".MainActivity"
    android:elevation="7dp">

    <LinearLayout
    android:layout_width="match_parent"
    android:layout_height="match_parent"
    android:orientation="vertical">

    <include layout="@layout/toolbar" />

    <!-- Let's add fragment -->
    <FrameLayout
        android:layout_width="match_parent"
        android:layout_height="match_parent"
        android:id="@+id/frame"/>

    </LinearLayout>


    <android.support.design.widget.NavigationView
    android:id="@+id/navigation"
    android:layout_width="wrap_content"
    android:layout_height="match_parent"
    android:layout_gravity="start"
    app:menu="@menu/activity_home_drawer"

    app:headerLayout="@layout/header"/>


</android.support.v4.widget.DrawerLayout>
头球。xml
    <?xml version="1.0" encoding="utf-8"?>
<LinearLayout xmlns:android="http://schemas.android.com/apk/res/android"
    android:orientation="vertical" android:layout_width="match_parent"
    android:background="@drawable/back_header"
    android:layout_height="178dp">


    <TextView
    android:layout_width="wrap_content"
    android:layout_height="wrap_content"
    android:layout_gravity="center_vertical"
    android:text="Header"
    android:textColor="@android:color/white"/>

</LinearLayout>
菜单文件夹activity_home_drawer.xml
<?xml version="1.0" encoding="utf-8"?>
   <menu xmlns:android="http://schemas.android.com/apk/res/android">

  <group android:id="@+id/grp1"  android:checkableBehavior="single">
    <item
        android:id="@+id/nav_first"
        android:icon="@drawable/first"
        android:title="First" />

   </group>

    // if you want to underline than use group

    <item
        android:id="@+id/nav_second"
        android:icon="@drawable/second"
        android:title="second" />


      </menu>
主要活动。JAVA
  public class MainActivity extends AppCompatActivity {


@Override
protected void onCreate(Bundle savedInstanceState) {
    super.onCreate(savedInstanceState);
    setContentView(R.layout.activity_main_nav);


    if (savedInstanceState == null) {
        getSupportFragmentManager().beginTransaction().replace(R.id.frame, new YourFragment()).commit();

    }
    setNavigationDrawer();
    setToolBar();


}

private void setToolBar() {
    final Toolbar tb = (Toolbar) findViewById(R.id.toolbar1);
    setSupportActionBar(tb);

    ActionBar ab = getSupportActionBar();
    ab.setHomeAsUpIndicator(R.drawable.ic_menu_white_24dp);
    ab.setDisplayHomeAsUpEnabled(true);
    ab.setDisplayShowHomeEnabled(true);


    final android.app.FragmentManager fm = getFragmentManager();

    fm.addOnBackStackChangedListener(new android.app.FragmentManager.OnBackStackChangedListener() {
        @Override
        public void onBackStackChanged() {

            if (getSupportFragmentManager().getBackStackEntryCount() ==0) {
                dLayout.closeDrawers();
                finish();
            }
            else
            {
                dLayout.closeDrawers();

            }
        }
    });
}


private void setNavigationDrawer() {
    dLayout = (DrawerLayout) findViewById(R.id.drawer_layout);
    NavigationView navView = (NavigationView) findViewById(R.id.navigation);
    Menu m = navView.getMenu();
    for (int i=0;i<m.size();i++) {
        MenuItem mi = m.getItem(i);

        //for aapplying a font to subMenu ...
        SubMenu subMenu = mi.getSubMenu();
        if (subMenu!=null && subMenu.size() >0 ) {
            for (int j=0; j <subMenu.size();j++) {
                MenuItem subMenuItem = subMenu.getItem(j);


            }
        }


    }
    navView.setNavigationItemSelectedListener(new NavigationView.OnNavigationItemSelectedListener() {
        @Override
        public boolean onNavigationItemSelected(MenuItem menuItem) {

            Fragment frag = null;
            int itemId = menuItem.getItemId();

            if (itemId == R.id.first) {
               // frag = new First();
                frag = new SearchJobActivity();

            } else if (itemId == R.id.second) {
                frag = new second();
            }


            if (frag != null) {
                openFragmentNew(frag);
                dLayout.closeDrawers();
                return  true;
            }


            return false;
        }
    });
}


public void openFragmentNew(Fragment fragment) {
    String backStateName = fragment.getClass().getName();
    FragmentManager manager = getSupportFragmentManager();
    //fragment not in back stack, create it.
    FragmentTransaction ft = manager.beginTransaction();
    if(!fragments.contains(backStateName)) {

       // ft.setTransition(FragmentTransaction.TRANSIT_FRAGMENT_FADE);
        // ft.setCustomAnimations(R.anim.fade_in, R.anim.fade_out);
        ft.replace(R.id.frame, fragment);
        ft.addToBackStack(backStateName);
        ft.commit();


        System.out.println("backStateName" + fragments);
    }
    else
    {
       // ft.remove(fragment);

        ft.replace(R.id.frame, fragment);
        ft.commit();
  //      manager.popBackStack();
    }


}


@Override
public void onBackPressed() {
    if (dLayout.isDrawerOpen(GravityCompat.START)) {
        dLayout.closeDrawer(GravityCompat.START);
    } else {
        super.onBackPressed();
    }
}
在主活动中更改对您的编码

您必须在“导航视图”中包含您的工具栏
您的代码如下所示:
<android.support.v4.widget.DrawerLayout
    xmlns:android="http://schemas.android.com/apk/res/android"
    xmlns:tools="http://schemas.android.com/tools"
    android:id="@+id/drawer_layout"
    android:layout_width="match_parent"
    android:layout_height="match_parent"
    android:fitsSystemWindows="true"
    tools:openDrawer="start">

    <android.support.design.widget.CoordinatorLayout
        xmlns:android="http://schemas.android.com/apk/res/android"
        xmlns:tools="http://schemas.android.com/tools"
        android:layout_width="match_parent"
        android:layout_height="match_parent">

            <android.support.v7.widget.Toolbar
                xmlns:android="http://schemas.android.com/apk/res/android"
                android:layout_width="match_parent"
                android:layout_height="wrap_content"

                android:background="#ff4000"
                android:id="@+id/toolbar"
                android:theme="@style/ThemeOverlay.AppCompat.Dark.ActionBar"
                app:title="Home"
                />


    </android.support.design.widget.CoordinatorLayout>


    <android.support.design.widget.NavigationView
        android:id="@+id/nav_view"
        android:layout_width="wrap_content"
        android:layout_height="match_parent"
        android:layout_gravity="left"
        android:fitsSystemWindows="true">

    </android.support.design.widget.NavigationView>

</android.support.v4.widget.DrawerLayout>

在这里你需要工具栏:
<?xml version="1.0" encoding="utf-8"?>
<android.support.v4.widget.DrawerLayout xmlns:android="http://schemas.android.com/apk/res/android"
    xmlns:app="http://schemas.android.com/apk/res-auto"
    xmlns:tools="http://schemas.android.com/tools"
    android:id="@+id/drawer_layout"
    android:layout_width="match_parent"
    android:layout_height="match_parent"
    android:fitsSystemWindows="true"//fit to top status bar
    tools:openDrawer="start">

    <include
        layout="@layout/app_bar_home_actvity"
        android:layout_width="match_parent"
        android:layout_height="match_parent" />

    <android.support.design.widget.NavigationView
        android:id="@+id/nav_view"
        android:layout_width="wrap_content"
        android:layout_height="match_parent"
        android:layout_gravity="start">

</android.support.design.widget.NavigationView>
</android.support.v4.widget.DrawerLayout>
app_bar_home_actvity.xml
<?xml version="1.0" encoding="utf-8"?>
<android.support.design.widget.CoordinatorLayout xmlns:android="http://schemas.android.com/apk/res/android"
    xmlns:app="http://schemas.android.com/apk/res-auto"
    xmlns:tools="http://schemas.android.com/tools"
    android:layout_width="match_parent"
    android:layout_height="match_parent"
    android:fitsSystemWindows="true" //fit to top status bar
    tools:context=".activity.HomeActivity">

    <android.support.design.widget.AppBarLayout
        android:layout_width="match_parent"
        android:layout_height="wrap_content"
        android:theme="@style/AppTheme.AppBarOverlay">

        <android.support.v7.widget.Toolbar
            android:id="@+id/toolbar"
            android:layout_width="match_parent"
            android:layout_height="?attr/actionBarSize"
            android:background="?attr/colorPrimary"
            app:popupTheme="@style/AppTheme.PopupOverlay" />

    </android.support.design.widget.AppBarLayout>

    <include layout="@layout/content_home_actvity" />


</android.support.design.widget.CoordinatorLayout>
-
我试图让我的抽屉菜单在状态栏下。我已经广泛阅读了关于ScrimInsetsFrameLayout视图的内容,我试图实现它,但出于某种原因,它不会下沉。 以下是我使用/编写的代码。 XML抽屉布局: ScrimInsetsFrameLayout。爪哇: 最后,这里是我的风格。xml for values-v21: 我已经看了2014年的输入输出应用程序源代码以及这个问题,我不知道有什么不同。 我已经
-
我尝试在我的应用程序中构建导航抽屉,导航抽屉在之前版本的牛轧糖中运行良好,但在牛轧糖中,导航抽屉不会出现在状态栏上。我尝试了很多解决方案,但没有在牛轧糖中发挥作用,请帮助!! 这是我的主要活动。xml文件: 我的styles.xml: 和样式(v21). xml 这是我当前的导航抽屉,我想放在状态栏上。
-
大家好, 我是一名Android编程新手,目前正在开发一款实践应用程序,它或多或少是教程代码的拼凑。 现在我在工具栏下面有一个导航抽屉。我想重新调整xml层次结构,使其与材料设计指南保持一致,并在工具栏上方具有导航抽屉。这似乎是一项足够简单的任务,但就我而言,我似乎无法完成它。 有人能提供一些建议吗? 上面的代码是这里找到的一个稍微修改的版本,由Ratan编写:https://androidbel
-
我目前正在为我的Android应用程序使用导航抽屉。在我的第一个片段中,有一个片段使用Facebook的Graph API加载数据。因此,当我的应用程序第一次加载时,它首先进入第一个片段。 然后,我使用导航抽屉单击另一个片段并查看它。 最后,我重用导航抽屉返回第一个片段并查看它。 我面临的问题是,我如何继续利用已经创建过一次的片段,而不是在选择导航抽屉项时重新创建它。我的片段切换代码如下所示。 我
-
我正在android应用程序中使用导航抽屉<每个片段都包含从internet获取数据并显示在自定义列表中的异步任务。 这是选择片段的代码: 但当我在片段之间切换时,一个异步任务再次开始加载数据<那么如何保存片段的状态呢 我在stackoverflow上尝试了所有可能的解决方案 请帮帮我
-
但是像App Store里一样透明模糊但是有背景色,问题是导航控制器的背景色不像正常的那样在状态栏下。 我的代码: 编辑:我有一个自定义类和视图控制器嵌入在一个 Swift 3,Xcode 8.0 beta 5。