
Android Opengl圆形纹理

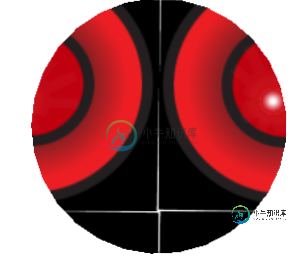
我一直在尝试添加纹理,但纹理如下所示:

下面是我添加坐标和纹理坐标的代码。
for(int i=0; i<outerVertexCount; i++) {
    float percent=(i/(float)(outerVertexCount));
    float rad= (float) (percent*2*Math.PI);
    float outerX= (float) (centerX+radius*Math.cos(rad));
    float outerY=(float)(centerY+radius*Math.sin(rad));

    int previous=idx;
    circleCoordinates[idx++]=outerX;
    circleCoordinates[idx++]=outerY;
    circleCoordinates[idx++]=(circleCoordinates[previous])/(radius*2);
    circleCoordinates[idx++] = (circleCoordinates[previous+1])/(radius*2);
}
请帮帮我。
共有2个答案

这是一个例子:
public class Circle {

private int[] textureIDs = new int[1];

private int numberOfVertices = 30;


private final float[][] vertices = new float[numberOfVertices][2];
private final float[][] texVertices = new float[numberOfVertices][2];


private FloatBuffer vertexBuffer; // Buffer for vertex-array
private FloatBuffer texBuffer;    // Buffer for texture-coords-array (NEW)


public Circle() {
    setUpVertices(1.0f);
    // Setup vertex-array buffer. Vertices in float. A float has 4 bytes
    ByteBuffer vbb = ByteBuffer.allocateDirect(vertices.length * 4 * 2);
    vbb.order(ByteOrder.nativeOrder()); // Use native byte order
    vertexBuffer = vbb.asFloatBuffer(); // Convert byte buffer to float

    // Loop through the vertices and put them in the vertexbuffer
    for (int i = 0; i < numberOfVertices; i++) {
        for (int j = 0; j <= 1; j++) {
            vertexBuffer.put(vertices[i][j]); // Copy data into buffer
        }
    }
    vertexBuffer.position(0); // Rewind

    setUpTextureVertices(1.0f);

    // Setup texture-coords-array buffer, in float. An float has 4 bytes
    ByteBuffer tbb = ByteBuffer.allocateDirect(vertices.length * 4 * 2);
    tbb.order(ByteOrder.nativeOrder());
    texBuffer = tbb.asFloatBuffer();
    // Loop through the vertices and put them in the vertexbuffer
    for (int i = 0; i < numberOfVertices; i++) {
        for (int j = 0; j <= 1; j++) {
            texBuffer.put(texVertices[i][j]); // Copy data into buffer
        }
    }
    texBuffer.position(0);
}


public void draw(GL10 gl) {
    gl.glFrontFace(GL10.GL_CCW);    // Front face in counter-clockwise orientation
    gl.glEnable(GL10.GL_CULL_FACE); // Enable cull face
    gl.glCullFace(GL10.GL_BACK);    // Cull the back face (don't display)

    // Enable vertex-array and define its buffer
    gl.glEnableClientState(GL10.GL_VERTEX_ARRAY);
    gl.glEnableClientState(GL10.GL_TEXTURE_COORD_ARRAY); // Enable texture-coords-array
    gl.glVertexPointer(2, GL10.GL_FLOAT, 0, vertexBuffer);
    gl.glTexCoordPointer(2, GL10.GL_FLOAT, 0, texBuffer); // Define texture-coords


    // Draw the primitives from the vertex-array directly

    gl.glPushMatrix();
    gl.glTranslatef(0.0f, 0.0f, 1.0f);
    gl.glDrawArrays(GL10.GL_TRIANGLE_FAN, 0, numberOfVertices);
    gl.glPopMatrix();

    gl.glDisableClientState(GL10.GL_TEXTURE_COORD_ARRAY);
    gl.glDisableClientState(GL10.GL_VERTEX_ARRAY);
    gl.glDisable(GL10.GL_CULL_FACE);

}


public void loadTexture(GL10 gl, Context context) {
    gl.glGenTextures(1, textureIDs, 0); // Generate texture-ID array
    gl.glBindTexture(GL10.GL_TEXTURE_2D, textureIDs[0]); // Bind to texture ID
    // Set up texture filters
    gl.glTexParameterf(GL10.GL_TEXTURE_2D, GL10.GL_TEXTURE_MIN_FILTER, GL10.GL_NEAREST);
    gl.glTexParameterf(GL10.GL_TEXTURE_2D, GL10.GL_TEXTURE_MAG_FILTER, GL10.GL_LINEAR);

    // Construct an input stream to texture image
    @SuppressLint("ResourceType")
    InputStream istream = context.getResources().openRawResource(R.drawable.circle);
    Bitmap bitmap;
    try {
        // Read and decode input as bitmap
        bitmap = BitmapFactory.decodeStream(istream);
    } finally {
        try {
            istream.close();
        } catch (IOException e) {
        }
    }

    // Build Texture from loaded bitmap for the currently-bind texture ID
    GLUtils.texImage2D(GL10.GL_TEXTURE_2D, 0, bitmap, 0);
    bitmap.recycle();
}

private void setUpTextureVertices(float radius) {
    float theta0 = (float) (2 * Math.PI / (numberOfVertices - 1));

    for (int i = 0; i < numberOfVertices; i++) {

        float theta = i * theta0;

        float c = (float) Math.cos(theta);
        float s = (float) Math.sin(theta);

        float x = radius * c;
        float y = radius * s;

        texVertices[i][0] = (x * 0.5f) + 0.5f;
        texVertices[i][1] = (y * 0.5f) + 0.5f;

    }
}

private void setUpVertices(float radius) {
    float theta0 = (float) (2 * Math.PI / (numberOfVertices - 1));

    for (int i = 0; i < numberOfVertices; i++) {

        float theta = i * theta0;

        float c = (float) Math.cos(theta);
        float s = (float) Math.sin(theta);

        float x = radius * c;
        float y = radius * s;

        vertices[i][0] = x;
        vertices[i][1] = y;

    }
}
}

您正在绘制一个圆,并使用“标准化”几乎相同的坐标来获取纹理坐标。所以你需要做的是将纹理坐标标准化到纹理空间[0,1]。最简单的方法是检查顶部和左侧的纹理坐标是否应分别为(0.5,0.0)和(0.0,0.5)。此外,底部和右侧应分别为(0.5,1.0)和(1.0,0.5)。(接触边缘的点)。
代码中的问题是:
  circleCoordinates[idx++] = (circleCoordinates[previous])/(radius*2);
  circleCoordinates[idx++] = (circleCoordinates[previous+1])/(radius*2);
当您在圆圈中创建点时,这些点将低于0,在某些象限中,这些点将采用错误的纹理点。您还可以通过centerX和centerY来抵消您的圆圈,这也会移动您的纹理。
工作代码应为:
  circleCoordinates[idx++] = (circleCoordinates[previous])/(radius*2) + 0.5 -  centerX / (radius * 2);
  circleCoordinates[idx++] = (circleCoordinates[previous+1])/(radius*2) + 0.5 - centerY / (radius * 2);
0.5是因为您使用radius*2对其进行了规格化,而不添加中心点,它将映射到[-0.5,0.5],但是您也添加了中心点,并对其进行了规格化,因此您必须减去center(XY)/(radius*2),以移除瑕疵。
TLDR;你的(0,0)是第一张图片中的白色交集,你希望它在左上方。相应地规范化。
-
问题内容: 我通过android开发实现了我的目标,如该链接所示:[从Android中的位图裁剪圆形区域,](http://codingdict.com/questions/148437 但是 如何 使用libGDX框架实现呢?我尝试与我合作,但没有成功。 任何人都可以帮助我实现这一目标。 问题答案: 我不知道是否有更简单的方法,但是我提出了一种使用遮罩并将遮罩与原始像素图合并为结果像素图的方法。
-
在Flutter中,我想用圆形边框样式图标按钮,也有材料波纹效果正确工作,以便波纹效果包含在圆形中。在下面的代码中,第一个按钮工作正常。在第二个(弹出)按钮中,波纹效应扩展到围绕该按钮的正方形,而不是限制在圆形边框上。 有办法让弹出按钮正常工作吗?
-
SVG 圆形 - <circle> <circle> 标签可用来创建一个圆: 下面是SVG代码: <svg xmlns="http://www.w3.org/2000/svg" version="1.1"> <circle cx="100" cy="50" r="40" stroke="black" stroke-width="2" fill="red"/> </svg> 对于Opera用
-
问题内容: 请提供有关如何在椭圆形或圆形上进行裁剪的想法。请分享您的想法。 问题答案: 通过增加半径,它将变得更圆滑。 只要图像是正方形,就可以通过将宽度的一半作为拐角半径来获得一个完美的圆: 您还需要添加 斯威夫特4.2
-
我用libgdx和box2d做卡车游戏。在我的游戏中,1米=100像素。我的2D地形是由我生成的,是由点制作的。 我所做的,是为整个多边形创建一个polygonregion并使用texturewrap.repeat。问题是,我的游戏大小被缩小了100倍,以适应box2d单位。 所以我的相机宽度是800/100,高度是480/100。(8x4.8像素)
-
主要内容:圆角矩形,椭圆示例JavaFX Shape类定义了常见的形状,例如线,矩形,圆,Arc,CubicCurve,Ellipse和QuadCurve。 在场景图上绘制矩形需要宽度,高度和左上角的(,)位置。 要在JavaFX中绘制一个矩形,可以使用类。 上面的代码生成以下结果。 圆角矩形 类实现了弧宽和弧高。可以使用这些功能来绘制圆角矩形。 上面的代码生成以下结果。 椭圆示例 上面的代码生成以下结果。