6.4. StatusActivity的布局
6.4.StatusActivity的布局
接下来开始设计一个用户界面,用户可以在里面输入新消息并发布。
Eclipse默认会在res/layout下创建一个main.xml文件。出于一致性的考虑,我们将把它的名字改为status.xml以对应StatusActivity。在Eclipse中重命名一个文件,就右键点击它,选择Refactor→Rename…,输入新名字即可。Eclipse在重命名时会智能地做些同步工作,使所有引用到这个文件的地方保持一致。这在更新Java文件时可以做到完全自动,但对XML文件就不那么尽善尽美了。修改一个XML文件名,我们还需要手工修改Java代码中引用R类的相关部分。比如在这里,就需要将onCreate()方法中的setContentView(R.layout.main)修改为setContentView(R.layout.status)。
这个界面分为四部分:
- 屏幕上方显示的标题,TextView控件。
- 消息的输入框,在此使用EditText控件。
- 更新状态的按钮,Button控件。
- 一个容纳以上所有控件的Layout,它负责将这些控件垂直排开。在此选用前面提到的常用Layout之一——LinearLayout。
StatusActivity的源码大致如下:
例 6.1. res/layout/status.xml
<?xml version="1.0" encoding="utf-8"?>
<!-- Main Layout of Status Activity -->
<LinearLayout xmlns:android="http://schemas.android.com/apk/res/android"
android:orientation="vertical" android:layout_width="fill_parent"
android:layout_height="fill_parent">
<!-- Title TextView-->
<TextView android:layout_width="fill_parent"
android:layout_height="wrap_content" android:gravity="center"
android:textSize="30sp"
android:layout_margin="10dp" android:text="@string/titleStatus"/>
<!-- Status EditText -->
<EditText android:layout_width="fill_parent"
android:layout_height="fill_parent" android:layout_weight="1"
android:hint="@string/hintText" android:id="@+id/editText"
android:gravity="top|center_horizontal"></EditText>
<!-- Update Button -->
<Button android:layout_width="fill_parent"
android:layout_height="wrap_content" android:text="@string/buttonUpdate"
android:textSize="20sp" android:id="@+id/buttonUpdate"></Button>
</LinearLayout>
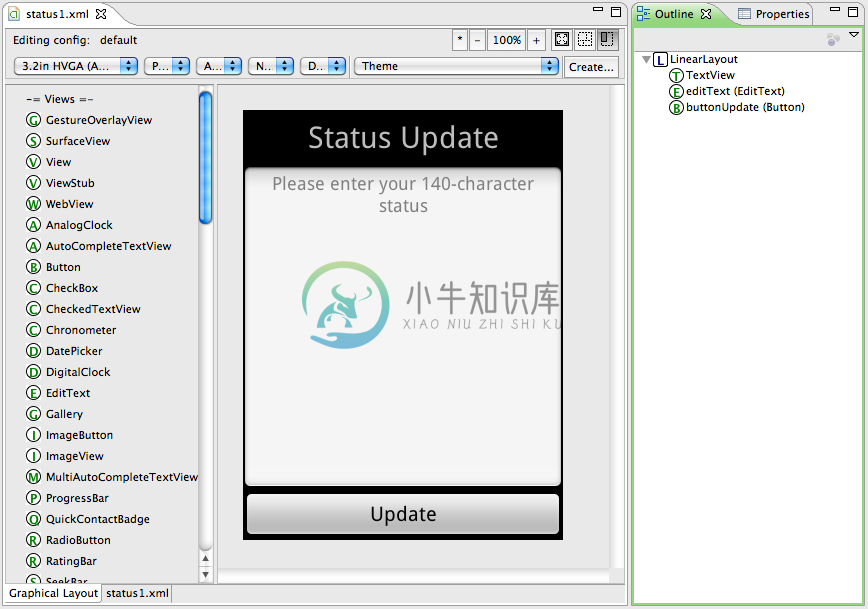
以上代码由Eclipse Graphical Layout自动生成,它是作为Eclipse插件的Android Development Tools(ADT)的一部分,即编辑Android中XML文件的辅助工具,如图6.3. Graphical Layout模式下的status.xml。ADT可以辨认出这是在编辑用户界面的Layout,因此按照Graphical Layout模式打开status.xml,很方便就可以生成上述的代码。
图6.3. Graphical Layout模式下的status.xml

在前面的章节里,我们已对这些XML资源的概念略有提及,但是代码中存在的细节仍是需要在后面慢慢体会的。

