第1章 开始 - 1.3 运行项目
优质
小牛编辑
145浏览
2023-12-01
项目有了,进入项目的跟目录(即 simple-service )现在先测试运行下:
$ mvn clean test
项目将会被编译,并且进行单元测试
-------------------------------------------------------T E S T S-------------------------------------------------------Running com.example.MyResourceTest八月 30, 2014 9:35:06 上午 org.glassfish.grizzly.http.server.NetworkListener startINFO: Started listener bound to [localhost:8080]八月 30, 2014 9:35:06 上午 org.glassfish.grizzly.http.server.HttpServer startINFO: [HttpServer] Started.八月 30, 2014 9:35:07 上午 org.glassfish.grizzly.http.server.NetworkListener shutdownNowINFO: Stopped listener bound to [localhost:8080]Tests run: 1, Failures: 0, Errors: 0, Skipped: 0, Time elapsed: 1.485 secResults :Tests run: 1, Failures: 0, Errors: 0, Skipped: 0[INFO] ------------------------------------------------------------------------[INFO] BUILD SUCCESS[INFO] ------------------------------------------------------------------------[INFO] Total time: 02:21 min[INFO] Finished at: 2014-08-30T09:35:07+08:00[INFO] Final Memory: 13M/31M[INFO] ------------------------------------------------------------------------
上面可以看看到测试通过,下面我们用标准模式运行项目:
$ mvn exec:java
运行结果如下:
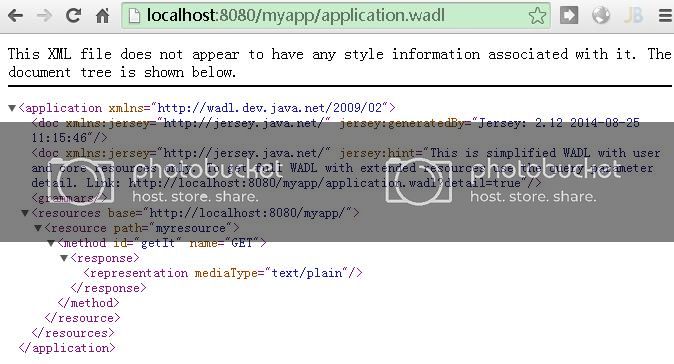
[INFO] Scanning for projects...[INFO][INFO] Using the builder org.apache.maven.lifecycle.internal.builder.singlethreaded.SingleThreadedBuilder with a thread count of 1[INFO][INFO] ------------------------------------------------------------------------[INFO] Building simple-service 1.0-SNAPSHOT[INFO] ------------------------------------------------------------------------[INFO][INFO] >>> exec-maven-plugin:1.2.1:java (default-cli) @ simple-service >>>[INFO][INFO] <<< exec-maven-plugin:1.2.1:java (default-cli) @ simple-service <<<[INFO][INFO] --- exec-maven-plugin:1.2.1:java (default-cli) @ simple-service ---八月 30, 2014 9:36:57 上午 org.glassfish.grizzly.http.server.NetworkListener startINFO: Started listener bound to [localhost:8080]八月 30, 2014 9:36:57 上午 org.glassfish.grizzly.http.server.HttpServer startINFO: [HttpServer] Started.Jersey app started with WADL available at http://localhost:8080/myapp/application.wadlHit enter to stop it...
项目已经运行,项目的 WADL 描述存在于http://localhost:8080/myapp/application.wadl URI中,将该URI在控制台 以curl命令执行或者浏览器中运行,就能看到该 WADL 描述以 XML 格式展示。
更多 WADL的内容,请查考
接下来试下与部署在 /myresource 下面的资源的交互。将资源的URL输入浏览器,或者在控制台用curl命令执行(译者注:如果没有安装curl,请参考curl安装):
$ curl http://localhost:8080/myapp/myresourceGot it!

用-i命令获取所有回应的头文件信息:
$ curl -i http://localhost:8080/myapp/myresourceHTTP/1.1 200 OKContent-Type: text/plainDate: Sat, 30 Aug 2014 02:23:25 GMTContent-Length: 7Got it!
注意到Content-Type: text/plain是在 MyResource 类中用@Produces 注解的。
如果想看到更多返回信息,可以变换不同的 curl 命令参数。举例:
$ curl -v http://localhost:8080/myapp/myresource* Adding handle: conn: 0x5bc180* Adding handle: send: 0* Adding handle: recv: 0* Curl_addHandleToPipeline: length: 1* - Conn 0 (0x5bc180) send_pipe: 1, recv_pipe: 0* About to connect() to localhost port 8080 (#0)* Trying 127.0.0.1...* Connected to localhost (127.0.0.1) port 8080 (#0)> GET /myapp/myresource HTTP/1.1> User-Agent: curl/7.33.0> Host: localhost:8080> Accept: */*>< HTTP/1.1 200 OK< Content-Type: text/plain< Date: Sat, 30 Aug 2014 01:55:06 GMT< Content-Length: 7<Got it!* Connection #0 to host localhost left intact
链接
- 目录
- 上一节 1.2探索新项目
- 下一节 1.4 创建一个JavaEE的Web项目


