Android 基础 - Android 中的动画(补帧与逐帧)
Android中的动画
综述
Android中的动画分为补间动画(Tweened Animation)和逐帧动画(Frame-by-Frame Animation)。没有意外的,补间动画是在几个关键的节点对对象进行描述又系统进行填充。而逐帧动画是在固定的时间点以一定速率播放一系列的drawable资源。下面对两种动画进行分别简要说明。
补间动画
补间动画分为如下种
- Alpha 淡入淡出
- Scale 缩放
- Rotate 旋转
- Translate 平移
这些动画是可以同时进行和顺次进行的。需要用到AnimationSet来实现。调用AnimationSet.addAnimation()即可。
实现方法举例:
(Button)btn = (Button)findViewById(...);AnimationSet as = new AnimationSet(false);//新建AnimationSet实例TranslateAnimation ta = new TranslateAnimation(//新建平移动画实例,在构造函数中传入平移的始末位置Animation.RELATIVE_TO_SELF, 0f,Animation.RELATIVE_TO_SELF, 0.3f,Animation.RELATIVE_TO_SELF, 0f,Animation.RELATIVE_TO_SELF, 0.3f);ta.setStartOffset(0);//AnimationSet被触发后立刻执行ta.setInterpolator(new AccelerateDecelerateInterpolator());//加入一个加速减速插值器ta.setFillAfter(true);//动画结束后保持该状态ta.setDuration(700);//设置动画时长ScaleAnimation sa = new ScaleAnimation(1f, 0.1f, 1f, 0.1f,//构造一个缩放动画实例,构造函数参数传入百分比和缩放中心ScaleAnimation.RELATIVE_TO_SELF, 0.5f,ScaleAnimation.RELATIVE_TO_SELF, 0.5f);sa.setInterpolator(new AccelerateDecelerateInterpolator());//加入一个加速减速插值器sa.setDuration(700);//设置时长sa.setFillAfter(true);//动画结束后保持该状态sa.setStartOffset(650);//AnimationSet触发后650ms启动动画AlphaAnimation aa = new AlphaAnimation(1f, 0f);//构造一个淡出动画,从100%变为0%aa.setDuration(700);//设置时长aa.setStartOffset(650);//AnimationSet触发后650ms启动动画aa.setFillAfter(true);//动画结束后保持该状态as.addAnimation(ta);as.addAnimation(sa);as.addAnimation(aa);//将动画放入AnimationSet中btn.setOnClickListener(new OnClickListener(){public void onClick(View view){btn.startAnimation(as);//触发动画}}
该段代码实现了先平移,然后边缩小边淡出。
具体的代码实现需要注意各个参数所代表的含义,比较琐碎,建议阅读文档熟悉。在这里不做过多讲解,文档说的已经很清楚了。
文档连接http://developer.android.com/reference/android/view/animation/Animation.html
逐帧动画
这一部分只涉及非常基础的知识。逐帧动画适用于更高级的动画效果,原因可想而知。我们可以将每帧图片资源放到drawable下然后代码中canvas.drawBitmap(Bitmap, Matrix, Paint)进行动画播放,但这样就将动画资源与代码耦合,如果哪天美工说我要换一下效果就呵呵了。因此我们要做的是将资源等信息放入配置文件然后教会美工怎么改配置文件,这样才有时间去刷知乎而不被打扰^_^。
大致分为两种方法:
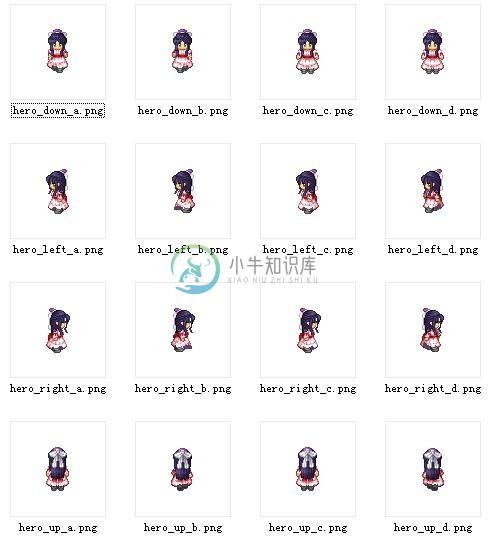
- 每一帧是一张png图片中
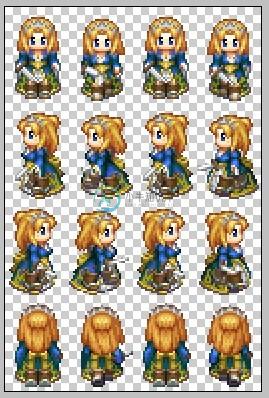
- 所有动画帧都存在一张png图片中
当然还有的专门的游戏公司有自己的动画编辑器,这里不加说明。
每一帧是一张png
说的就是这个效果:
在animation1.xml文件中进行如下配置:
<?xml version="1.0" encoding="utf-8"?><animation-listxmlns:android="http://schemas.android.com/apk/res/android"android:oneshot="true"<!-- true表示只播放一次,false表示循环播放 -->><item android:drawable="@drawable/hero_down_a" android:duration="70"></item><item android:drawable="@drawable/hero_down_b" android:duration="70"></item><item android:drawable="@drawable/hero_down_c" android:duration="70"></item><item android:drawable="@drawable/hero_down_d" android:duration="70"></item></animation-list>
在JAVA文件中我们进行如下加载:
ImageView animationIV;AnimationDrawable animationDrawable;animationIV.setImageResource(R.drawable.animation1);animationDrawable = (AnimationDrawable) animationIV.getDrawable();animationDrawable.start();
注意动画的播放是按照xml文件中的顺序顺次播放,如果要考虑到循环播放的时候应该写两个xml一个正向一个反向才能很好地循环播放。
所有动画在一张png中
说的就是这个效果:
animation.xml的配置:
<key>010001.png</key><dict><key>frame</key><string>{{378, 438}, {374, 144}}</string><key>offset</key><string>{-2, 7}</string><key>sourceColorRect</key><string>{{61, 51}, {374, 144}}</string><key>sourceSize</key><string>{500, 260}</string></dict><key>010002.png</key><dict><key>frame</key><string>{{384, 294}, {380, 142}}</string><key>offset</key><string>{1, 7}</string><key>sourceColorRect</key><key>rotate</key><false/><string>{{61, 52}, {380, 142}}</string><key>sourceSize</key><string>{500, 260}</string></dict>…
其中:
- frame 指定在原图中截取的框大小;
- offeset 指定原图中心与截图中心偏移的向量;
- rotate若为true顺时针旋转90°;
- sourceColorRect 截取原图透明部分的大小
- sourceSize 原图大小
JAVA的加载方式与第一种方法相同。
在使用过程中一定要注意内存资源的回收和drawable的压缩,一不小心可能爆掉。
本文参考博闻:
最后放一张demo:

