2.2 Browserify + Gulp + Babelify

在进入第二种方法前,首先先介绍一下会用到 Browserify、Gulp、Babelify 三种前端开发常会用到的工具:
- 如同官网上说明的:
Browserify lets you require('modules') in the browser by bundling up all of your dependencies.,Browserify 是一个可以让你在浏览器端也能使用像 Node 用的 CommonJS 规範一样,用输出(export)和引用(require)来管理模组。此外,也能使用许多在 NPM 中的模组
Gulp是一个前端任务工具自动化管理工具。随着前端工程的发展(Task Runner),我们在开发前端应用程式时有许多工作是必须重複进行,例如:打包文件、uglify、将 LESS 转译成一般的 CSS 的档案,转译 ES6 语法等工作。若是使用一般手动的方式,往往会造成效率的低下,所以透过像是 Grunt、Gulp 这类的 Task Runner 不但可以提昇效率,也可以更方便管理这些任务。由于 Gulp 是透过 pipeline 方式来处理档案,在使用上比起 Grunt 的方式直观许多,所以这边我们主要讨论的是 Gulp
Babelify是一个使用 Browserify 进行 Babel 转换的外挂,你可以想成是一个翻译机,可以将 React 中的JSX或ES6语法转成浏览器相容的ES5语法
初步了解了三种工具的概念后,接下来我们就开始我们的环境设置:
若是电脑中尚未安装 Node(Node.js 是一个开放原始码、跨平台的、可用于伺服器端和网路应用的 Google V8 引擎执行执行环境)和 NPM(Node 套件管理器 Node Package Manager。是一个以 JavaScript 编写的软体套件管理系统,预设环境为 Node.js,从 Node.js 0.6.3 版本开始,npm 被自动附带在安装包中)的话,请先 上官网安装
用
npm安装browserify用
npm安装gulp、gulp-concat、gulp-html-replace、gulp-streamify、gulp-uglify、watchify、vinyl-source-stream开发环境用的套件(development dependencies)// 使用 npm install --save-dev 会将安装的套件名称和版本存放到 package.json 的 devDependencies 栏位中$ npm install --save-dev gulp gulp-concat gulp-html-replace gulp-streamify gulp-uglify watchify vinyl-source-stream
安装
babelify、babel-preset-es2015、babel-preset-react,转译ES6和JSX开发环境用的套件,并于根目录底下设定.babelrc,设定转译规则(presets:es2015、react)和使用的外挂// 使用 npm install --save-dev 会将安装的套件名称和版本存放到 package.json 的 devDependencies 栏位中$ npm install --save-dev babelify babel-preset-es2015 babel-preset-react
// filename: .babelrc{"presets": ["es2015","react",],"plugins": []}
安装 react 和 react-dom
$ npm install --save react react-dom
撰写 Component
// filename: ./app/index.jsimport React from 'react';import ReactDOM from 'react-dom';class App extends React.Component {constructor(props) {super(props);this.state = {};}render() {return (<div><h1>Hello, World!</h1></div>);}}ReactDOM.render(<App />, document.getElementById('app'));
<!-- filename: ./index.html --><!DOCTYPE html><html lang="en"><head><meta charset="UTF-8"><title>Hello React!</title></head><body><div id="app"></div><!-- build:js --><script src="./dist/src/bundle.js"></script><!-- endbuild --></body></html>
- 设定
gulpfile.js
// filename: gulpfile.js// 引入所有需要的档案const gulp = require('gulp');const uglify = require('gulp-uglify');const htmlreplace = require('gulp-html-replace');const source = require('vinyl-source-stream');const browserify = require('browserify');const watchify = require('watchify');const babel = require('babelify');const streamify = require('gulp-streamify');// 档案位置参数const path = {HTML: 'index.html',MINIFIED_OUT: 'bundle.min.js',OUT: 'bundle.js',DEST: 'dist',DEST_BUILD: 'dist/build',DEST_SRC: 'dist/src',ENTRY_POINT: './app/index.js'};// 複製 html 到 dist 资料夹中gulp.task('copy', function(){gulp.src(path.HTML).pipe(gulp.dest(path.DEST));});// 监听档案是否有变化,若有变化则重新编译一次gulp.task('watch', function() {gulp.watch(path.HTML, ['copy']);var watcher = watchify(browserify({entries: [path.ENTRY_POINT],transform: [babel],debug: true,}));return watcher.on('update', function () {watcher.bundle().pipe(source(path.OUT)).pipe(gulp.dest(path.DEST_SRC))console.log('Updated');}).bundle().pipe(source(path.OUT)).pipe(gulp.dest(path.DEST_SRC));});// 执行 build production 的流程(包括 uglify、转译等)gulp.task('copy', function(){browserify({entries: [path.ENTRY_POINT],transform: [babel],}).bundle().pipe(source(path.MINIFIED_OUT)).pipe(streamify(uglify(path.MINIFIED_OUT))).pipe(gulp.dest(path.DEST_BUILD));});// 将 script 引用换成 production 的档案gulp.task('replaceHTML', function(){gulp.src(path.HTML).pipe(htmlreplace({'js': 'build/' + path.MINIFIED_OUT})).pipe(gulp.dest(path.DEST));});// 设定 NODE_ENV 为 productiongulp.task('apply-prod-environment', function() {process.env.NODE_ENV = 'production';});// 若直接执行 gulp 会执行 gulp default 的任务:watch、copy。若跑 gulp production,则会执行 build、replaceHTML、apply-prod-environmentgulp.task('production', ['build', 'replaceHTML', 'apply-prod-environment']);gulp.task('default', ['watch', 'copy']);
- 成果展示
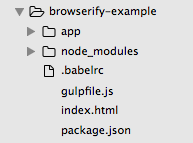
到目前为止我们的资料夹的结构应该会是这样:

接下来我们透过在终端机(terminal)下 gulp 指令来处理我们设定好的任务:
// 当只有输入 gulp 没有输入任务名称时,gulp 会自动执行 default 的任务,我们这边会执行 `watch` 和 `copy` 的任务,前者会监听 `./app/index.js` 是否有改变,有的话则更新。后者则是会把 `index.html` 複製到 `./dist/index.html`$ gulp
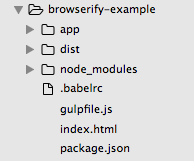
当执行完 gulp 后,我们可以发现多了一个 dist 资料夹

如果我们是要进行 production 的应用程式开发的话,我们可以执行:
// 当输入 gulp production 时,gulp 会执行 production 的任务,我们这边会执行 replaceHTML、build 和 apply-prod-environment 的任务,build 任务会进行转译和 uglify。replaceHTML 会取代 index.html 注解中的 <script> 引入档案,变成引入压缩和 uglify 后的 ./dist/build/bundle.min.js。apply-prod-environment 则是会更改 NODE_ENV 变数,让环境设定改为 production,有兴趣的读者可以参考React 官网说明
$ gulp production
此时我们可以在浏览器上打开我们的 ./dist/hello.html,就可以看到 Hello, world! 了!

