XML DOM设置节点
在本章中,我们将学习如何更改XML DOM对象中节点的值。 节点值可以更改(或设置)如下 -
var value = node.nodeValue;
如果node是Attribute类型,那么value变量将是属性的值; 如果node是Text类型,则它将是文本内容; 如果node是Element类型,则它将为null。
以下部分将演示每种节点类型(Attribute,Text和Element类型)的节点值设置。
以下所有示例中使用的node.xml如下所示 -
<Company>
   <Employee category = "Technical" id = "firstelement">
      <FirstName>Susen</FirstName>
      <LastName>Su</LastName>
      <ContactNo>1584567890</ContactNo>
      <Email>susen@yiibai.com</Email>
   </Employee>

   <Employee category = "Non-Technical">
      <FirstName>Max</FirstName>
      <LastName>Su</LastName>
      <ContactNo>1334667898</ContactNo>
      <Email>maxsu@yiibai.com</Email>
   </Employee>

   <Employee category = "Management">
      <FirstName>Min</FirstName>
      <LastName>Su</LastName>
      <ContactNo>1364562350</ContactNo>
      <Email>minsu@yiibai.com</Email>
   </Employee>
</Company>
1. 更改 Text 节点的值
当Node元素的更改值时,需要编辑元素的文本内容(也称为文本节点)。 以下示例演示如何更改元素的Text节点。
示例
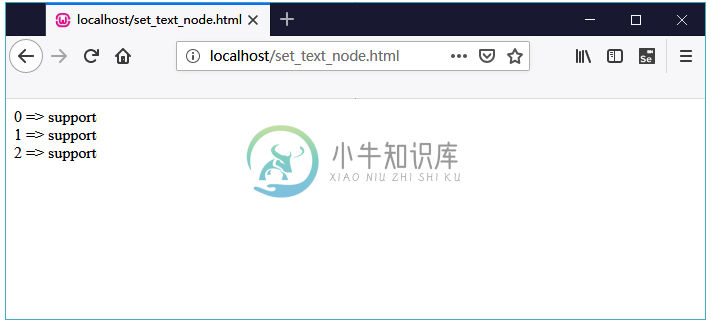
以下示例(set_text_node.html)将XML文档(node.xml)解析为XML DOM对象,并更改元素文本节点的值。 在这个示例中,将每个员工的电子邮件更新为support@yiibai.com并打印值。
文件:set_text_node.html -
<!DOCTYPE html>
<html>
   <head>
      <script>

      </script>
   </head>
   <body>
      <script>
         function loadXMLDoc(filename) {
            if (window.XMLHttpRequest) {
               xhttp = new XMLHttpRequest();
            } else {
                // code for IE5 and IE6
                xhttp = new ActiveXObject("Microsoft.XMLHTTP");
            }
            xhttp.open("GET",filename,false);
            xhttp.send();

            return xhttp.responseXML;
         }

         var xmlDoc = loadXMLDoc("/node.xml");

         x = xmlDoc.getElementsByTagName("Email");
         for(i = 0;i<x.length;i++) {

            x[i].childNodes[0].nodeValue = "support@yiibai.com";
            document.write(i+" => ");
            document.write(x[i].childNodes[0].nodeValue);
            document.write('<br>');
         }

      </script>
   </body>
</html>
执行
将此文件保存为:set_text_node.html,放到服务器路径上(此文件和node.xml应位于服务器中的同一路径上)。 使用浏览器打开将看到以下输出 -
2. 更改属性节点的值
以下示例演示如何更改元素的属性节点。
示例
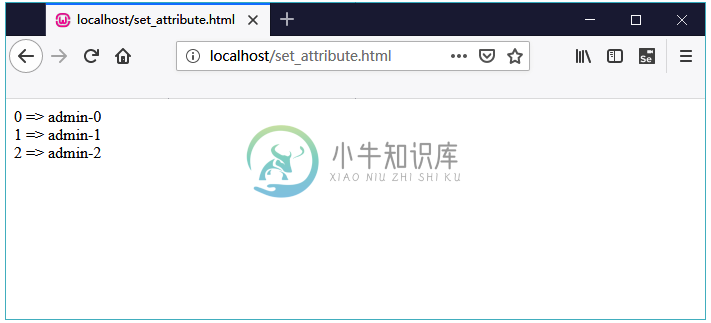
以下示例(set_attribute.html)将XML文档(node.xml)解析为XML DOM对象,并更改元素属性节点的值。 在这种情况下,每个Employee元素的Category属性分别为:admin-0,admin-1,admin-2并打印它们的值。
文件:set_text_node.html -
<!DOCTYPE html>
<html>
   <head>
      <script>
         function loadXMLDoc(filename) {
            if (window.XMLHttpRequest) {
                xhttp = new XMLHttpRequest();
            } else{ // code for IE5 and IE6
                xhttp = new ActiveXObject("Microsoft.XMLHTTP");
            }
            xhttp.open("GET",filename,false);
            xhttp.send();
            return xhttp.responseXML;
         }
      </script>
   </head>
   <body>
      <script>
         xmlDoc = loadXMLDoc("/node.xml");

         x = xmlDoc.getElementsByTagName("Employee");
         for(i = 0 ;i<x.length;i++){

            newcategory = x[i].getAttributeNode('category');
            newcategory.nodeValue = "admin-"+i;
            document.write(i+' => ');
            document.write(x[i].getAttributeNode('category').nodeValue);
            document.write('<br>');
         }

      </script>
   </body>
</html>
执行
将此文件保存为:set_attribute.html,放到服务器路径上(此文件和node.xml应位于服务器中的同一路径上)。 使用浏览器打开将看到以下输出 -