
Android入门之AlertDialog用法实例分析

本文实例讲述的是AlertDialog,这种对话框会经常遇到。AlertDialog跟WIN32开发中的Dialog不一样,AlertDialog是非阻塞的,而阻塞的对话框用的是PopupWindow。
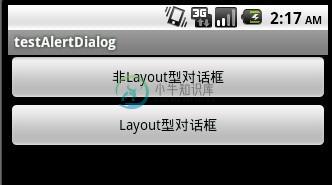
先贴出该程序运行的截图:
main.xml的源码:
<?xml version="1.0" encoding="utf-8"?>
<LinearLayout xmlns:android="http://schemas.android.com/apk/res/android"
  android:orientation="vertical"
  android:layout_width="fill_parent"
  android:layout_height="fill_parent"
  >

<Button android:id="@+id/Button01" android:layout_height="wrap_content" android:text="非Layout型对话框" android:layout_width="fill_parent"></Button>
<Button android:id="@+id/Button02" android:layout_height="wrap_content" android:text="Layout型对话框" android:layout_width="fill_parent"></Button><View android:id="@+id/View01" android:layout_width="wrap_content" android:layout_height="wrap_content"></View>

</LinearLayout>
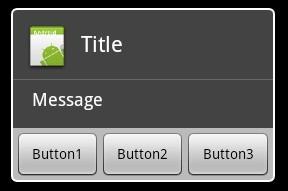
下图是非Layout型对话框,直接使用AlertDialog
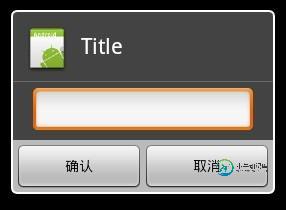
下图是使用了Layout的对话框,可以自定义控件,实现更复杂的对话框
dialoglayout.xml的源码:
<?xml version="1.0" encoding="utf-8"?>

<LinearLayout xmlns:android="http://schemas.android.com/apk/res/android"
 android:layout_width="fill_parent" android:layout_height="wrap_content"
 android:orientation="vertical">
 <EditText android:layout_height="wrap_content"
 android:layout_width="fill_parent" android:layout_marginLeft="20dip"
 android:layout_marginRight="20dip" android:textAppearance="?android:attr/textAppearanceMedium" android:id="@+id/edtInput"/>
</LinearLayout>
程序源码:
package com.testAlertDialog;

import android.app.Activity;
import android.app.AlertDialog;
import android.content.Context;
import android.content.DialogInterface;
import android.os.Bundle;
import android.view.Gravity;
import android.view.LayoutInflater;
import android.view.View;
import android.view.View.OnClickListener;
import android.widget.Button;
import android.widget.EditText;
import android.widget.PopupWindow;


public class testAlertDialog extends Activity {
 Button btnShowDialog;
 Button btnShowDialog_Layout;
  /** Called when the activity is first created. */
  @Override
  public void onCreate(Bundle savedInstanceState) {
    super.onCreate(savedInstanceState);
    setContentView(R.layout.main);
    //定义按钮
    btnShowDialog=(Button)this.findViewById(R.id.Button01);
    btnShowDialog.setOnClickListener(new ClickEvent());
    btnShowDialog_Layout=(Button)this.findViewById(R.id.Button02);
    btnShowDialog_Layout.setOnClickListener(new ClickEvent());
  }


  //统一处理按键事件
  class ClickEvent implements OnClickListener{

   @Override
   public void onClick(View v) {
   // TODO Auto-generated method stub
   if(v==btnShowDialog)
    showDialog(testAlertDialog.this);

   else if(v==btnShowDialog_Layout)
    showDialog_Layout(testAlertDialog.this);

   }

  }

  //显示基本的AlertDialog
 private void showDialog(Context context) {
 AlertDialog.Builder builder = new AlertDialog.Builder(context);
 builder.setIcon(R.drawable.icon);
 builder.setTitle("Title");
 builder.setMessage("Message");
 builder.setPositiveButton("Button1",
  new DialogInterface.OnClickListener() {
   public void onClick(DialogInterface dialog, int whichButton) {
   setTitle("点击了对话框上的Button1");
   }
  });
 builder.setNeutralButton("Button2",
  new DialogInterface.OnClickListener() {
   public void onClick(DialogInterface dialog, int whichButton) {
   setTitle("点击了对话框上的Button2");
   }
  });
 builder.setNegativeButton("Button3",
  new DialogInterface.OnClickListener() {
   public void onClick(DialogInterface dialog, int whichButton) {
   setTitle("点击了对话框上的Button3");
   }
  });
 builder.show();
 }


  //显示基于Layout的AlertDialog
 private void showDialog_Layout(Context context) {
 LayoutInflater inflater = LayoutInflater.from(this);
 final View textEntryView = inflater.inflate(
  R.layout.dialoglayout, null);
 final EditText edtInput=(EditText)textEntryView.findViewById(R.id.edtInput);
 final AlertDialog.Builder builder = new AlertDialog.Builder(context);
 builder.setCancelable(false);
 builder.setIcon(R.drawable.icon);
 builder.setTitle("Title");
 builder.setView(textEntryView);
 builder.setPositiveButton("确认",
  new DialogInterface.OnClickListener() {
   public void onClick(DialogInterface dialog, int whichButton) {
   setTitle(edtInput.getText());
   }
  });
 builder.setNegativeButton("取消",
  new DialogInterface.OnClickListener() {
   public void onClick(DialogInterface dialog, int whichButton) {
   setTitle("");
   }
  });
 builder.show();
 }
}
-
本文向大家介绍Android开发入门之Appwidget用法分析,包括了Android开发入门之Appwidget用法分析的使用技巧和注意事项,需要的朋友参考一下 本文实例讲述了Android Appwidget用法。分享给大家供大家参考,具体如下: App Widgets 是一个小型应用程序的View 他可以嵌入到其他应用程序中(如 桌面程序) 并且可以得到周期性刷新。 在创建App Widg
-
本文向大家介绍Android开发入门之Notification用法分析,包括了Android开发入门之Notification用法分析的使用技巧和注意事项,需要的朋友参考一下 本文实例讲述了Android中Notification用法。分享给大家供大家参考,具体如下: Notification可以理解为通知的意思一般用来显示广播信息 用Notification就必须要用到NotificationM
-
本文向大家介绍Pytorch入门之mnist分类实例,包括了Pytorch入门之mnist分类实例的使用技巧和注意事项,需要的朋友参考一下 本文实例为大家分享了Pytorch入门之mnist分类的具体代码,供大家参考,具体内容如下 以上就是本文的全部内容,希望对大家的学习有所帮助,也希望大家多多支持呐喊教程。
-
本文向大家介绍Android入门之TabHost与TabWidget实例解析,包括了Android入门之TabHost与TabWidget实例解析的使用技巧和注意事项,需要的朋友参考一下 本文实例介绍的是Android的Tab控件,Tab控件可以达到分页的效果,让一个屏幕的内容尽量丰富,当然也会增加开发的复杂程度,在有必要的时候再使用。Android的Tab控件使用起来有点奇怪,必须包含和按照以下
-
本文向大家介绍Android开发之BroadcastReceiver用法实例分析,包括了Android开发之BroadcastReceiver用法实例分析的使用技巧和注意事项,需要的朋友参考一下 本文实例讲述了Android开发中BroadcastReceiver用法。分享给大家供大家参考。具体分析如下: 在Android系统中,广播(Broadcast)是在组件之间传播数据(Intent)的一种
-
本文向大家介绍Android控件之TabHost用法实例分析,包括了Android控件之TabHost用法实例分析的使用技巧和注意事项,需要的朋友参考一下 本文实例讲述了Android控件之TabHost用法。分享给大家供大家参考。具体如下: 以下通过TabHost实现android选项卡。 main.xml布局文件: TabHostActivity类: 运行结果: 希望本文所述对大家的Andro