
前端 - uniapp app端实现海报功能?

uniapp项目app端实现下载海报
现在的代码如下:
html
<uni-popup ref="popup" type="dialog" @close="handleClose" @confirm="handleConfirm">
        <view class="content">
            <view class="close" @tap="handleClose">
                <image style="width: 40rpx;height: 40rpx;" src="../../static/img/chaIcon.png" mode=""></image>
            </view>
            <view
                style="line-height: 80rpx;height: 80rpx;text-align: center;color: #fff;font-size: 36rpx;padding-top: 100rpx;">
                {{ school_name }}
            </view>
            <view style="height: 80rpx;text-align: center;color: #fff;font-size: 36rpx;">
                {{ classes_name }}
            </view>
            <image :src="codeImg" mode="aspectFill"></image>

            <view>
                <u-button class="custom-style" @click="handleCode(codeImg)">下载海报</u-button>
            </view>
            <view class="code_ing">
                <image src="@/static/img/codeImg.jpg" mode="aspectFill"></image>
            </view>
        </view>
    </uni-popup>
js
逻辑
    handleCode(codeImg) {
            if (uni.getSystemInfoSync().platform === 'android' || uni.getSystemInfoSync().platform === 'ios') {
                uni.saveImageToPhotosAlbum({
                    filePath: codeImg,
                    success: function() {
                        uni.showToast({
                            title: '保存成功',
                            icon: 'success'
                        });
                    },
                    fail: function(err) {
                        uni.showToast({
                            title: '保存失败',
                            icon: 'none'
                        });
                    }
                });
            } else {
                uni.showToast({
                    title: '请在App中下载二维码',
                    icon: 'none'
                });
            }
        }
原先是下载二维码,现在换成下载海报,海报里显示@/static/img/codeImg.jpg,school_name、classes_name跟一个背景色background: #f3af1e,还有二维码codeImg,下载的海报图样式跟下面的图片一样,关闭跟下载按钮不要,其他都要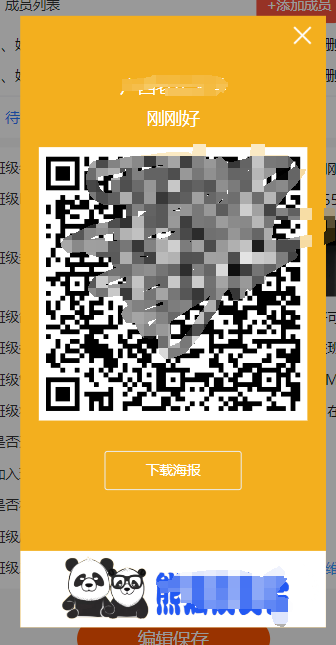
大佬们,修改上面的代码如何实现下载海报功能
现在js逻辑改成这样的了
// 点击下载海报按钮
generateAndDownloadPoster(){
            let classId = {
                class_id: this.classData.class_id,
                school_id: this.classData.school_id,
                type: 1
            };
            getClassQRcodeApi(classId).then(res => {
                if (res.status == 200) {
                    this.generatePoster(res.data.qr_url, res.data.school_name, res.data.classes_name);
                    console.log(this.generatePoster);
                }
            }).catch(error => {
                    console.error('Error fetching QR code:', error);
            });
        },
        generatePoster(qrUrl, schoolName, className) {
            const canvas = document.createElement('canvas');
            const ctx = canvas.getContext('2d');
            // 设置画布大小
            const width = 800;
            const height = 1200;
            canvas.width = width;
            canvas.height = height;
            // 填充背景色
            ctx.fillStyle = '#f3af1e';
            ctx.fillRect(0, 0, width, height);

            // 绘制文本(学校名称和班级名称)
            ctx.font = '36px Arial';
            ctx.fillStyle = '#fff';
            ctx.fillText(schoolName, 100, 200);
            ctx.fillText(className, 100, 300);

            // 绘制二维码
            const qrImage = new Image();
            qrImage.onload = () => {
                // 计算二维码的合适大小并居中
                const qrWidth = 200;
                const qrHeight = qrWidth * qrImage.height / qrImage.width;
                const qrX = (width - qrWidth) / 2;
                const qrY = (height - qrHeight) / 2 + 200;

                ctx.drawImage(qrImage, qrX, qrY, qrWidth, qrHeight);

                // 转换Canvas为图片并下载
                canvas.toBlob(blob => {
                        const url = URL.createObjectURL(blob);
                        const a = document.createElement('a');
                        a.href = url;
                        a.download = 'poster.png';
                        document.body.appendChild(a);
                        a.click();
                        document.body.removeChild(a);
                        URL.revokeObjectURL(url);
                    });
                qrImage.src = qrUrl;
            }
        }
共有2个答案

这个要用canvas创建一个画布把内容画出啦,相对来说还是比较简单的,具体实现需自行实现,下面代码仅供参考
主要涉及
1、图片绘制
function circleImg(ctx, img, x, y, r, borderWidth, borderColor) {
    ctx.save();
    ctx.beginPath();
    var d =2 * r;
    var cx = x + r;
    var cy = y + r;
    ctx.arc(cx, cy, r, 0, 2 * Math.PI);
    ctx.setFillStyle('transparent')
    ctx.fill()//保证图片无bug填充
    ctx.clip();
    ctx.drawImage(img, x, y, d, d);
    ctx.restore();
}
2、文案绘制
function drawText(ctx, str, x, y, fontSize, color, maxWidth, align="left") {
    try{
        ctx.save();
        ctx.setFontSize(fontSize); //设置标题字体大小
        ctx.setFillStyle(color); //设置标题文本颜色
        let _strLastIndex = 0; //每次开始截取的字符串的索引
        let _strlineW = 0;
        ctx.setTextAlign(align);
        for (let i = 0; i < str.length; i++) {
            _strlineW += ctx.measureText(str[i]).width;
            if (_strlineW > maxWidth) {
                ctx.fillText(str.substring(_strLastIndex, i), x, y);
                _strlineW = 0;
                _strLastIndex = i;
            }else if (i == str.length - 1) {
                ctx.fillText(str.substring(_strLastIndex, i + 1), x, y);
                _strlineW = 0;
            }
        }
        ctx.restore();
    }catch(e){
        console.log('出现异常',e);
    }
}
3、矩形绘制
function roundRectColor(ctx, x, y, w, h, r, color) {  //绘制圆角矩形(纯色填充)
  ctx.save();
  ctx.beginPath(0);
  ctx.setFillStyle(color);
  ctx.setLineJoin('round');  //交点设置成圆角
  ctx.setLineWidth(0);
  //从右下角顺时针绘制,弧度从0到1/2PI
  ctx.arc(x+w - r, y + h - r, r, 0, Math.PI / 2);
  //矩形下边线
  ctx.lineTo(x+r,  y + h);
  //左下角圆弧,弧度从1/2PI到PI
  ctx.arc(x+r, y + h - r, r, Math.PI / 2, Math.PI);
  //矩形左边线
  ctx.lineTo(x, y + r);
  //左上角圆弧,弧度从PI到3/2PI
  ctx.arc(x+r, y + r, r, Math.PI, Math.PI * 3 / 2);
  //上边线
  ctx.lineTo(x+w - r, y);
  //右上角圆弧
  ctx.arc(x+w - r, y + r, r, Math.PI * 3 / 2, Math.PI * 2);
  //右边线
  ctx.lineTo(x+w, y + h - r);
  ctx.closePath();
  ctx.fill();

  ctx.restore();
}
使用 Canvas 把图绘出来,再按你的逻辑做保存或者下载。
把你的背景,二维码 等多个图,用Canvas做成一张图。
给你一个Canvas代码例子(自己按需改一改):
<!DOCTYPE html>
<html lang="en">

<head>
  <meta charset="UTF-8">
  <meta http-equiv="X-UA-Compatible" content="IE=edge">
  <meta name="viewport" content="width=device-width, initial-scale=1.0">
  <title>Canvas 多张图合成一张图</title>
</head>

<body>
  <canvas id="myCanvas" width="800" height="600"></canvas>

  <script>
    // 加载图片
    function loadImage(url) {
      return new Promise((resolve, reject) => {
        const img = new Image();
        img.onload = () => resolve(img);
        img.onerror = reject;
        img.src = url;
      });
    }

    // 绘制图片到 canvas
    async function drawImages() {
      const canvas = document.getElementById('myCanvas');
      const ctx = canvas.getContext('2d');

      const image1 = await loadImage('image1.jpg');
      const image2 = await loadImage('image2.jpg');

      ctx.drawImage(image1, 0, 0);
      ctx.drawImage(image2, 200, 200);
    }

    drawImages();
  </script>
</body>

</html>-
uniapp项目的结构 进来就加载 canvas ,回显到页面,然后点击保存按钮到手机相册上,现在遇到的问题浏览器切换h5页面,在切换 IOS 手机屏幕,或者到其他屏幕,canvasCtx.drawImage('/static/img/codeImg.jpg', 0, 420, 375, 120)跟canvasCtx.setFillStyle('#f3af1e') 没有铺满,请问大佬们,如何修改这
-
1.项目使用window.open下载时,并没有携带token,容易被盗链下载,况且使用这个api,后端没有办法校验token,把token拼接在url后面还是一样的,前端直接去对应地址取文件,后端并没办法取到token; 2.使用正常的接口下载,blob格式的,由于文件比较大,经常会出现数百M或者上G的大小,在下载过程中,如果页面被刷新也会失败;好像还不能用分片下载,因为文件可能是安装包,有可能
-
1、自我介绍 2、介绍下项目 3、说下项目重难点 4、JWT的鉴权流程、实现逻辑 5、v-if和v-show区别 6、v-if和v-for优先级 7、选择器 8、实习时间? 反问: 问:业务?答:海关做信息化 问:工作时间?答:朝九晚五
-
1.自我介绍 2.问项目,轮播图你是怎么封装的? requestAnimationFrame是特点,封装轮轮播图用webworker的作用? 3.你是如何用websocket实现聊天的 4.你参加的开源社区项目主要做什么,github action你是如何开发的 5.vue父子通信 6.vue响应式原理 7.proxy相比于object.definepropertity的优势 8.反问 9月26日
-
自我介绍 1.创建一个新对象发生了什么(new的过程),讲讲原型链 2.本地缓存有哪些,两个相同页面sessionStorage可以共享会话吗 3.vuex的数据丢失问题 4.vue2、vue3的不同 5.vue、react的不同 6.react的优化手段 7.前端性能优化 8.canvas如何获取鼠标点击的元素,canvas有哪些具体方法 9.CSS如何隐藏当前的聊天窗口 10.深浅拷贝的区别,
-
本文向大家介绍JavaScript前端实现压缩图片功能,包括了JavaScript前端实现压缩图片功能的使用技巧和注意事项,需要的朋友参考一下 为什么要前端来压缩图片 最近在做一个移动端h5上传图片的功能,本来这个功能并不复杂,只需要将图片文件通过axios传到服务端即可,但是考虑到现在手机设配的拍照功能十分强大,随便一张照片都能动辄五六兆,而服务端的要求是上传图片必须小于两兆,而且直接传这么大图