Seata 数据源代理解析
在Seata1.3.0版本中,数据源自动代理和手动代理一定不能混合使用,否则会导致多层代理,从而导致以下问题:
- 单数据源情况下:导致分支事务提交时,undo_log本身也被代理,即
为 undo_log 生成了 undo_log, 假设为undo_log2,此时undo_log将被当作分支事务来处理;分支事务回滚时,因为undo_log2生成的有问题,在undo_log对应的事务分支回滚时会将业务表关联的undo_log也一起删除,从而导致业务表对应的事务分支回滚时发现undo_log不存在,从而又多生成一条状态为1的undo_log。这时候整体逻辑已经乱了,很严重的问题 - 多数据源和
逻辑数据源被代理情况下:除了单数据源情况下会出现的问题,还可能会造成死锁问题。死锁的原因就是针对undo_log的操作,本该在一个事务中执行的select for update和delete操作,被分散在多个事务中执行,导致一个事务在执行完select for update后一直不提交,一个事务在执行delete时一直等待锁,直到超时
代理描述
即对DataSource代理一层,重写一些方法。比如getConnection方法,这时不直接返回一个Connection,而是返回ConnectionProxy,其它的以此类推
// DataSourceProxy

public DataSourceProxy(DataSource targetDataSource) {
    this(targetDataSource, DEFAULT_RESOURCE_GROUP_ID);
}

private void init(DataSource dataSource, String resourceGroupId) {
    DefaultResourceManager.get().registerResource(this);
}

public Connection getPlainConnection() throws SQLException {
    return targetDataSource.getConnection();
}

@Override
public ConnectionProxy getConnection() throws SQLException {
    Connection targetConnection = targetDataSource.getConnection();
    return new ConnectionProxy(this, targetConnection);
}
手动代理
即手动注入一个DataSourceProxy,如下
@Bean
public DataSource druidDataSource() {
    return new DruidDataSource()
}

@Primary
@Bean("dataSource")
public DataSourceProxy dataSource(DataSource druidDataSource) {
    return new DataSourceProxy(druidDataSource);
}
自动代理
针对DataSource创建一个代理类,在代理类里面基于DataSource获取DataSourceProxy(如果没有就创建),然后调用DataSourceProxy的相关方法。核心逻辑在SeataAutoDataSourceProxyCreator中
public class SeataAutoDataSourceProxyCreator extends AbstractAutoProxyCreator {
    private static final Logger LOGGER = LoggerFactory.getLogger(SeataAutoDataSourceProxyCreator.class);
    private final String[] excludes;
    private final Advisor advisor = new DefaultIntroductionAdvisor(new SeataAutoDataSourceProxyAdvice());

    public SeataAutoDataSourceProxyCreator(boolean useJdkProxy, String[] excludes) {
        this.excludes = excludes;
        setProxyTargetClass(!useJdkProxy);
    }

    @Override
    protected Object[] getAdvicesAndAdvisorsForBean(Class<?> beanClass, String beanName, TargetSource customTargetSource) throws BeansException {
        if (LOGGER.isInfoEnabled()) {
            LOGGER.info("Auto proxy of [{}]", beanName);
        }
        return new Object[]{advisor};
    }

    @Override
    protected boolean shouldSkip(Class<?> beanClass, String beanName) {
        return SeataProxy.class.isAssignableFrom(beanClass) ||
                DataSourceProxy.class.isAssignableFrom(beanClass) ||
                !DataSource.class.isAssignableFrom(beanClass) ||
                Arrays.asList(excludes).contains(beanClass.getName());
    }
}

public class SeataAutoDataSourceProxyAdvice implements MethodInterceptor, IntroductionInfo {
    @Override
    public Object invoke(MethodInvocation invocation) throws Throwable {
        DataSourceProxy dataSourceProxy = DataSourceProxyHolder.get().putDataSource((DataSource) invocation.getThis());
        Method method = invocation.getMethod();
        Object[] args = invocation.getArguments();
        Method m = BeanUtils.findDeclaredMethod(DataSourceProxy.class, method.getName(), method.getParameterTypes());
        if (m != null) {
            return m.invoke(dataSourceProxy, args);
        } else {
            return invocation.proceed();
        }
    }

    @Override
    public Class<?>[] getInterfaces() {
        return new Class[]{SeataProxy.class};
    }
}
数据源多层代理
@Bean
@DependsOn("strangeAdapter")
public DataSource druidDataSource(StrangeAdapter strangeAdapter) {
    doxx
    return new DruidDataSource()
}

@Primary
@Bean("dataSource")
public DataSourceProxy dataSource(DataSource druidDataSource) {
    return new DataSourceProxy(druidDataSource);
}
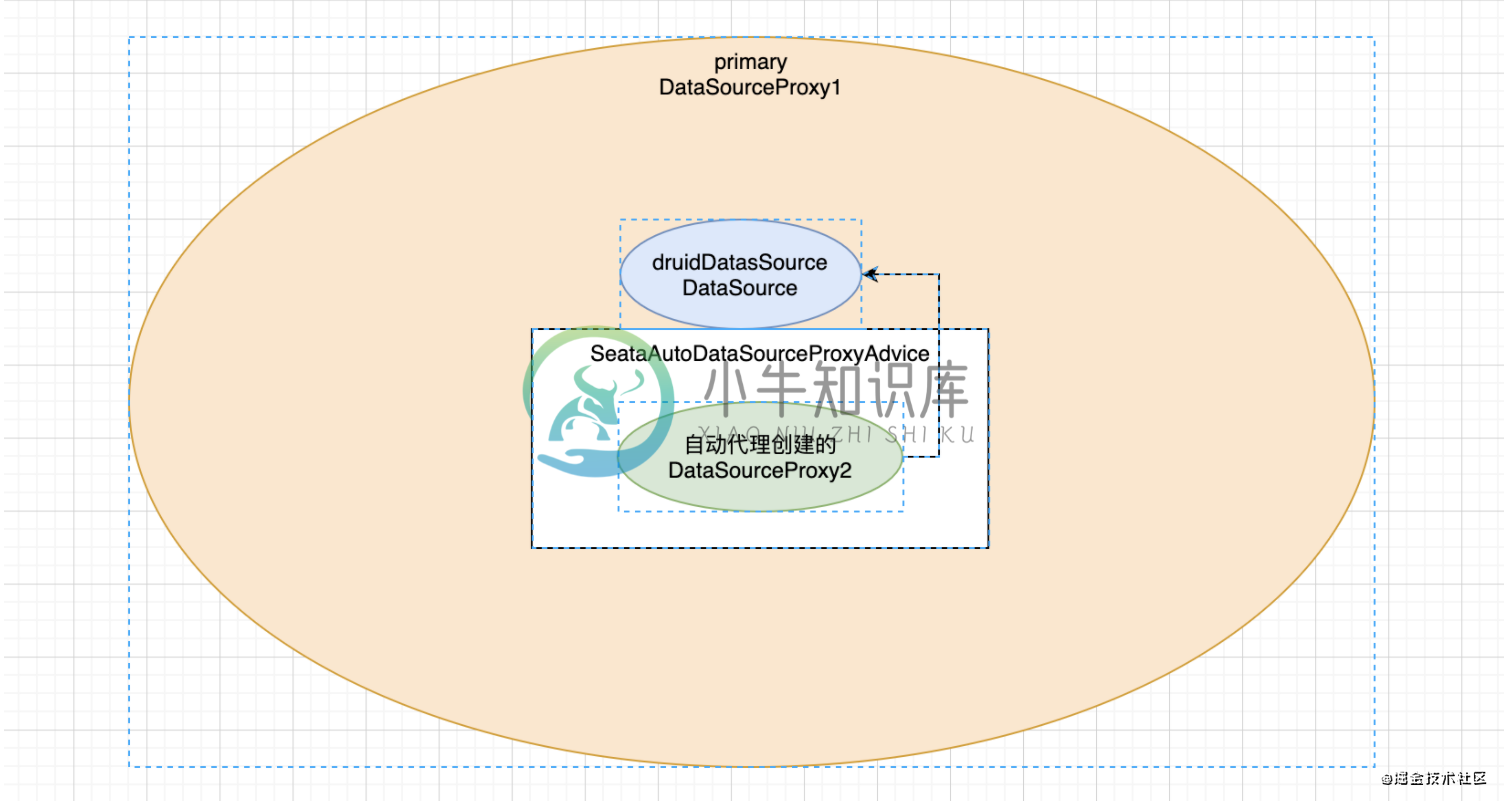
- 首先我们在配置类里面注入了两个
DataSource,分别为:DruidDataSource和DataSourceProxy, 其中DruidDataSource 作为 DataSourceProxy 的 targetDataSource 属性,并且DataSourceProxy为使用了@Primary注解声明 - 应用默认开启了数据源自动代理,所以在调用
DruidDataSource相关方法时,又会为为DruidDataSource创建一个对应的数据源代理DataSourceProxy2 - 当我们在程序中想获取一个Connection时会发生什么?
- 先获取一个
DataSource,因为DataSourceProxy为Primary,所以此时拿到的是DataSourceProxy - 基于
DataSource获取一个Connection,即通过DataSourceProxy获取Connection。此时会先调用targetDataSource 即 DruidDataSource 的 getConnection 方法,但因为切面会对DruidDataSource进行拦截,根据步骤2的拦截逻辑可以知道,此时会自动创建一个DataSourceProxy2,然后调用DataSourceProxy2#getConnection,然后再调用DruidDataSource#getConnection。最终形成了双层代理, 返回的Connection也是一个双层的ConnectionProxy
- 先获取一个

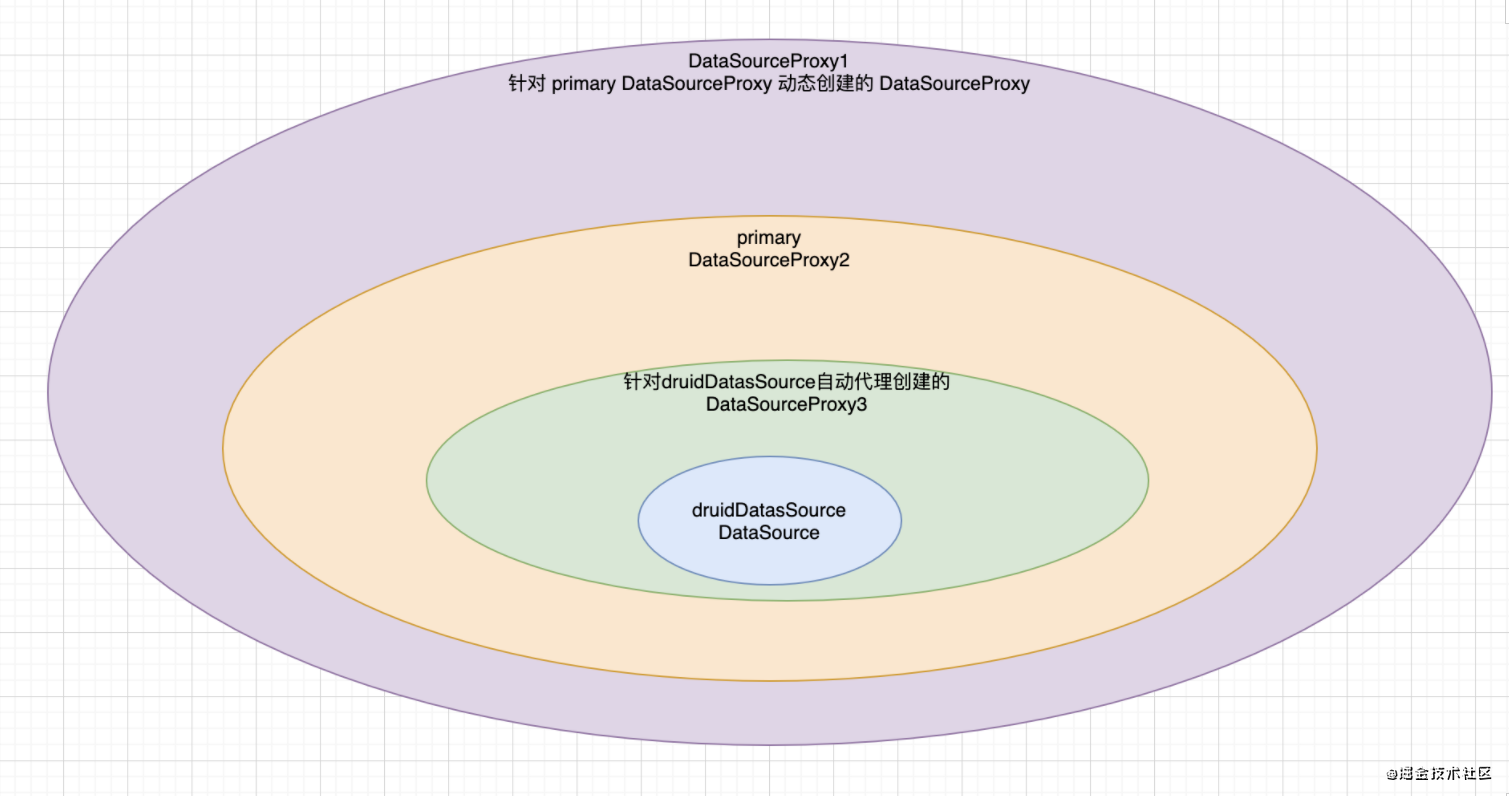
上面其实是改造之后的代理逻辑,Seata默认的自动代理会对DataSourceProxy再次进行代理,后果就是代理多了一层此时对应的图如下

数据源多层代理会导致的两个问题在文章开头处已经总结了,下面会有案例介绍。
分支事务提交
通过ConnectionProxy中执行对应的方法,会发生什么?以update操作涉及到的一个分支事务提交为例:
- 执行
ConnectionProxy#prepareStatement, 返回一个PreparedStatementProxy - 执行
PreparedStatementProxy#executeUpdate,PreparedStatementProxy#executeUpdate大概会帮做两件事情: 执行业务SQL和提交undo_log
提交业务SQL
// ExecuteTemplate#execute
if (sqlRecognizers.size() == 1) {
    SQLRecognizer sqlRecognizer = sqlRecognizers.get(0);
    switch (sqlRecognizer.getSQLType()) {
        case INSERT:
            executor = EnhancedServiceLoader.load(InsertExecutor.class, dbType,
                    new Class[]{StatementProxy.class, StatementCallback.class, SQLRecognizer.class},
                    new Object[]{statementProxy, statementCallback, sqlRecognizer});
            break;
        case UPDATE:
            executor = new UpdateExecutor<>(statementProxy, statementCallback, sqlRecognizer);
            break;
        case DELETE:
            executor = new DeleteExecutor<>(statementProxy, statementCallback, sqlRecognizer);
            break;
        case SELECT_FOR_UPDATE:
            executor = new SelectForUpdateExecutor<>(statementProxy, statementCallback, sqlRecognizer);
            break;
        default:
            executor = new PlainExecutor<>(statementProxy, statementCallback);
            break;
    }
} else {
    executor = new MultiExecutor<>(statementProxy, statementCallback, sqlRecognizers);
}
主要流程就是: 先执行业务SQL,然后执行ConnectionProxy的commit方法,在这个方法中,会先帮我们执行对应的 undo_log SQL,然后提交事务
PreparedStatementProxy#executeUpdate =>
ExecuteTemplate#execute =>
BaseTransactionalExecutor#execute =>
AbstractDMLBaseExecutor#doExecute =>
AbstractDMLBaseExecutor#executeAutoCommitTrue =>
AbstractDMLBaseExecutor#executeAutoCommitFalse => 在这一步操中,会触发statementCallback#execute方法,即调用调用原生PreparedStatement#executeUpdate方法
ConnectionProxy#commit
ConnectionProxy#processGlobalTransactionCommit
UNDO_LOG插入
// ConnectionProxy#processGlobalTransactionCommit
private void processGlobalTransactionCommit() throws SQLException {
    try {
        // 注册分支事务,简单理解向server发一个请求,然后server在branch_table表里插入一条记录,不关注
        register();
    } catch (TransactionException e) {
        // 如果没有for update 的sql,会直接在commit之前做注册,此时不止插入一条branch记录,而会附带锁信息进行竞争,下方的异常一般就是在注册时没拿到锁抛出,一般就是纯update语句的并发下会触发竞争锁失败的异常 @FUNKYE
        recognizeLockKeyConflictException(e, context.buildLockKeys());
    }
    try {
        // undo_log处理,期望用 targetConnection 处理           @1
        UndoLogManagerFactory.getUndoLogManager(this.getDbType()).flushUndoLogs(this);

        // 提交本地事务,期望用 targetConnection 处理             @2
        targetConnection.commit();
    } catch (Throwable ex) {
        LOGGER.error("process connectionProxy commit error: {}", ex.getMessage(), ex);
        report(false);
        throw new SQLException(ex);
    }
    if (IS_REPORT_SUCCESS_ENABLE) {
        report(true);
    }
    context.reset();
}
- undo_log处理@1,解析当前事务分支涉及到的
undo_log,然后使用TargetConnection, 写到数据库
public void flushUndoLogs(ConnectionProxy cp) throws SQLException {
    ConnectionContext connectionContext = cp.getContext();
    if (!connectionContext.hasUndoLog()) {
        return;
    }

    String xid = connectionContext.getXid();
    long branchId = connectionContext.getBranchId();

    BranchUndoLog branchUndoLog = new BranchUndoLog();
    branchUndoLog.setXid(xid);
    branchUndoLog.setBranchId(branchId);
    branchUndoLog.setSqlUndoLogs(connectionContext.getUndoItems());

    UndoLogParser parser = UndoLogParserFactory.getInstance();
    byte[] undoLogContent = parser.encode(branchUndoLog);

    if (LOGGER.isDebugEnabled()) {
        LOGGER.debug("Flushing UNDO LOG: {}", new String(undoLogContent, Constants.DEFAULT_CHARSET));
    }

    insertUndoLogWithNormal(xid, branchId, buildContext(parser.getName()), undoLogContent,cp.getTargetConnection());
}
- 提交本地事务@2,即通过
TargetConnection提交事务。即务SQL执行、undo_log写入、即事务提交用的都是同一个TargetConnection
lcn的内置数据库方案,lcn是将undolog写到他内嵌的h2(忘了是不是这个来着了)数据库上,此时会变成2个本地事务,一个是h2的undolog插入事务,一个是业务数据库的事务,如果在h2插入后,业务数据库异常,lcn的方案就会出现数据冗余,回滚数据的时候也是一样,删除undolog跟回滚业务数据不是一个本地事务. 但是lcn这样的好处就是入侵小,不需要另外添加undolog表。 感谢@FUNKYE大佬给的建议,对lcn不太了解,有机会好好研究一下
分支事务回滚
- Server端向Client端发送回滚请求
- Client端接收到Server发过来的请求,经过一系列处理,最终会到
DataSourceManager#branchRollback方法 - 先根据resourceId从
DataSourceManager.dataSourceCache中获取对应的DataSourceProxy,此时为masterSlaveProxy(回滚阶段我们就不考代理数据源问题,简单直接一些,反正最终拿到的都是TragetConnection) - 根据Server端发过来的xid和branchId查找对应的undo_log并解析其
rollback_info属性,每条undo_log可能会解析出多条SQLUndoLog,每个SQLUndoLog可以理解成是一个操作。比如一个分支事务先更新A表,再更新B表,这时候针对该分支事务生成的undo_log就包含两个SQLUndoLog:第一个SQLUndoLog对应的是更新A表的前后快照;第二个SQLUndoLog对应的是更新B表的前后快照 - 针对每条
SQLUndoLog执行对应的回滚操作,比如一个SQLUndoLog对应的操作是INSERT,则其对应的回滚操作就是DELETE - 根据xid和branchId删除该undo_log
// AbstractUndoLogManager#undo   删除了部分非关键代码

public void undo(DataSourceProxy dataSourceProxy, String xid, long branchId) throws TransactionException {
    Connection conn = null;
    ResultSet rs = null;
    PreparedStatement selectPST = null;
    boolean originalAutoCommit = true;

    for (; ; ) {
        try {
            // 获取原生数据源的Connection, 回滚阶段我们不管代理数据源问题,最终拿到的都是 TargetConnection
            conn = dataSourceProxy.getPlainConnection();

            // 将回滚操作放在一个本地事务中,手动提交,确保最终业务SQL操作和undo_log删除操作一起提交
            if (originalAutoCommit = conn.getAutoCommit()) {
                conn.setAutoCommit(false);
            }

            // 根据xid 和 branchId 查询 undo_log,注意此时的SQL语句  SELECT * FROM undo_log WHERE branch_id = ? AND xid = ? FOR UPDATE
            selectPST = conn.prepareStatement(SELECT_UNDO_LOG_SQL);
            selectPST.setLong(1, branchId);
            selectPST.setString(2, xid);
            rs = selectPST.executeQuery();

            boolean exists = false;
            while (rs.next()) {
                exists = true;
                // status == 1 undo_log不处理,和防悬挂相关
                if (!canUndo(state)) {
                    return;
                }

                // 解析undo_log
                byte[] rollbackInfo = getRollbackInfo(rs);
                BranchUndoLog branchUndoLog = UndoLogParserFactory.getInstance(serializer).decode(rollbackInfo);
                try {
                    setCurrentSerializer(parser.getName());
                    List<SQLUndoLog> sqlUndoLogs = branchUndoLog.getSqlUndoLogs();
                    if (sqlUndoLogs.size() > 1) {
                        Collections.reverse(sqlUndoLogs);
                    }
                    for (SQLUndoLog sqlUndoLog : sqlUndoLogs) {
                        AbstractUndoExecutor undoExecutor = UndoExecutorFactory.getUndoExecutor(dataSourceProxy.getDbType(), sqlUndoLog);
                        // 执行对应的回滚操作
                        undoExecutor.executeOn(conn);
                    }
                }
            }

            //
            if (exists) {
                LOGGER.error("\n delete from undo_log where xid={} AND branchId={} \n", xid, branchId);
                deleteUndoLog(xid, branchId, conn);
                conn.commit();
            // 和防悬挂相关 如果根据 xid和branchId 没有查到undo_log,说明这个分支事务有异常:例如业务处理超时,导致全局事务回滚,但这时候业务undo_log并没有插入
            } else {
                LOGGER.error("\n insert into undo_log xid={},branchId={} \n", xid, branchId);
                insertUndoLogWithGlobalFinished(xid, branchId, UndoLogParserFactory.getInstance(), conn);
                conn.commit();
            }
            return;
        } catch (Throwable e) {
            throw new BranchTransactionException(BranchRollbackFailed_Retriable, String
                .format("Branch session rollback failed and try again later xid = %s branchId = %s %s", xid,branchId, e.getMessage()), e);
        }
    }
}
有以下几个注意点:
- 回滚时不考虑数据源代理问题,最终都是使用
TargetConnection - 设置atuoCommit为false,即需要手动提交事务
- 根据xid和branchId查询undo_log时加了
for update,也就是说,这个事务会持有这条undo_log的锁直到所有回滚操作都完成,因为完成之后才会
多层代理问题
数据源多层代理会导致的几个问题在文章开头的时候已经提到过了,重点分析一下为什么会造成以上问题:
对分支事务提交的影响
先分析一下,如果使用双层代理会发生什么?我们从两个方面来分析:业务SQL和undo_log
- 业务SQL
PreparedStatementProxy1.executeUpdate =>
statementCallback#executeUpdate(PreparedStatementProxy2#executeUpdate) =>
PreparedStatement#executeUpdate
好像没啥影响,就是多绕了一圈,最终还是通过PreparedStatement执行
- undo_log
ConnectionProxy1#getTargetConnection ->
ConnectionProxy2#prepareStatement ->
PreparedStatementProxy2#executeUpdate ->
PreparedStatement#executeUpdate(原生的undo_log写入,在此之前会对为该 undo_log 生成 undo_log2(即 undo_log 的 undo_log)) ->
ConnectionProxy2#commit ->
ConnectionProxy2#processGlobalTransactionCommit(写入undo_log2) ->
ConnectionProxy2#getTargetConnection ->
TargetConnection#prepareStatement ->
PreparedStatement#executeUpdate
对分支事务回滚的影响
在事务回滚之后,为何undo_log没有被删除呢?
其实并不是没有被删除。前面已经说过,双层代理会导致undo_log被当作分支事务来处理,所以也会为该 undo_log生成一个undo_log(假设为undo_log2),而undo_log2生成的有问题(其实也没问题,就应该这样生成),从而导致回滚时会将业务表关联的undo_log也一起删除,最终导致业务表对应的事务分支回滚时发现undo_log不存在,从而又多生成一条状态为为1的undo_log
回滚之前
// undo_log
84	59734070967644161	172.16.120.59:23004:59734061438185472 serializer=jackson 1.1KB  0
85	59734075254222849	172.16.120.59:23004:59734061438185472 serializer=jackson 4.0KB  0

// branch_table
59734070967644161	172.16.120.59:23004:59734061438185472		jdbc:mysql://172.16.248.10:3306/tuya_middleware
59734075254222849	172.16.120.59:23004:59734061438185472		jdbc:mysql://172.16.248.10:3306/tuya_middleware

// lock_table
jdbc:mysql://xx^^^seata_storage^^^1 59734070967644161	jdbc:mysql://172.16.248.10:3306/tuya_middleware	seata_storage	  1
jdbc:mysql://xx^^^undo_log^^^84	    59734075254222849	jdbc:mysql://172.16.248.10:3306/tuya_middleware	undo_log	      84
回滚之后
// 生成了一条状态为1的undo_log,对应的日志为: undo_log added with GlobalFinished
86	59734070967644161	172.16.120.59:23004:59734061438185472 serializer=jackson 1.0Byte  1
问题分析
- 根据xid和branchId找到对应的undo_log日志
- 对undo_log进行解析,主要就是解析它的
rollback_info字段,rollback_info解析出来就是一个SQLUndoLog集合,每条SQLUndoLog对应着一个操作,里面包含了该操作的前后的快照,然后执行对应的回滚 - 根据xid和branchId删除undo_log日志
因为双层代理问题,导致一条undo_log变成了一个分支事务,所以发生回滚时,我们也需要对undo_log分支事务进行回滚: 1、首先根据xid和branchId找到对应的undo_log并解析其rollback_info属性,这里解析出来的rollback_info包含了两条SQLUndoLog。为什么有两条?
仔细想想也可以可以理解,第一层代理针对
seata_storage的操作,放到缓存中,本来执行完之后是需要清掉的,但因为这里是双层代理,所以这时候这个流程并没有结束。轮到第二层代理对undo_log操作时,将该操作放到缓存中,此时缓存中有两个操作,分别为seata_storage的UPDATE和undo_log的INSERT。所以这也就很好理解为什么针对undo_log操作的那条undo_log格外大(4KB),因为它的rollback_info包含了两个操作。
有一点需要注意的是,第一条SQLUndoLog对应的after快照,里面的branchId=59734070967644161 pk=84, 即 seata_storage分支对应的branchId 和 seata_storage对应的undo_log PK。也就是说,undo_log回滚时候 把seata_storage对应的undo_log删掉了。 那undo_log本身对应的undo_log 如何删除呢?在接下来的逻辑中会根据xid和branchId删除
2、解析第一条SQLUndoLog,此时对应的是undo_log的INSERT操作,所以其对应的回滚操作是DELETE。因为undo_log此时被当作了业务表。所以这一步会将59734075254222849对应的undo_log删除,但这个其实是业务表对应的对应的undo_log
3、解析第二条SQLUndoLog,此时对应的是seata_storage的UPDATE操作,这时会通过快照将seata_storage对应的记录恢复
4、根据xid和branchId删除undo_log日志,这里删除的是undo_log 的 undo_log , 即 undo_log2。所以,执行到这里,两条undo_log就已经被删除了
5、接下来回滚seata_storage,因为这时候它对应的undo_log已经在步骤2删掉了,所以此时查不到undo_log,然后重新生成一条status == 1 的 undo_log
案例分析
背景
1、配置了三个数据源: 两个物理数据源、一个逻辑数据源,但是两个物理数据源对应的连接地址是一样的。这样做有意思吗?
@Bean("dsMaster")
DynamicDataSource dsMaster() {
    return new DynamicDataSource(masterDsRoute);
}

@Bean("dsSlave")
DynamicDataSource dsSlave() {
    return new DynamicDataSource(slaveDsRoute);
}

@Primary
@Bean("masterSlave")
DataSource masterSlave(@Qualifier("dsMaster") DataSource dataSourceMaster,
                        @Qualifier("dsSlave") DataSource dataSourceSlave) throws SQLException {
    Map<String, DataSource> dataSourceMap = new HashMap<>(2);
    //主库
    dataSourceMap.put("dsMaster", dataSourceMaster);
    //从库
    dataSourceMap.put("dsSlave", dataSourceSlave);
    // 配置读写分离规则
    MasterSlaveRuleConfiguration masterSlaveRuleConfig = new MasterSlaveRuleConfiguration(
            "masterSlave", "dsMaster", Lists.newArrayList("dsSlave")
    );
    Properties shardingProperties = new Properties();
    shardingProperties.setProperty("sql.show", "true");
    shardingProperties.setProperty("sql.simple", "true");
    // 获取数据源对象
    DataSource dataSource = MasterSlaveDataSourceFactory.createDataSource(dataSourceMap, masterSlaveRuleConfig, shardingProperties);
    log.info("datasource initialized!");
    return dataSource;˚
}

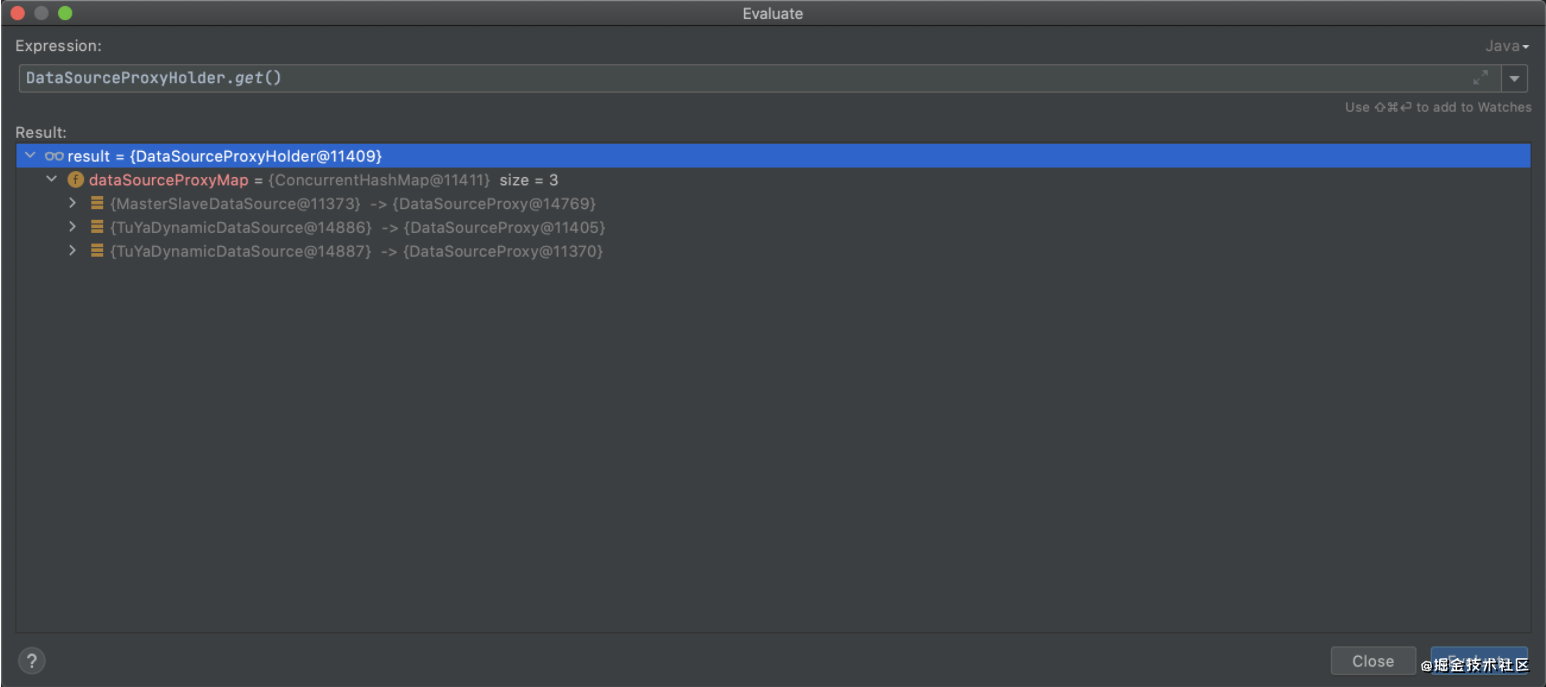
2、开启seata的数据源动态代理,根据seata的数据源代理逻辑可以知道,最终会生成三个代理数据源,原生数据源和代理数据源的关系缓存在DataSourceProxyHolder.dataSourceProxyMap中,假如原生数据源和代理数据源对应的关系如下:
dsMaster(DynamicDataSource)           =>       dsMasterProxy(DataSourceProxy)
dsSlave(DynamicDataSource)           =>       dsSlaveProxy(DataSourceProxy)
masterSlave(MasterSlaveDataSource)       =>       masterSlaveProxy(DataSourceProxy)
所以,最终在IOC容器中存在的数据源是这三个: dsMasterProxy 、 dsSlaveProxy 、 masterSlaveProxy 。根据@Primary的特性可以知道,当我们从容器中获取一个DataSource的时候,默认返回的就是代理数据源 masterSlaveProxy
对shardingjdbc没有具体的研究过,只是根据debug时看到的代码猜测它的工作机制,又不对的地方,还请大佬指出来
masterSlaveProxy可以看成是被 DataSourceProxy 包装后的 MasterSlaveDataSource。我们可以大胆的猜测MasterSlaveDataSource并不是一个物理数据源,而是一个逻辑数据源,可以简单的认为里面包含了路由的逻辑。当我们获取一个连接时,会通过里面的路由规则选择到具体的物理数据源,然后通过该物理数据源获取一个真实的连接。 路由规则应该可以自己定义,根据debug时观察到的现象,默认的路由规则应该是:
- 针对select 读操作,会路由到从库,即我们的 dsSlave
- 针对update 写操作,会路由到主库,即我们的 dsMaster
3、每个DataSourceProxy在初始化的时候,会解析该真实DataSource的连接地址,然后将该连接地址和DataSourceProxy本身维护DataSourceManager.dataSourceCache中。DataSourceManager.dataSourceCache有一个作用是用于回滚:回滚时根据连接地址找到对应的DataSourceProxy,然后基于该DataSourceProxy做回滚操作。 但我们可以发现这个问题,这三个数据源解析出来的连接地址是一样的,也就是key重复了,所以在DataSourceManager.dataSourceCache中中,当连接地相同时,后注册的数据源会覆盖已存在的。即: DataSourceManager.dataSourceCache最终存在的是masterSlaveProxy,也就是说,最终会通过masterSlaveProxy进行回滚,这点很重要。
4、涉及到的表:很简单,我们期待的就一个业务表seata_account,但因为重复代理问题,导致seata将undo_log也当成了一个业务表
- seata_account
- undo_log
好了,这里简单介绍一下背景,接下来进入Seata环节
需求
我们的需求很简单,就是在分支事务里面执行一条简单的update操作,更新seata_account的count值。在更新完之后,手动抛出一个异常,触发全局事务的回滚。 为了更便于排查问题,减少干扰,我们全局事务中就使用一个分支事务,没有其它分支事务了。SQL如下:
update seata_account set count = count - 1 where id = 100;
问题现象
Client:在控制台日志中,不断重复打印以下日志
- 以上日志打印的间隔为20s,而我查看了数据库的
innodb_lock_wait_timeout属性值,刚好就是20,说明每次回滚请求过来的时候,都因为获取锁超时(20)而回滚失败 - 为什么会没过20s打印一次?因为Server端会有定时处理回滚请求
// 分支事务开始回滚
Branch rollback start: 172.16.120.59:23004:59991911632711680 59991915571163137 jdbc:mysql://172.16.248.10:3306/tuya_middleware

// undo_log事务分支 原始操作对应是 insert, 所以其回滚为 delete
undoSQL undoSQL=DELETE FROM undo_log WHERE id = ?  , PK=[[id,139]]
// 因为第一层代理对应的操作也在上下文中,undo_log分支事务 提交时候, 对应的undo_log包含两个操作
undoSQL undoSQL=UPDATE seata_account SET money = ? WHERE id = ?  , PK=[[id,1]]

// 该分支事务回滚完成之后,再删除该分支事务的对应的 undo_log
delete from undo_log where xid=172.16.120.59:23004:59991911632711680 AND branchId=59991915571163137

// 抛出异常,提示回滚失败,失败原因是`Lock wait timeout exceeded`, 在根据xid和branchId删除undo_log时失败,失败原因是获取锁超时,说明此时有另一个操作持有该记录的锁没有释放
branchRollback failed. branchType:[AT], xid:[172.16.120.59:23004:59991911632711680], branchId:[59991915571163137], resourceId:[jdbc:mysql://172.16.248.10:3306/tuya_middleware], applicationData:[null]. reason:[Branch session rollback failed and try again later xid = 172.16.120.59:23004:59991911632711680 branchId = 59991915571163137 Lock wait timeout exceeded; try restarting transaction]
Server:每20s打印以下日志,说明server在不断的重试发送回滚请求
Rollback branch transaction fail and will retry, xid = 172.16.120.59:23004:59991911632711680 branchId = 59991915571163137
在该过程中,涉及到的SQL大概如下:
1. SELECT * FROM undo_log WHERE branch_id = ? AND xid = ? FOR UPDATE							slaveDS
2. SELECT * FROM undo_log WHERE  (id ) in (  (?)  )												        slaveDS
3. DELETE FROM undo_log WHERE id = ?  															              masterDS
4. SELECT * FROM seata_account WHERE  (id ) in (  (?)  )										      masterDS
5. UPDATE seata_account SET money = ? WHERE id = ?  											        masterDS
6. DELETE FROM undo_log WHERE branch_id = ? AND xid = ?											      masterDS
此时查看数据库的 事务情况、锁情况 、锁等待关系 1、查当前正在执行的事务
SELECT * FROM information_schema.INNODB_TRX;

2、查当前锁情况
SELECT * FROM information_schema.INNODB_LOCKs;

3、查当前锁等待关系
SELECT * FROM information_schema.INNODB_LOCK_waits;

SELECT
	block_trx.trx_mysql_thread_id AS 已经持有锁的sessionID,
	request_trx.trx_mysql_thread_id AS 正在申请锁的sessionID,
	block_trx.trx_query AS 已经持有锁的SQL语句,
	request_trx.trx_query AS 正在申请锁的SQL语句,
	waits.blocking_trx_id AS 已经持有锁的事务ID,
	waits.requesting_trx_id AS 正在申请锁的事务ID,
	waits.requested_lock_id AS 锁对象的ID,
	locks.lock_table AS lock_table, 					-- 锁对象所锁定的表
	locks.lock_type AS lock_type, 						-- 锁类型
	locks.lock_mode AS lock_mode 							-- 锁模式
FROM
	information_schema.innodb_lock_waits AS waits
	INNER JOIN information_schema.innodb_trx AS block_trx ON waits.blocking_trx_id = block_trx.trx_id
	INNER JOIN information_schema.innodb_trx AS request_trx ON waits.requesting_trx_id = request_trx.trx_id
	INNER JOIN information_schema.innodb_locks AS locks ON waits.requested_lock_id = locks.lock_id;

- 涉及到到记录为
branch_id = 59991915571163137 AND xid = 172.16.120.59:23004:59991911632711680 - 事务ID
1539483284持有该记录的锁,但是它对应的SQL为空,那应该是在等待commit - 事务ID
1539483286在尝试获取该记录的锁,但从日志可以发现,它一直锁等待超时
大概可以猜测是 select for update 和 delete from undo ... 发生了冲突。根据代码中的逻辑,这两个操作应该是放在一个事务中提交了,为什么被分开到两个事务了?
问题分析
结合上面的介绍的回滚流程看看我们这个例子在回滚时会发生什么
- 先获取数据源,此时dataSourceProxy.getPlainConnection()获取到的是
MasterSlaveDataSource数据源 - 在
select for update操作的时候,通过MasterSlaveDataSource获取一个Connection,前面说到过MasterSlaveDataSource是一个逻辑数据源,里面有路由逻辑,根据上面介绍的,这时候拿到的是dsSlave的Connection - 在执行
delete from undo ...操作的时候,这时候拿到的是dsMaster的Connection - 虽然
dsSlave和dsMaster对应的是相同的地址,但此时获取到的肯定是不同的连接,所以此时两个操作肯定是分布在两个事务中 - 执行
select for update的事务,会一直等待直到删除undo_log完成才会提交 - 执行
delete from undo ...的事务,会一直等待select for update的事务释放锁 - 典型的死锁问题
验证猜想
我尝试用了两个方法验证这个问题:
修改Seata代码,将
select for update改成select,此时在查询undo_log就不需要持有该记录的锁,也就不会造成死锁修改数据源代理逻辑,这才是问题的关键,该问题主要原因不是
select for update。在此之前多层代理问题已经产生,然后才会造成死锁问题。从头到尾我们就不应该对masterSlave数据源进行代理。它只是一个逻辑数据源,为什么要对它进行代理呢?如果代理masterSlave,就不会造成多层代理问题,也就不会造成删除undo_log时的死锁问题
最终实现
masterSlave也是一个DataSource类型,该如何仅仅对dsMaster 和 dsSlave 代理而不对masterSlave代理呢?观察SeataAutoDataSourceProxyCreator#shouldSkip方法,我们可以通过EnableAutoDataSourceProxy注解的excludes属性解决这个问题
@Override
protected boolean shouldSkip(Class<?> beanClass, String beanName) {
    return SeataProxy.class.isAssignableFrom(beanClass) ||
            DataSourceProxy.class.isAssignableFrom(beanClass) ||
            !DataSource.class.isAssignableFrom(beanClass) ||
            Arrays.asList(excludes).contains(beanClass.getName());
}
即: 将数据源自动代理关闭,然后在启动类加上这个注解
@EnableAutoDataSourceProxy(excludes = {"org.apache.shardingsphere.shardingjdbc.jdbc.core.datasource.MasterSlaveDataSource"})
自动代理在新版本中的优化
因为Seata 1.4.0还没有正式发布,我目前看的是1.4.0-SNAPSHOT版本的代码,即当前时间ddevelop分支最新的代码
代码改动
主要改动如下,一些小的细节就不过多说明了:
DataSourceProxyHolder调整DataSourceProxy调整SeataDataSourceBeanPostProcessor新增
DataSourceProxyHolder
在这个类改动中,最主要是其putDataSource方法的改动
public SeataDataSourceProxy putDataSource(DataSource dataSource, BranchType dataSourceProxyMode) {
    DataSource originalDataSource;
    if (dataSource instanceof SeataDataSourceProxy) {
        SeataDataSourceProxy dataSourceProxy = (SeataDataSourceProxy) dataSource;
        // 如果是代理数据源,并且和当前应用配置的数据源代理模式(AT/XA)一样, 则直接返回
        if (dataSourceProxyMode == dataSourceProxy.getBranchType()) {
            return (SeataDataSourceProxy)dataSource;
        }

        // 如果是代理数据源,和当前应用配置的数据源代理模式(AT/XA)不一样,则需要获取其TargetDataSource,然后为其创建一个代理数据源
        originalDataSource = dataSourceProxy.getTargetDataSource();
    } else {
        originalDataSource = dataSource;
    }

    // 如果有必要,基于 TargetDataSource 创建 代理数据源
    return this.dataSourceProxyMap.computeIfAbsent(originalDataSource,
            BranchType.XA == dataSourceProxyMode ? DataSourceProxyXA::new : DataSourceProxy::new);
}
DataSourceProxyHolder#putDataSource方法主要在两个地方被用到:一个是在SeataAutoDataSourceProxyAdvice切面中;一个是在SeataDataSourceBeanPostProcessor中。 这段判断为我们解决了什么问题?数据源多层代理问题。在开启了数据源自动代理的前提下,思考以下场景:
- 如果我们在项目中手动注入了一个
DataSourceProxy,这时候在切面调用DataSourceProxyHolder#putDataSource方法时会直接返回该DataSourceProxy本身,而不会为其再创建一个DataSourceProxy - 如果我们在项目中手动注入了一个
DruidSource,这时候在切面调用DataSourceProxyHolder#putDataSource方法时会为其再创建一个DataSourceProxy并返回
这样看好像问题已经解决了,有没有可能会有其它的问题呢?看看下面的代码
@Bean
public DataSourceProxy dsA(){
    return new DataSourceProxy(druidA)
}

@Bean
public DataSourceProxy dsB(DataSourceProxy dsA){
    return new DataSourceProxy(dsA)
}
- 这样写肯定是不对,但如果他就要这样写你也没办法
dsA没什么问题,但dsB还是会产生双层代理的问题,因为此时dsB 的 TargetDataSource是dsA- 这就涉及到
DataSourceProxy的改动
DataSourceProxy
public DataSourceProxy(DataSource targetDataSource, String resourceGroupId) {
    // 下面这个判断,保证了在我们传入一个DataSourceProxy的时候,也不会产生双层代理问题
    if (targetDataSource instanceof SeataDataSourceProxy) {
        LOGGER.info("Unwrap the target data source, because the type is: {}", targetDataSource.getClass().getName());
        targetDataSource = ((SeataDataSourceProxy) targetDataSource).getTargetDataSource();
    }
    this.targetDataSource = targetDataSource;
    init(targetDataSource, resourceGroupId);
}
SeataDataSourceBeanPostProcessor
public class SeataDataSourceBeanPostProcessor implements BeanPostProcessor {
    private static final Logger LOGGER = LoggerFactory.getLogger(SeataDataSourceBeanPostProcessor.class);

    ......

    @Override
    public Object postProcessAfterInitialization(Object bean, String beanName) throws BeansException {
        if (bean instanceof DataSource) {
            //When not in the excludes, put and init proxy.
            if (!excludes.contains(bean.getClass().getName())) {
                //Only put and init proxy, not return proxy.
                DataSourceProxyHolder.get().putDataSource((DataSource) bean, dataSourceProxyMode);
            }

            //If is SeataDataSourceProxy, return the original data source.
            if (bean instanceof SeataDataSourceProxy) {
                LOGGER.info("Unwrap the bean of the data source," +
                    " and return the original data source to replace the data source proxy.");
                return ((SeataDataSourceProxy) bean).getTargetDataSource();
            }
        }
        return bean;
    }
}
SeataDataSourceBeanPostProcessor实现了BeanPostProcessor接口,在一个bean初始化后,会执行BeanPostProcessor#postProcessAfterInitialization方法。也就是说,在postProcessAfterInitialization方法中,这时候的bean已经是可用状态了- 为什么要提供这么一个类呢?从它的代码上来看,仅仅是为了再bean初始化之后,为数据源初始化对应的
DataSourceProxy,但为什么要这样做呢?
因为有些数据源在应用启动之后,可能并不会初始化(即不会调用数据源的相关方法)。如果没有提供
SeataDataSourceBeanPostProcessor类,那么就只有在SeataAutoDataSourceProxyAdvice切面中才会触发DataSourceProxyHolder#putDataSource方法。假如有一个客户端在回滚的时候宕机了,在重启之后,Server端通过定时任务向其派发回滚请求,这时候客户端需要先根据rsourceId(连接地址)找到对应的DatasourceProxy。但如果在此之前客户端还没有主动触发数据源的相关方法,就不会进入SeataAutoDataSourceProxyAdvice切面逻辑,也就不会为该数据源初始化对应的DataSourceProxy,从而导致回滚失败
多层代理总结
通过上面的分析,我们大概已经知道了seata在避免多层代理上的一些优化,但其实还有一个问题需要注意:逻辑数据源的代理 
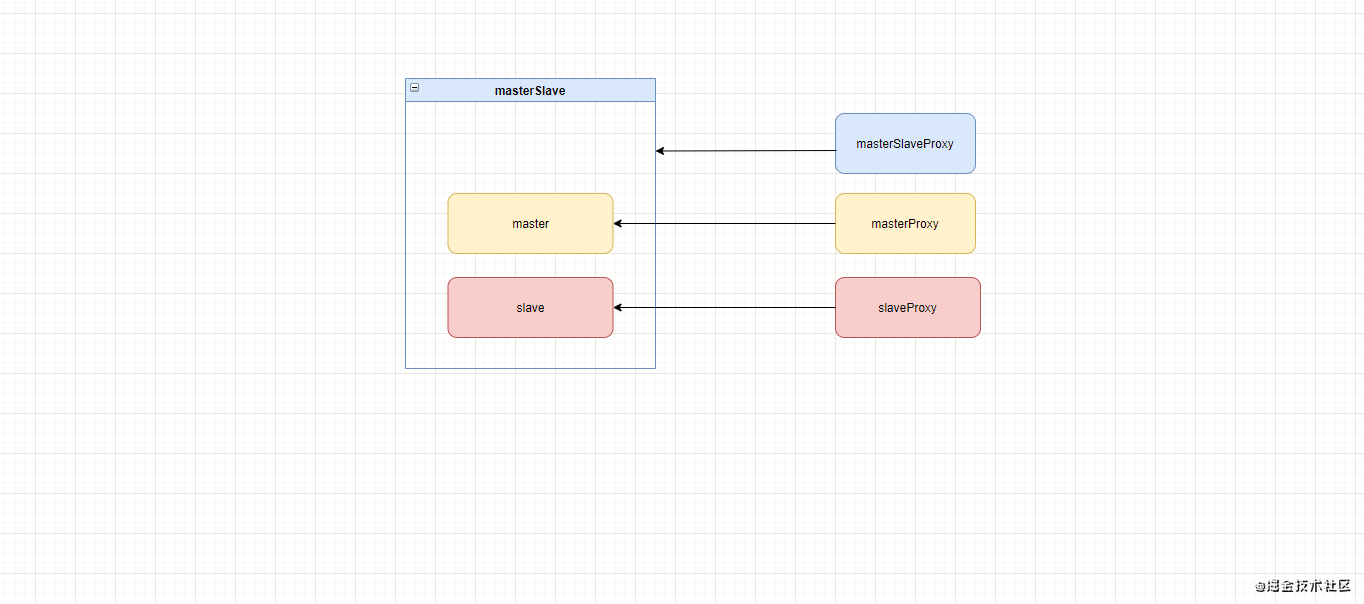
这时候的调用关系为: masterSlaveProxy -> masterSlave -> masterproxy/slaveProxy -> master/slave
此时可以通过excludes属性排除逻辑数据源,从而不为其创建数据源代理。
总结一下:
- 在为
数据源初始化对应的DataSourceProxy时,判断是否有必要为其创建对应的DataSourceProxy,如果本身就是DataSourceProxy,就直接返回 - 针对一些
数据源手动注入的情况,为了避免一些人为误操作的导致的多层代理问题,在DataSourceProxy构造函数中添加了判断,如果入参TragetDatasource本身就是一个DataSourceProxy, 则获取其target属性作为新DataSourceProxy的tragetDatasource - 针对一些其它情况,比如逻辑数据源代理问题,通过
excludes属性添加排除项,这样可以避免为逻辑数据源创建DataSourceProxy
全局事务和本地事务使用建议
有一个问题,如果在一个方法里涉及到多个DB操作,比如涉及到3条update操作,我们需不需在这个方法使用spring中的@Transactional注解?针对这个问题,我们分别从两个角度考虑:不使用@Transactional注解 和 使用@Transactional注解
不使用@Transactional注解
- 在提交阶段,因为该分支事务有3条update操作,每次执行update操作的时候,都会通过数据代理向TC注册一个分支事务,并为其生成对应的undo_log,最终3个update操作被当作3个分支事务来处理
- 在回滚阶段,需要回滚3个分支事务
- 数据的一致性通过seata全局事务来保证
使用@Transactional注解
- 在提交阶段,3个update操作被当作一个分支事务来提交,所以最终只会注册一个分支事务
- 在回滚阶段,需要回滚1个分支事务
- 数据的一致性:这3个update的操作通过本地事务的一致性保证;全局一致性由seata全局事务来保证。此时3个update仅仅是一个分支事务而已
结论
通过上面的对比,答案是显而易见的,合理的使用本地事务,可以大大的提升全局事务的处理速度。上面仅仅是3个DB操作,如果一个方法里面涉及到的DB操作更多呢,这时候两种方式的差别是不是更大呢?
最后,感谢@FUNKYE大佬为我解答了很多问题并提供了宝贵建议!

