Envoy作为前端代理
注意:本书中的 Service Mesh 章节已不再维护,请转到 istio-handbook 中浏览。
本文是使用 Envoy 作为前端代理的介绍,仅使用 docker 容器和 docker-compose 做编排在单机中运行,帮助我们从更底层了解 Envoy,当我们将 Envoy 作为 Istio Service Mesh 的 data panel 的时候将更加游刃有余。
快速开始
Envoy 中的所有规则配置跟 Kubernetes 一样都是通过 YAML 文件来完成的。在继续下面的步骤之前,首先克隆 Envoy 的 GitHub repo。
git clone https://github.com/envoyproxy/envoy.git运行 sandbox 测试
Envoy 官方提供了以下打包用例:
全部可以使用 docker-compose 运行,代码可以在 https://github.com/envoyproxy/envoy/tree/master/examples 找到。
Front proxy
Envoy 在 envoymesh 的边缘做反向代理,详细使用方式见 https://www.envoyproxy.io/docs/envoy/latest/start/sandboxes/front_proxy,在此我将解说下以下问题:
- Envoy 是如何作为进程外架构运行的?
- 为何说 Envoy 是无侵入式架构?
- Envoy 作为边缘反向代理能做什么?
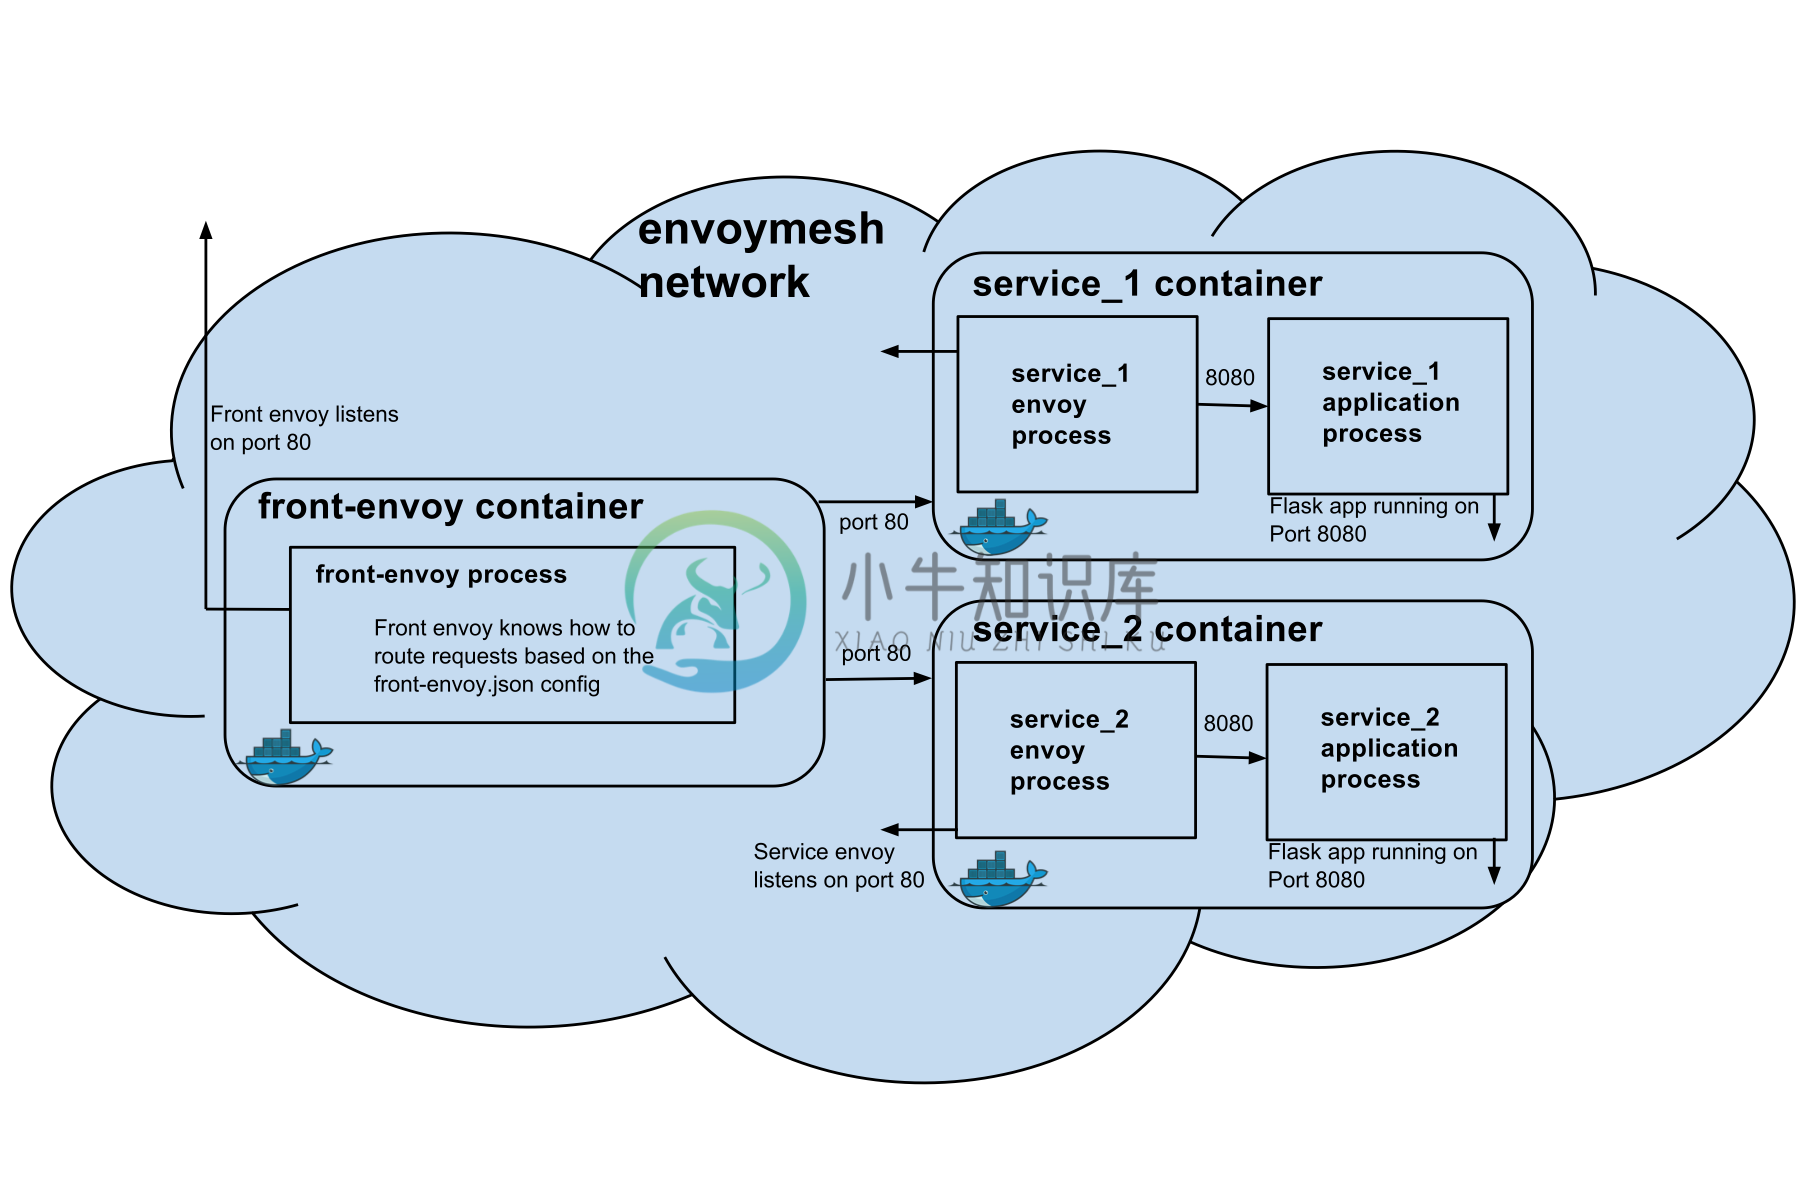
本示例的架构图如下所示,此时 Envoy 将作为一个反向代理,类似于 Nginx,但与 Nginx 不同的是它还会作为一个进程,伴随每个服务一起运行在同一个容器中(在 Kubernetes 中可以作为 Sidecar 与应用容器一起运行在同一个 Pod 中)。

在此示例中一共有 3 个服务,我们需要为其创建容器编排的 docker-compose.yml 文件。
version: '2'
services:

  front-envoy:
    build:
      context: .
      dockerfile: Dockerfile-frontenvoy
    volumes:
      - ./front-envoy.yaml:/etc/front-envoy.yaml
    networks:
      - envoymesh
    expose:
      - "80"
      - "8001"
    ports:
      - "8000:80"
      - "8001:8001"

  service1:
    build:
      context: .
      dockerfile: Dockerfile-service
    volumes:
      - ./service-envoy.yaml:/etc/service-envoy.yaml
    networks:
      envoymesh:
        aliases:
          - service1
    environment:
      - SERVICE_NAME=1
    expose:
      - "80"

  service2:
    build:
      context: .
      dockerfile: Dockerfile-service
    volumes:
      - ./service-envoy.yaml:/etc/service-envoy.yaml
    networks:
      envoymesh:
        aliases:
          - service2
    environment:
      - SERVICE_NAME=2
    expose:
      - "80"

networks:
  envoymesh: {}
使用 docker-compose 启动可以保证三个服务都在同一个网络内,即 frontproxy_envoymesh 网络中。
其中 front-envoy 是前端(边缘)Envoy 服务,用来做反向代理,它使用的是 Dockerfile-frontenvoy 文件来构建镜像的,我们来看下该 Dockerfile 的内容。
FROM envoyproxy/envoy:latest

RUN apt-get update && apt-get -q install -y \
    curl
CMD /usr/local/bin/envoy -c /etc/front-envoy.yaml --service-cluster front-proxy
其中 /etc/front-envoy.yaml 是本地的 front-envoy.yaml 挂载进去的。我们看下该文件的内容。
static_resources:
  listeners:
  - address:
      socket_address:
        address: 0.0.0.0
        port_value: 80
    filter_chains:
    - filters:
      - name: envoy.http_connection_manager
        config:
          codec_type: auto
          stat_prefix: ingress_http
          route_config:
            name: local_route
            virtual_hosts:
            - name: backend
              domains:
              - "*"
              routes:
              - match:
                  prefix: "/service/1"
                route:
                  cluster: service1
              - match:
                  prefix: "/service/2"
                route:
                  cluster: service2
          http_filters:
          - name: envoy.router
            config: {}
  clusters:
  - name: service1
    connect_timeout: 0.25s
    type: strict_dns
    lb_policy: round_robin
    http2_protocol_options: {}
    hosts:
    - socket_address:
        address: service1
        port_value: 80
  - name: service2
    connect_timeout: 0.25s
    type: strict_dns
    lb_policy: round_robin
    http2_protocol_options: {}
    hosts:
    - socket_address:
        address: service2
        port_value: 80
admin:
  access_log_path: "/dev/null"
  address:
    socket_address:
      address: 0.0.0.0
      port_value: 8001
我们看到其中包括了三大配置项:
- static_resources:路由配置信息
- cluster:envoymesh 的服务注册信息
- admin:管理接口,可以通过访问 8001 端口的,访问
/stats获取当前 envoymesh 的一些统计信息,访问/server_info获取 Envoy 的版本信息
使用 docker-compose 启动三个容器。
$ pwd
envoy/examples/front-proxy
$ docker-compose up --build -d
$ docker-compose ps
        Name                       Command               State      Ports
-------------------------------------------------------------------------------------------------------------
example_service1_1      /bin/sh -c /usr/local/bin/ ... Up       80/tcp
example_service2_1      /bin/sh -c /usr/local/bin/ ... Up       80/tcp
example_front-envoy_1   /bin/sh -c /usr/local/bin/ ... Up       0.0.0.0:8000->80/tcp, 0.0.0.0:8001->8001/tcp
我们下面将过一遍 Envoy 作为前端代理的所有功能,这些功能是通用功能。
路由
访问 service1 http://localhost:8000/service/1 将看到如下输出。
$ curl -v localhost:8000/service/1
*
Trying ::1...
* TCP_NODELAY set
* Connected to localhost (::1) port 8000 (#0)
> GET /service/1 HTTP/1.1
> Host: localhost:8000
> User-Agent: curl/7.54.0
> Accept: */*
>
< HTTP/1.1 200 OK
< content-type: text/html; charset=utf-8
< content-length: 89
< server: envoy
< date: Fri, 20 Apr 2018 08:26:33 GMT
< x-envoy-upstream-service-time: 14
<
Hello from behind Envoy (service 1)! hostname: a3e4185a9a49 resolvedhostname: 172.18.0.4
* Connection #0 to host localhost left intact
访问 service2 http://localhost:8000/service/2 将看到如下输出。
*   Trying ::1...
* TCP_NODELAY set
* Connected to localhost (::1) port 8000 (#0)
> GET /service/2 HTTP/1.1
> Host: localhost:8000
> User-Agent: curl/7.54.0
> Accept: */*
>
< HTTP/1.1 200 OK
< content-type: text/html; charset=utf-8
< content-length: 89
< server: envoy
< date: Fri, 20 Apr 2018 08:27:27 GMT
< x-envoy-upstream-service-time: 10
<
Hello from behind Envoy (service 2)! hostname: f6650e1911a0 resolvedhostname: 172.18.0.3
* Connection #0 to host localhost left intact
我们看到访问请求被路由到了正确的服务后端。
负载均衡
增加 service1 的示例数。
$ docker-compose scale service1=3
WARNING: The scale command is deprecated. Use the up command with the --scale flag instead.
Starting frontproxy_service1_1 ... done
Creating frontproxy_service1_2 ... done
Creating frontproxy_service1_3 ... done

$ docker-compose ps
          Name                        Command               State                            Ports
---------------------------------------------------------------------------------------------------------------------------
frontproxy_front-envoy_1   /usr/bin/dumb-init -- /bin ...   Up      10000/tcp, 0.0.0.0:8000->80/tcp, 0.0.0.0:8001->8001/tcp
frontproxy_service1_1      /bin/sh -c /usr/local/bin/ ...   Up      10000/tcp, 80/tcp
frontproxy_service1_2      /bin/sh -c /usr/local/bin/ ...   Up      10000/tcp, 80/tcp
frontproxy_service1_3      /bin/sh -c /usr/local/bin/ ...   Up      10000/tcp, 80/tcp
frontproxy_service2_1      /bin/sh -c /usr/local/bin/ ...   Up      10000/tcp, 80/tcp
我们看到现在 service1 已经有了 3 个实例,现在再访问 service1 http://localhost:8000/service/1。
$ while true;do curl localhost:8000/service/1;sleep 1;done
Hello from behind Envoy (service 1)! hostname: a3e4185a9a49 resolvedhostname: 172.18.0.4
Hello from behind Envoy (service 1)! hostname: fe44dba64122 resolvedhostname: 172.18.0.5
Hello from behind Envoy (service 1)! hostname: c5b9f1289e0f resolvedhostname: 172.18.0.6
Hello from behind Envoy (service 1)! hostname: a3e4185a9a49 resolvedhostname: 172.18.0.4
Hello from behind Envoy (service 1)! hostname: fe44dba64122 resolvedhostname: 172.18.0.5
Hello from behind Envoy (service 1)! hostname: c5b9f1289e0f resolvedhostname: 172.18.0.6
我们看到对 service1 的已经有负载均衡了,使用的策略是 round_robin,这些都是在 front-envoy.yaml 文件中的 cluster 项下配置的。
admin 端点
访问 http://localhost:8001 可以看到 Envoy admin 提供以下管理 API 端点。
| 命令 | 描述 |
|---|---|
| / | Admin 主页 |
| /certs | 打印机器上的 certs |
| /clusters | upstream cluster 状态 |
| /config_dump | 输出当前的 Envoy 配置 |
| /cpuprofiler | 开启/关闭 CPU profiler |
| /healthcheck/fail | 导致服务失败健康检查 |
| /healthcheck/ok | 导致服务通过健康检查 |
| /help | 打印管理命令的帮助信息 |
| /hot_restart_version | 打印热重启兼容版本 |
| /listeners | 打印 listener 地址 |
| /logging | 查询/更改日志级别 |
| /quitquitquit | 退出服务 |
| /reset_counters | 将计数器重置为 1 |
| /runtime | 打印运行时值 |
| /runtime_modify | 修改运行时值 |
| /server_info | 打印服务器版本/状态信息 |
| /stats | 打印服务器状态统计信息 |
| /stats/prometheus | 打印 prometheus 格式的服务器状态统计信息 |
Envoy 提供了 API 管理端点,可以对 Envoy 进行动态配置,参考 v2 API reference。

