当前位置: 首页 > 文档资料 > Kotlin 极简教程 >

第11章 使用Kotlin集成SpringBoot开发Web服务端

优质
小牛编辑
160浏览
2023-12-01

我们在前面第2章 “ 2.3 Web RESTFul HelloWorld ” 一节中,已经介绍了使用 Kotlin 结合 SpringBoot 开发一个RESTFul版本的 Hello World。当然,Kotlin与Spring家族的关系不止如此。在 Spring 5.0 M4 中引入了一个专门针对Kotlin的支持。

本章我们就一起来学习怎样使用Kotlin集成SpringBoot、SpringMVC等框架来开发Web服务端应用,同时简单介绍Spring 5.0对Kotlin的支持特性。

11.1 Spring Boot简介

SpringBoot是伴随着Spring4.0诞生的。从字面理解,Boot是引导的意思,SpringBoot帮助开发者快速搭建Spring框架、快速启动一个Web容器等,使得基于Spring的开发过程更加简易。 大部分Spring Boot Application只要一些极简的配置,即可“一键运行”。

SpringBoot的特性如下:

  • 创建独立的Spring applications
  • 能够使用内嵌的Tomcat, Jetty or Undertow,不需要部署war
  • 提供定制化的starter poms来简化maven配置(gradle相同)
  • 追求极致的自动配置Spring
  • 提供一些生产环境的特性,比如特征指标,健康检查和外部配置。
  • 零代码生成和零XML配置

Spring由于其繁琐的配置,一度被人认为“配置地狱”,各种XML文件的配置,让人眼花缭乱,而且如果出错了也很难找出原因。而Spring Boot更多的是采用Java Config的方式对Spring进行配置。

11.2 统架构技术栈

本节我们介绍使用 Kotlin 集成 Spring Boot 开发一个完整的博客站点的服务端Web 应用, 它支持 Markdown 写文章, 文章列表分页、搜索查询等功能。

其系统架构技术栈如下表所示:

编程语言Java,Kotlin
数据库MySQL , mysql-jdbc-driver, Spring data JPA,
J2EE框架Spring Boot, Spring MVC
视图模板引擎Freemarker
前端组件库jquery,bootstrap, flat UI , Mditor , DataTables
工程构建工具Gradle

11.3 环境准备

11.3.1 创建工程

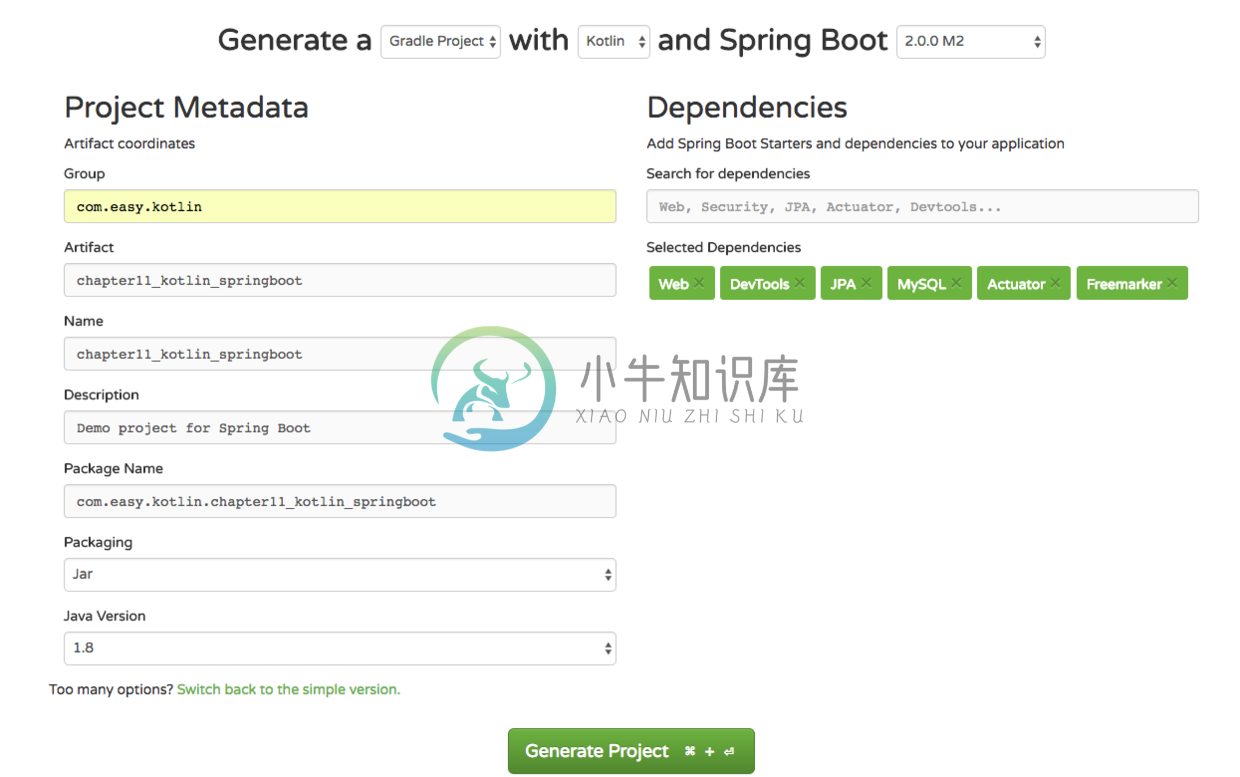
首先,我们使用SPRING INITIALIZR来创建一个模板工程。

第一步:访问 http://start.spring.io/, 选择生成一个Gradle项目,使用Kotlin语言,使用的Spring Boot版本是2.0.0 M2。

第二步: 配置项目基本信息。 Group: com.easy.kotlin Artifact:chapter11_kotlin_springboot 以及项目名称、项目描述、包名称等其他的选项。选择jar包方式打包,使用JDK1.8 。

第三步:选择项目依赖。我们这里分别选择了:Web、DevTools、JPA、MySQL、Actuator、Freemarker。

以上三步如下图所示:

螢幕快照 2017-07-17 16.40.19.png

点击生成项目,下载zip包,解压后导入IDEA中,我们可以看到一个如下目录结构的工程:

.
├── build
│   └── kotlin-build
│       └── caches
├── build.gradle
├── gradle
│   └── wrapper
│       ├── gradle-wrapper.jar
│       └── gradle-wrapper.properties
├── gradlew
├── gradlew.bat
└── src
    ├── main
    │   ├── kotlin
    │   │   └── com
    │   │       └── easy
    │   │           └── kotlin
    │   │               └── chapter11_kotlin_springboot
    │   │                   └── Chapter11KotlinSpringbootApplication.kt
    │   └── resources
    │       ├── application.properties
    │       ├── static
    │       └── templates
    └── test
        └── kotlin
            └── com
                └── easy
                    └── kotlin
                        └── chapter11_kotlin_springboot
                            └── Chapter11KotlinSpringbootApplicationTests.kt

21 directories, 8 files

其中,Chapter11KotlinSpringbootApplication.kt是SpringBoot应用的入口启动类。

11.3.2 Gradle配置文件说明

整个工程的Gradle构建配置文件build.gradle的内容如下:

buildscript {
    ext {
        kotlinVersion = '1.1.3-2'
        springBootVersion = '2.0.0.M2'
    }
    repositories {
        mavenCentral()
        maven { url "https://repo.spring.io/snapshot" }
        maven { url "https://repo.spring.io/milestone" }
    }
    dependencies {
        classpath("org.springframework.boot:spring-boot-gradle-plugin:${springBootVersion}")
        classpath("org.jetbrains.kotlin:kotlin-gradle-plugin:${kotlinVersion}")
        classpath("org.jetbrains.kotlin:kotlin-allopen:${kotlinVersion}")
    }
}

apply plugin: 'kotlin'
apply plugin: 'kotlin-spring'
apply plugin: 'eclipse'
apply plugin: 'org.springframework.boot'
apply plugin: 'io.spring.dependency-management'

version = '0.0.1-SNAPSHOT'
sourceCompatibility = 1.8
compileKotlin {
    kotlinOptions.jvmTarget = "1.8"
}
compileTestKotlin {
    kotlinOptions.jvmTarget = "1.8"
}

repositories {
    mavenCentral()
    maven { url "https://repo.spring.io/snapshot" }
    maven { url "https://repo.spring.io/milestone" }
}


dependencies {
    compile('org.springframework.boot:spring-boot-starter-actuator')
    compile('org.springframework.boot:spring-boot-starter-data-jpa')
    compile('org.springframework.boot:spring-boot-starter-freemarker')
    compile('org.springframework.boot:spring-boot-starter-web')
    compile("org.jetbrains.kotlin:kotlin-stdlib-jre8:${kotlinVersion}")
    compile("org.jetbrains.kotlin:kotlin-reflect:${kotlinVersion}")
    runtime('org.springframework.boot:spring-boot-devtools')
    runtime('mysql:mysql-connector-java')
    testCompile('org.springframework.boot:spring-boot-starter-test')
}

其中主要的配置项如下表说明:

配置项功能说明
spring-boot-gradle-pluginSpringBoot集成Gradle的插件
kotlin-gradle-pluginKotlin集成Gradle的插件
kotlin-allopenKotlin全开放插件。Kotlin 里类默认都是final的,如果声明的类需要被继承则需要使用open 关键字来描述类,这个插件就是把Kotlin中的所有类都open打开,可被继承
spring-boot-starter-actuatorSpringBoot的健康检查监控组件启动器
spring-boot-starter-data-jpaJPA启动器
spring-boot-starter-freemarker模板引擎freemarker启动器
kotlin-stdlib-jre8Kotlin基于JRE8的标准库
kotlin-reflectKotlin反射库
spring-boot-devtoolsSpringBoot开发者工具,例如:热部署等
mysql-connector-javaJava的MySQL连接器库
spring-boot-starter-test测试启动器

11.4 数据库层配置

上面的模板工程,我们来直接运行main函数,会发现启动失败,控制台会输出如下报错信息:

BeanCreationException: Error creating bean with name 'dataSource' defined in class path resource [org/springframework/boot/autoconfigure/jdbc/DataSourceConfiguration$Hikari.class]
...
***************************
APPLICATION FAILED TO START
***************************

Description:

Cannot determine embedded database driver class for database type NONE

Action:

If you want an embedded database please put a supported one on the classpath. If you have database settings to be loaded from a particular profile you may need to active it (no profiles are currently active).

因为我们还没有配置数据源。我们先在MySQL中新建一个schema:

CREATE SCHEMA `blog` DEFAULT CHARACTER SET utf8 ;

11.4.1 配置数据源

接着,我们在配置文件application.properties中配置MySQL数据源:

# datasource
# datasource: unicode编码的支持,设定为utf-8
spring.datasource.url=jdbc:mysql://localhost:3306/blog?zeroDateTimeBehavior=convertToNull&characterEncoding=utf8&characterSetResults=utf8
spring.datasource.username=root
spring.datasource.password=root
spring.datasource.testWhileIdle=true
spring.datasource.validationQuery=SELECT 1

其中,spring.datasource.url 中,为了支持中文的正确显示(防止出现中文乱码),我们需要设置一下编码。

数据库ORM(对象关系映射)层,我们使用spring-data-jpa :

spring.jpa.database=MYSQL
spring.jpa.show-sql=true
# Hibernate ddl auto (create, create-drop, update)
spring.jpa.hibernate.ddl-auto=update
# Naming strategy
spring.jpa.hibernate.naming-strategy=org.hibernate.cfg.ImprovedNamingStrategy
spring.jpa.properties.hibernate.dialect=org.hibernate.dialect.MySQL5Dialect

再次运行启动类,控制台输出启动日志:

...
                        _  __     _   _ _
                       | |/ /    | | | (_)          _
                       | ' / ___ | |_| |_ _ __    _| |_
                       |  < / _ \| __| | | '_ \  |_   _|
                       | . \ (_) | |_| | | | | |   |_|
                       |_|\_\___/ \__|_|_|_| |_|


              _____            _             ____              _
             / ____|          (_)           |  _ \            | |
            | (___  _ __  _ __ _ _ __   __ _| |_) | ___   ___ | |_
             \___ \| '_ \| '__| | '_ \ / _` |  _ < / _ \ / _ \| __|
             ____) | |_) | |  | | | | | (_| | |_) | (_) | (_) | |_
            |_____/| .__/|_|  |_|_| |_|\__, |____/ \___/ \___/ \__|
                   | |                  __/ |
                   |_|                 |___/


2017-07-17 21:10:48.741  INFO 5062 --- [  restartedMain] c.Chapter11KotlinSpringbootApplicationKt : Starting Chapter11KotlinSpringbootApplicationKt on 192.168.1.6 with PID 5062 ...
...
2017-07-17 21:19:40.548  INFO 5329 --- [  restartedMain] j.LocalContainerEntityManagerFactoryBean : Initialized JPA EntityManagerFactory for persistence unit 'default'
2017-07-17 21:11:03.017  INFO 5062 --- [  restartedMain] o.s.b.a.e.mvc.EndpointHandlerMapping     : Mapped "{[/application/env || /application/env.json],methods=[GET],produces=[application/vnd.spring-boot.actuator.v2+json || application/json]}" onto public java.lang.Object org.springframework.boot.actuate.endpoint.mvc.EndpointMvcAdapter.invoke()
...
2017-07-17 21:11:03.026  INFO 5062 --- [  restartedMain] o.s.b.a.e.mvc.EndpointHandlerMapping     : Mapped "{[/application/beans || /application/beans.json],methods=[GET],produces=[application/vnd.spring-boot.actuator.v2+json || application/json]}" onto public java.lang.Object org.springframework.boot.actuate.endpoint.mvc.EndpointMvcAdapter.invoke()
2017-07-17 21:11:03.028  INFO 5062 --- [  restartedMain] o.s.b.a.e.mvc.EndpointHandlerMapping     : Mapped "{[/application/health || /application/health.json],methods=[GET],produces=[application/vnd.spring-boot.actuator.v2+json || application/json]}" onto public java.lang.Object org.springframework.boot.actuate.endpoint.mvc.HealthMvcEndpoint.invoke(javax.servlet.http.HttpServletRequest,java.security.Principal)
...
2017-07-17 21:11:03.060  INFO 5062 --- [  restartedMain] o.s.b.a.e.mvc.EndpointHandlerMapping     : Mapped "{[/application/autoconfig || /application/autoconfig.json],methods=[GET],produces=[application/vnd.spring-boot.actuator.v2+json || application/json]}" onto public java.lang.Object org.springframework.boot.actuate.endpoint.mvc.EndpointMvcAdapter.invoke()
...
2017-07-17 21:11:03.478  INFO 5062 --- [  restartedMain] o.s.ui.freemarker.SpringTemplateLoader   : SpringTemplateLoader for FreeMarker: using resource loader [org.springframework.boot.web.servlet.context.AnnotationConfigServletWebServerApplicationContext@6aab8872: startup date [Mon Jul 17 21:10:48 CST 2017]; root of context hierarchy] and template loader path [classpath:/templates/]
2017-07-17 21:11:03.479  INFO 5062 --- [  restartedMain] o.s.w.s.v.f.FreeMarkerConfigurer         : ClassTemplateLoader for Spring macros added to FreeMarker configuration
2017-07-17 21:11:03.520  WARN 5062 --- [  restartedMain] o.s.b.a.f.FreeMarkerAutoConfiguration    : Cannot find template location(s): [classpath:/templates/] (please add some templates, check your FreeMarker configuration, or set spring.freemarker.checkTemplateLocation=false)
2017-07-17 21:11:03.713  INFO 5062 --- [  restartedMain] o.s.b.d.a.OptionalLiveReloadServer       : LiveReload server is running on port 35729
2017-07-17 21:11:03.871  INFO 5062 --- [  restartedMain] o.s.j.e.a.AnnotationMBeanExporter        : Registering beans for JMX exposure on startup
2017-07-17 21:11:03.874  INFO 5062 --- [  restartedMain] o.s.j.e.a.AnnotationMBeanExporter        : Bean with name 'dataSource' has been autodetected for JMX exposure
2017-07-17 21:11:03.886  INFO 5062 --- [  restartedMain] o.s.j.e.a.AnnotationMBeanExporter        : Located MBean 'dataSource': registering with JMX server as MBean [com.zaxxer.hikari:name=dataSource,type=HikariDataSource]
2017-07-17 21:11:03.901  INFO 5062 --- [  restartedMain] o.s.c.support.DefaultLifecycleProcessor  : Starting beans in phase 0
2017-07-17 21:11:04.232  INFO 5062 --- [  restartedMain] o.s.b.w.embedded.tomcat.TomcatWebServer  : Tomcat started on port(s): 8000 (http)
2017-07-17 21:11:04.240  INFO 5062 --- [  restartedMain] c.Chapter11KotlinSpringbootApplicationKt : Started Chapter11KotlinSpringbootApplicationKt in 16.316 seconds (JVM running for 17.68)

关于上面的日志,我们通过下面的表格作简要说明:

日志内容简要说明
LocalContainerEntityManagerFactoryBean : Initialized JPA EntityManagerFactory初始化JAP实体管理器工厂
EndpointHandlerMapping : Mapped "{[/application/beans ...等SpringBoot健康监控Endpoint 等REST接口
FreeMarkerAutoConfigurationFreemarker模板引擎自动配置,默认视图文件目录是classpath:/templates/
AnnotationMBeanExporter : Bean with name 'dataSource' has been autodetected for JMX exposure ... Located MBean 'dataSource': registering with JMX server as MBean [com.zaxxer.hikari:name=dataSource,type=HikariDataSource]数据源Bean通过annotation注解注册MBean到JMX实现监控其运行状态
TomcatWebServer : Tomcat started on port(s): 8000 (http)SpringBoot默认内嵌了Tomcat,端口我们可以在application.properties中配置
Started Chapter11KotlinSpringbootApplicationKt in 16.316 seconds (JVM running for 17.68)SpringBoot应用启动成功

11.5 Endpoint监控接口

我们来尝试访问:http://127.0.0.1:8000/application/beans ,浏览器显示如下信息:

Whitelabel Error Page

This application has no explicit mapping for /error, so you are seeing this as a fallback.

Mon Jul 17 21:30:35 CST 2017
There was an unexpected error (type=Unauthorized, status=401).
Full authentication is required to access this resource.

提示没有权限访问。我们去控制台日志可以看到下面这行输出:

s.b.a.e.m.MvcEndpointSecurityInterceptor : Full authentication is required to access actuator endpoints. Consider adding Spring Security or set 'management.security.enabled' to false.

意思是说,要访问这些Endpoints需要权限,可以通过Spring Security来实现权限控制,或者把权限限制去掉:把management.security.enabled设置为false

我们在application.properties里面添加配置:

management.security.enabled=false

重启应用,再次访问,我们可以看到如下输出:

[
  {
    "context": "application:8000",
    "parent": null,
    "beans": [
      {
        "bean": "chapter11KotlinSpringbootApplication",
        "aliases": [

        ],
        "scope": "singleton",
        "type": "com.easy.kotlin.chapter11_kotlin_springboot.Chapter11KotlinSpringbootApplication$$EnhancerBySpringCGLIB$$353fd63e",
        "resource": "null",
        "dependencies": [

        ]
      },
      ...
      {
        "bean": "org.springframework.boot.autoconfigure.orm.jpa.HibernateJpaAutoConfiguration",
        "aliases": [

        ],
        "scope": "singleton",
        "type": "org.springframework.boot.autoconfigure.orm.jpa.HibernateJpaAutoConfiguration$$EnhancerBySpringCGLIB$$24d31c25",
        "resource": "null",
        "dependencies": [
          "dataSource",
          "spring.jpa-org.springframework.boot.autoconfigure.orm.jpa.JpaProperties"
        ]
      },
      {
        "bean": "transactionManager",
        "aliases": [

        ],
        "scope": "singleton",
        "type": "org.springframework.orm.jpa.JpaTransactionManager",
        "resource": "class path resource [org/springframework/boot/autoconfigure/orm/jpa/HibernateJpaAutoConfiguration.class]",
        "dependencies": [

        ]
      },
      ...
      {
        "bean": "spring.devtools-org.springframework.boot.devtools.autoconfigure.DevToolsProperties",
        "aliases": [

        ],
        "scope": "singleton",
        "type": "org.springframework.boot.devtools.autoconfigure.DevToolsProperties",
        "resource": "null",
        "dependencies": [

        ]
      },
      {
        "bean": "org.springframework.orm.jpa.SharedEntityManagerCreator#0",
        "aliases": [

        ],
        "scope": "singleton",
        "type": "com.sun.proxy.$Proxy86",
        "resource": "null",
        "dependencies": [
          "entityManagerFactory"
        ]
      }
    ]
  }

可以看出,我们一行代码还没写,只是加了几行配置,SpringBoot已经自动配置初始化了这么多的Bean。我们再访问 http://127.0.0.1:8000/application/health


{
  "status": "UP",
  "diskSpace": {
    "status": "UP",
    "total": 120108089344,
    "free": 1724157952,
    "threshold": 10485760
  },
  "db": {
    "status": "UP",
    "database": "MySQL",
    "hello": 1
  }
}

从上面我们可以看到一些应用的健康状态信息,例如:应用状态、磁盘空间、数据库状态等信息。

11.6 数据库实体类

我们在上面已经完成了MySQL数据源的配置,下面我们来写一个实体类。新建package com.easy.kotlin.chapter11_kotlin_springboot.entity ,然后新建Article实体类:

package com.easy.kotlin.chapter11_kotlin_springboot.entity

import java.util.*
import javax.persistence.*

@Entity
class Article {
    @Id
    @GeneratedValue(strategy = GenerationType.IDENTITY)
    var id: Long = -1
    @Version
    var version: Long = 0
    var title: String = ""
    var content: String = ""
    var author: String = ""
    var gmtCreated: Date = Date()
    var gmtModified: Date = Date()
    var isDeleted: Int = 0 //1 Yes 0 No
    var deletedDate: Date = Date()

    override fun toString(): String {
        return "Article(id=$id, version=$version, title='$title', content='$content', author='$author', gmtCreated=$gmtCreated, gmtModified=$gmtModified, isDeleted=$isDeleted, deletedDate=$deletedDate)"
    }

}

类似的实体类,我们在Java中需要生成一堆getter/setter方法;如果我们用Scala写还需要加个 注解@BeanProperty, 例如

package com.springboot.in.action.entity

import java.util.Date
import javax.persistence.{ Entity, GeneratedValue, GenerationType, Id }
import scala.language.implicitConversions
import scala.beans.BeanProperty

@Entity
class HttpApi {
  @Id
  @GeneratedValue(strategy = GenerationType.AUTO)
  @BeanProperty
  var id: Integer = _

  @BeanProperty
  var httpSuiteId: Integer = _
  //用例名称
  @BeanProperty
  var name: String = _

  //用例状态: -1未执行 0失败 1成功
  @BeanProperty
  var state: Integer = _
  ...

}

我们这个是一个博客文章的简单实体类。再次重启运行应用,我们去MySQL的Schema: blog 里面去看,发现数据库自动生成了 Table: article , 它的表字段信息如下:

FieldTypeNullKeyDefaultExtra
idbigint(20)NOPRINULLauto_increment
authorvarchar(255)YESNULL
contentvarchar(255)YESNULL
deleted_datedatetimeYESNULL
gmt_createddatetimeYESNULL
gmt_modifieddatetimeYESNULL
is_deletedint(11)NONULL
titlevarchar(255)YESNULL
versionbigint(20)NONULL-

11.7 数据访问层代码

在Spring Data JPA中,我们只需要实现接口CrudRepository<T, ID>即可获得一个拥有基本CRUD操作的接口实现了:

interface ArticleRepository : CrudRepository<Article, Long>

JPA会自动实现ArticleRepository接口中的方法,不需要我们写基本的CRUD操作代码。它的常用的基本CRUD操作方法的简单说明如下表:

方法功能说明
S save(S entity)保存给定的实体对象,我们可以使用这个保存之后返回的实例进行进一步操作(保存操作可能会更改实体实例)
findById(ID id)根据主键id查询
existsById(ID id)判断是否存在该主键id的记录
findAll()返回所有记录
findAllById(Iterable ids)根据主键id集合批量查询
count()返回总记录条数
deleteById(ID id)根据主键id删除
deleteAll()全部删除

当然,如果我们需要自己去实现SQL查询逻辑,我们可以直接使用@Query注解。

interface ArticleRepository : CrudRepository<Article, Long> {
    override fun findAll(): MutableList<Article>

    @Query(value = "SELECT * FROM blog.article where title like %?1%", nativeQuery = true)
    fun findByTitle(title: String): MutableList<Article>

    @Query("SELECT a FROM #{#entityName} a where a.content like %:content%")
    fun findByContent(@Param("content") content: String): MutableList<Article>

    @Query(value = "SELECT * FROM blog.article  where author = ?1", nativeQuery = true)
    fun findByAuthor(author: String): MutableList<Article>
}

11.7.1 原生SQL查询

其中,@Query注解里面的value的值就是我们要写的 JP QL语句。另外,JPA的EntityManager API 还提供了创建 Query 实例以执行原生 SQL 语句的createNativeQuery方法。

默认是非原生的JP QL查询模式。如果我们想指定原生SQL查询,只需要设置 nativeQuery=true即可。

11.7.2 模糊查询like写法

另外,我们原生SQL模糊查询like语法,我们在写sql的时候是这样写的

like '%?%'

但是在JP QL中, 这样写

like %?1%

11.7.3 参数占位符

其中,查询语句中的 ?1 是函数参数的占位符,1代表的是参数的位置。

11.7.4 JP QL中的SpEL

另外我们使用JPA的标准查询(Criteria Query):

SELECT a FROM #{#entityName} a where a.content like %:content%

其中的#{#entityName} 是SpEL(Spring表达式语言),用来代替本来实体的名称,而Spring data jpa会自动根据Article实体上对应的默认的 @Entity class Article ,或者指定@Entity(name = "Article") class Article 自动将实体名称填入 JP QL语句中。

通过把实体类名称抽象出来成为参数,帮助我们解决了项目中很多dao接口的方法除了实体类名称不同,其他操作都相同的问题。

11.7.5 注解参数

我们使用@Param("content") 来指定参数名绑定,然后在JP QL语句中这样引用:

:content

JP QL 语句中通过": 变量"的格式来指定参数,同时在方法的参数前面使用 @Param 将方法参数与 JP QL 中的命名参数对应。

11.8 控制器层

我们新建子目录controller,然后在下面新建控制器类:

@Controller
class ArticleController {

}

我们首先,装配数据访问层的接口Bean:

@Autowired val articleRepository: ArticleRepository? = null

这个接口Bean的实例化由Spring data jpa完成。如果我们去 http://127.0.0.1:8000/application/beans 中查看这个Bean,我们可以看到信息如下:

      {
        "bean": "articleRepository",
        "aliases": [

        ],
        "scope": "singleton",
        "type": "com.easy.kotlin.chapter11_kotlin_springboot.dao.ArticleRepository",
        "resource": "null",
        "dependencies": [
          "(inner bean)#39c36d98",
          "(inner bean)#19d60142",
          "(inner bean)#1757cb01",
          "(inner bean)#6dd045f0",
          "jpaMappingContext"
        ]
      }

我们先来实现一个简单的查询所有记录的REST接口。我们在ArticleRepository中重写了findAll方法:

override fun findAll(): MutableList<Article>

然后,我们在控制器代码中直接调用这个接口方法:

    @GetMapping("listAllArticle")
    @ResponseBody
    fun listAllArticle(): MutableList<Article>? {
        return articleRepository?.findAll()
    }

其中,注解@ResponseBody表示把方法返回值直接绑定到响应体(response body)。

11.9 启动初始化CommandLineRunner

为了方便测试用,我们在SpringBoot应用启动的时候初始化几条数据到数据库里。Spring Boot 为我们提供了一个方法,通过实现接口 CommandLineRunner 来实现。这是一个函数式接口:

@FunctionalInterface
public interface CommandLineRunner {
    void run(String... args) throws Exception;
}

我们只需要创建一个实现接口 CommandLineRunner 的类。很简单,只需要一个类就可以,无需其他配置。 这里我们使用Kotlin的Lambda表达式来写:

    @Bean
    fun init(repository: ArticleRepository) = CommandLineRunner {
        val article: Article = Article()
        article.author = "Kotlin"
        article.title = "极简Kotlin教程 ${Date()}"
        article.content = "Easy Kotlin ${Date()}"
        repository.save(article)
    }

11.10 应用启动类

我们在main函数中调用SpringApplication类的静态run方法,我们的SpringBootApplication主类代码如下:

package com.easy.kotlin.chapter11_kotlin_springboot

import com.easy.kotlin.chapter11_kotlin_springboot.dao.ArticleRepository
import com.easy.kotlin.chapter11_kotlin_springboot.entity.Article
import org.springframework.boot.CommandLineRunner
import org.springframework.boot.SpringApplication
import org.springframework.boot.autoconfigure.SpringBootApplication
import org.springframework.context.annotation.Bean
import java.util.*

@SpringBootApplication
class Chapter11KotlinSpringbootApplication {
    @Bean
    fun init(repository: ArticleRepository) = CommandLineRunner {
        val article: Article = Article()
        article.author = "Kotlin"
        article.title = "极简Kotlin教程 ${Date()}"
        article.content = "Easy Kotlin ${Date()}"
        repository.save(article)
    }
}

fun main(args: Array<String>) {
    SpringApplication.run(Chapter11KotlinSpringbootApplication::class.java, *args)
}


这里我们主要关注的是@SpringBootApplication注解,它包括三个注解,简单说明如下表:

注解功能说明
@SpringBootConfiguration(它包括@Configuration)表示将该类作用springboot配置文件类。
@EnableAutoConfiguration表示SpringBoot程序启动时,启动Spring Boot默认的自动配置。
@ComponentScan表示程序启动时自动扫描当前包及子包下所有类。

11.10.1 启动运行

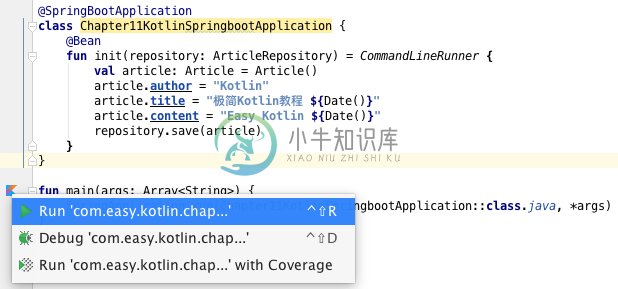
如果是在IDEA中运行,可以直接点击main函数运行,如下图所示:

螢幕快照 2017-07-18 17.44.31.png

如果想在命令行运行,直接在项目根目录下运行命令:

$ gradle bootRun

我们可以看到控制台的日志输出:

2017-07-18 17:42:53.689  INFO 21239 --- [  restartedMain] o.s.b.w.embedded.tomcat.TomcatWebServer  : Tomcat started on port(s): 8000 (http)
Hibernate: insert into article (author, content, deleted_date, gmt_created, gmt_modified, is_deleted, title, version) VALUES (NULL, ?, ?, ?, ?, ?, ?, ?)
2017-07-18 17:42:53.974  INFO 21239 --- [  restartedMain] c.Chapter11KotlinSpringbootApplicationKt : Started Chapter11KotlinSpringbootApplicationKt in 16.183 seconds (JVM running for 17.663)
<==========---> 83% EXECUTING [1m 43s]
> :bootRun

我们在浏览器中直接访问: http://127.0.0.1:8000/listAllArticle , 可以看到类似如下输出:

[
  {
    "id": 1,
    "version": 0,
    "title": "极简Kotlin教程",
    "content": "Easy Kotlin ",
    "author": "Kotlin",
    "gmtCreated": 1500306475000,
    "gmtModified": 1500306475000,
    "deletedDate": 1500306475000
  },
  {
    "id": 2,
    "version": 0,
    "title": "极简Kotlin教程",
    "content": "Easy Kotlin ",
    "author": "Kotlin",
    "gmtCreated": 1500306764000,
    "gmtModified": 1500306764000,
    "deletedDate": 1500306764000
  }
]

至此,我们已经完成了一个简单的REST接口从数据库到后端的开发。

下面我们继续来写一个前端的文章列表页面。

11.11 Model数据绑定

我们写一个返回ModelAndView对象控制器类,其中数据模型Model中放入文章列表数据,代码如下:

    @GetMapping("listAllArticleView")
    fun listAllArticleView(model: Model): ModelAndView {
        model.addAttribute("articles", articleRepository?.findAll())
        return ModelAndView("list")
    }

其中,ModelAndView("list")中的"list"表示视图文件的所在目录的相对路径。SpringBoot的默认的视图文件放在src/main/resources/templates目录。

11.12 模板引擎视图页面

我们使用Freemarker模板引擎。我们在templates目录下新建一个list.ftl文件,内容如下:

<html>
<head>
    <title>Blog!!!</title>
</head>
<body>
<table>
    <thead>
    <th>序号</th>
    <th>标题</th>
    <th>作者</th>
    <th>发表时间</th>
    <th>操作</th>
    </thead>
    <tbody>
    <#-- 使用FTL指令 -->
    <#list articles as article>
    <tr>
        <td>${article.id}</td>
        <td>${article.title}</td>
        <td>${article.author}</td>
        <td>${article.gmtModified}</td>
        <td><a href="#" target="_blank">编辑</a></td>
    </tr>
    </#list>
    </tbody>
</table>
</body>
</html>

其中,<#list articles as article>是Freemarker的循环指令,${}是 Freemarker引用变量的方式。

提示:关于Freemarker的详细语法可参考 http://freemarker.org/

11.13 运行测试

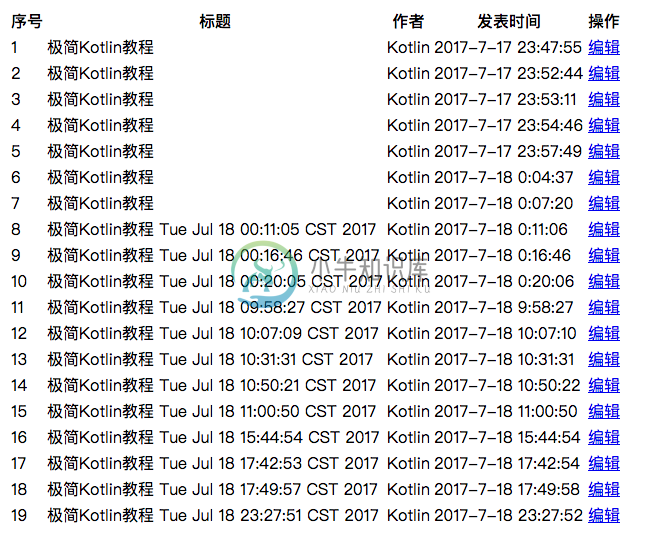
重启应用,浏览器访问 : http://127.0.0.1:8000/listAllArticleView ,我们可以看到页面输出:

螢幕快照 2017-07-18 23.52.35.png

到这里,我们已经完成了一个从数据库到前端页面的完整的一个极简的Web应用。

当然,这样的UI样式未免太简陋了一些。下面我们加入前端UI组件美化一下。

11.14 引入前端组件

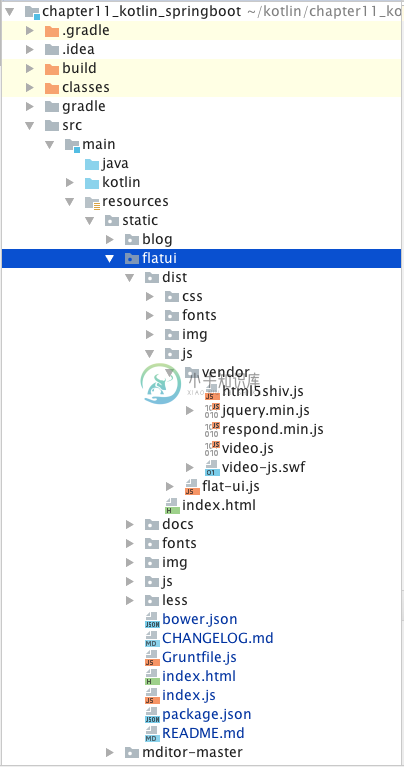
我们使用基于Bootstrap的前端UI库Flat UI。首先去Flat UI的首页:http://www.bootcss.com/p/flat-ui/ 下载zip包,加压后,放到我们的工程里,放置的目录是:src/main/resources/static 。如下图所示:

螢幕快照 2017-07-19 01.12.49.png

我们在list.ftl头部引入静态资源文件:

<head>
    <meta charset="utf-8">
    <title>Blog</title>
    <meta name="description"
          content="Blog, using Flat UI Kit Free is a Twitter Bootstrap Framework design and Theme, this responsive framework includes a PSD and HTML version."/>

    <meta name="viewport" content="width=1000, initial-scale=1.0, maximum-scale=1.0">

    <!-- Loading Bootstrap -->
    <link href="/flatui/dist/css/vendor/bootstrap/css/bootstrap.min.css" rel="stylesheet">

    <!-- Loading Flat UI -->
    <link href="/flatui/dist/css/flat-ui.css" rel="stylesheet">
    <link href="/flatui/docs/assets/css/demo.css" rel="stylesheet">

    <link rel="shortcut icon" href="/flatui/img/favicon.ico">

    <script src="/flatui/dist/js/vendor/jquery.min.js"></script>
    <script src="/flatui/dist/js/flat-ui.js"></script>
    <script src="/flatui/dist/js/vendor/html5shiv.js"></script>
    <script src="/flatui/dist/js/vendor/respond.min.js"></script>

    <link rel="stylesheet" href="/blog/blog.css">
    <script src="/blog/blog.js"></script>
</head>

其中,我们的这个SpringBoot应用中默认的静态资源的跟路径是src/main/resources/static,然后我们的HTML代码中引用的路径是在此根目录下的相对路径。

提示:更多的关于Spring Boot静态资源处理内容可以参考文章: http://www.jianshu.com/p/d127c4f78bb8

然后,我们再把我们的文章列表布局优化一下:

<div class="container">
    <h1>我的博客</h1>
    <table class="table table-responsive table-bordered">
        <thead>
        <th>序号</th>
        <th>标题</th>
        <th>作者</th>
        <th>发表时间</th>
        <th>操作</th>
        </thead>
        <tbody>
        <#-- 使用FTL指令 -->
        <#list articles as article>
        <tr>
            <td>${article.id}</td>
            <td>${article.title}</td>
            <td>${article.author}</td>
            <td>${article.gmtModified}</td>
            <td><a href="#" target="_blank">编辑</a></td>
        </tr>
        </#list>
        </tbody>
    </table>
</div>

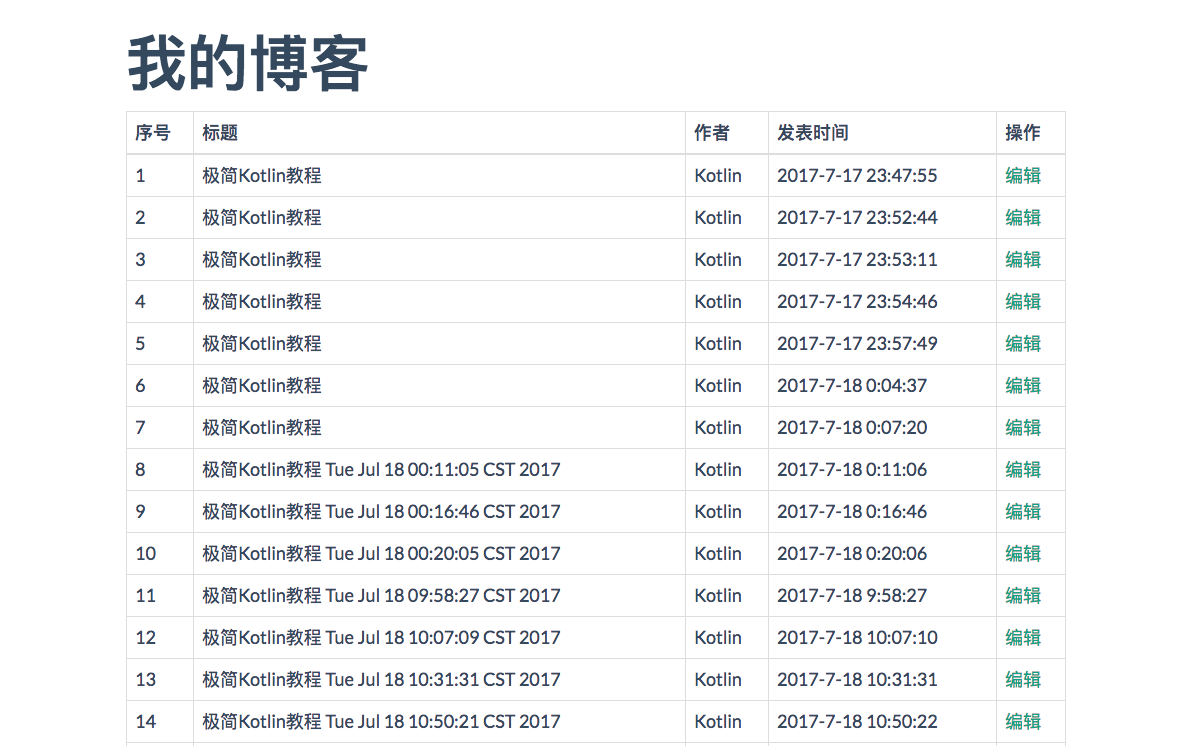
重新build工程,在此访问文章列表页,我们将看到一个比刚才漂亮多了的页面:

螢幕快照 2017-07-19 00.39.20.png

考虑到头部的静态资源文件基本都是公共的代码,我们单独抽取到一个head.ftl文件中, 然后在list.ftl中直接这样引用:

<#include "head.ftl">

11.15 实现写文章模块

我们在列表页上面添加一个“写文章”的入口:

<a href="addArticleView" target="_blank" class="btn btn-primary pull-right add-article">写文章</a>

其中,btn btn-primary pull-right 这三个css样式类是Flat UI组件的。add-article是我们自定义的样式类:

.add-article {
    margin: 20px;
}

下面我们来写新建文章的页面。我们写文章的跳转页面路径是 <a href="addArticleView">, 我们先来新建一个写文章页面addArticleView.ftl:

<!DOCTYPE html>
<html>
<#include "head.ftl">
<body>
<div class="container">
    <h2>写文章</h2>

    <form id="addArticleForm" class="form-horizontal">
        <div class="form-group">
            <input type="text" name="title" class="form-control" placeholder="文章标题">
        </div>

        <div class="form-group">
            <textarea id="articleContentEditor" type="text" name="content" class="form-control" rows="20"
                      placeholder=""></textarea>
        </div>

        <div class="form-group save-article">
            <div class="col-sm-offset-2 col-sm-10">
                <button type="submit" class="btn btn-primary" id="addArticleBtn">保存并发表</button>
            </div>
        </div>
    </form>
</div>
</body>
</html>

然后,再添加控制器请求转发。这里我们使用集成WebMvcConfigurerAdapter类,重写实现addViewControllers方法的方式来添加一个不带数据传输的,单纯的请求转发的跳转View的RequestMapping Controller:

@Configuration
class WebMvcConfig : WebMvcConfigurerAdapter() {
    // 注册简单请求转发跳转View的RequestMapping Controller
    override fun addViewControllers(registry: ViewControllerRegistry?) {
        //写文章的RequestMapping
        registry?.addViewController("addArticleView")?.setViewName("addArticleView")
    }
}

这样前端浏览器来的请求addArticle会直接映射转发到视图addArticle.ftl文件渲染解析。

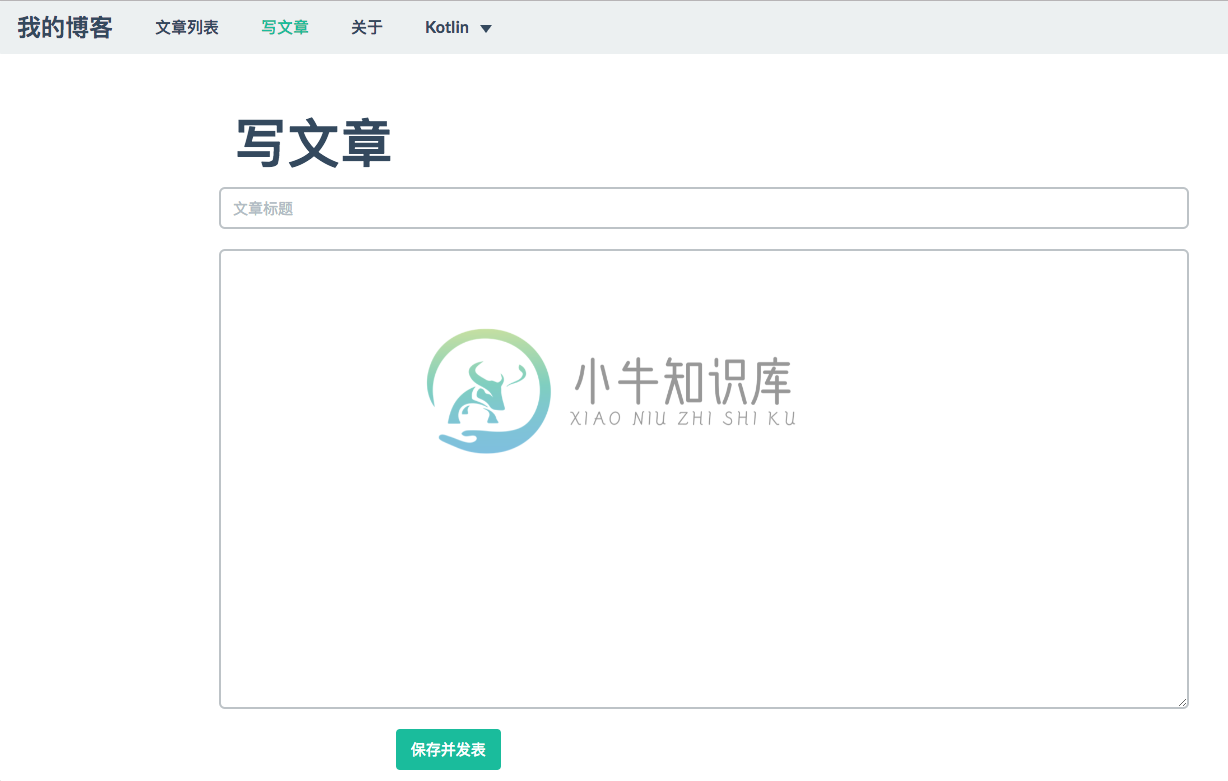
重启应用,进入到我们的写文章的页面,如下图:

螢幕快照 2017-07-19 01.39.34.png

11.15.1 加上导航栏

为了方便页面之间的跳转,我们给我们的博客站点加上导航栏,我们新建一个navbar.ftl文件,内容如下:

<nav class="navbar navbar-default" role="navigation">
    <div class="container-fluid">
        <div class="navbar-header">
            <button type="button" class="navbar-toggle" data-toggle="collapse"
                    data-target="#example-navbar-collapse">
                <span class="sr-only">切换导航</span>
                <span class="icon-bar"></span>
                <span class="icon-bar"></span>
                <span class="icon-bar"></span>
            </button>
            <a class="navbar-brand" href="#">我的博客</a>
        </div>
        <div class="collapse navbar-collapse" id="example-navbar-collapse">
            <ul class="nav navbar-nav">
                <li class=""><a href="listAllArticleView">文章列表</a></li>
                <li class="active"><a href="addArticleView">写文章</a></li>
                <li><a href="#">关于</a></li>
                <li class="dropdown">
                    <a href="http://www.jianshu.com/nb/12976878" class="dropdown-toggle" data-toggle="dropdown">
                        Kotlin <b class="caret"></b>
                    </a>
                    <ul class="dropdown-menu">
                        <li><a href="http://www.jianshu.com/nb/12976878" target="_blank">Kotlin极简教程</a></li>
                        <li class="divider"></li>
                        <li><a href="#">Java</a></li>
                        <li><a href="#">Scala</a></li>
                        <li><a href="#">Groovy</a></li>
                        <li class="divider"></li>
                        <li><a href="http://www.jianshu.com/nb/12066555" target="_blank">SpringBoot极简教程</a></li>
                    </ul>
                </li>
            </ul>
        </div>
    </div>
</nav>

11.15.2 抽取公共模板文件

考虑到head.ftl、navbar.ftl都是公共的文件,我们把他们单独放到一个common目录下。

然后,我们分别在addArticleView.ftl、listAllArticleView.ftl引用如下:

<!DOCTYPE html>
<html>
<#include "common/head.ftl">
<body>
<#include "common/navbar.ftl">

加入了导航栏之后,我们的页面现在更加美观了:

螢幕快照 2017-07-19 01.57.56.png

螢幕快照 2017-07-19 02.02.27.png

11.15.3 写文章的控制器层接口

控制器层保存接口:

    @PostMapping("saveArticle")
    @ResponseBody
    fun saveArticle(article: Article): Article? {
        article.gmtCreated = Date()
        article.gmtModified = Date()
        article.version = 0
        return articleRepository?.save(article)
    }

另外,为了支持较多内容的文章,我们把文章内容字段设置成LONGTEXT:

ALTER TABLE `blog`.`article`
CHANGE COLUMN `content` `content` LONGTEXT NULL DEFAULT NULL ;

11.15.4 前端 ajax 请求

我们在blog.js中加上ajax POST请求后端接口的逻辑:

$(function () {

    $('#addArticleBtn').on('click', function () {
        saveArticle()
    })

    function saveArticle() {
        $.ajax({
            url: "saveArticle",
            data: $('#addArticleForm').serialize(),
            type: "POST",
            async: false,
            success: function (resp) {
                if (resp) {
                    saveArticleSuccess(resp)
                } else {
                    saveArticleFail()
                }
            },
            error: function () {
                saveArticleFail()
            }
        })
    }

    function saveArticleSuccess(resp) {
        alert('保存成功: ' + JSON.stringify(resp))
        window.open('detailArticleView?id=' + resp.id)
    }

    function saveArticleFail() {
        alert("保存失败!")
    }


})

11.15.5 文章详情页

保存成功后,我们默认跳转该文章详情页。 后端控制器代码:

    @GetMapping("detailArticleView")
    fun detailArticleView(id: Long, model: Model): ModelAndView {
        model.addAttribute("article", articleRepository?.findById(id)?.get())
        return ModelAndView("detailArticleView")
    }

注意,这里的articleRepository?.findById(id) 方法返回的是Optional

, 我们调用其get()方法,返回真正的Article实体对象。

前端视图detailArticleView.ftl代码:

<!DOCTYPE html>
<html>
<#include "common/head.ftl">
<body>
<#include "common/navbar.ftl">
<div class="container">
    <h3>${article.title}</h3>
    <h6>${article.author}</h6>
    <h6>${article.gmtModified}</h6>
    <div>${article.content}</div>
</div>
</body>
</html>

我们在文章列表页中,给每篇文章标题加上跳转文章详情的超链接:

<td><a target="_blank" href="detailArticleView?id=${article.id}">${article.title}</a></td>

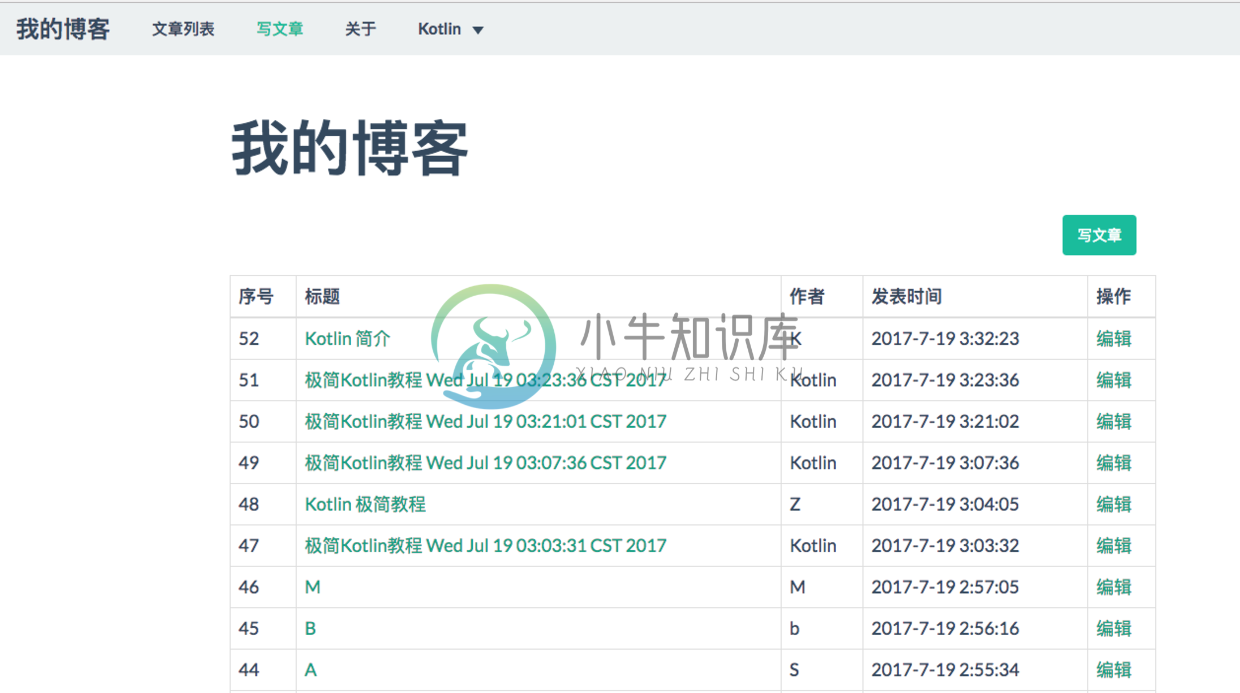
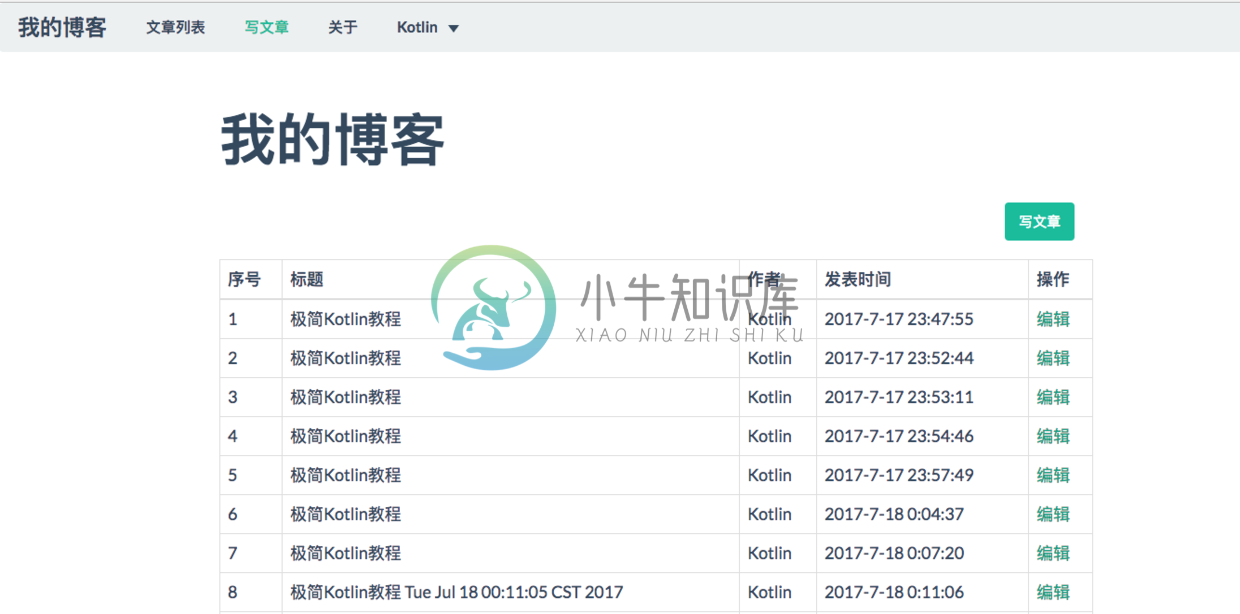
现在我们的文章列表页面如下:

螢幕快照 2017-07-19 03.34.46.png

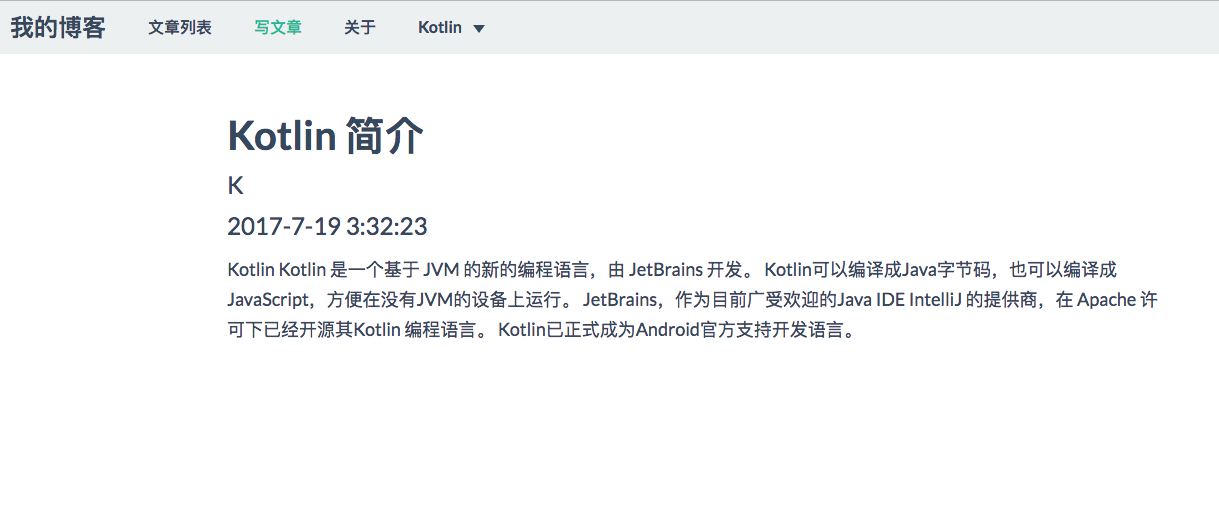
点击一篇文章标题,即可进入详情页:

螢幕快照 2017-07-19 03.35.03.png

11.16 添加Markdown支持

我们写技术博客文章,最常用的就是使用Markdown了。我们来为我们的博客添加Markdown的支持。我们使用前端js组件Mditor来支持Markdown的编辑。 Mditor是一个简洁、易于集成、方便扩展、期望舒服的编写 markdown 的编辑器。

11.16.1 引入静态资源

    <link href="/mditor-master/dist/css/mditor.css" rel="stylesheet">
    <script src="/mditor-master/dist/js/mditor.js"></script>

11.16.2 初始化Mditor

我们在写文章的页面addArticleView.ftl,初始化Mditor如下:

<script>
    $(function () {
        //写文章 mditor
        var mditor = Mditor.fromTextarea(document.getElementById('articleContentEditor'));

        //是否打开分屏
        mditor.split = true;    //打开
        //是否打开预览
        mditor.preivew = true;  //打开
        //是否全屏
        mditor.fullscreen = false;  //关闭
        //获取或设置编辑器的值
        mditor.on('ready', function () {
            mditor.value = '# ';
        });
        hljs.initHighlightingOnLoad();
        //源码高亮
        $('pre code').each(function (i, block) {
            hljs.highlightBlock(block);
        });
    })
</script>

另外,我们还使用了代码高亮插件highlight.js 。

这样,写文章的页面对应的textarea区域就变成了支持Markdown在线编辑+预览的功能了:
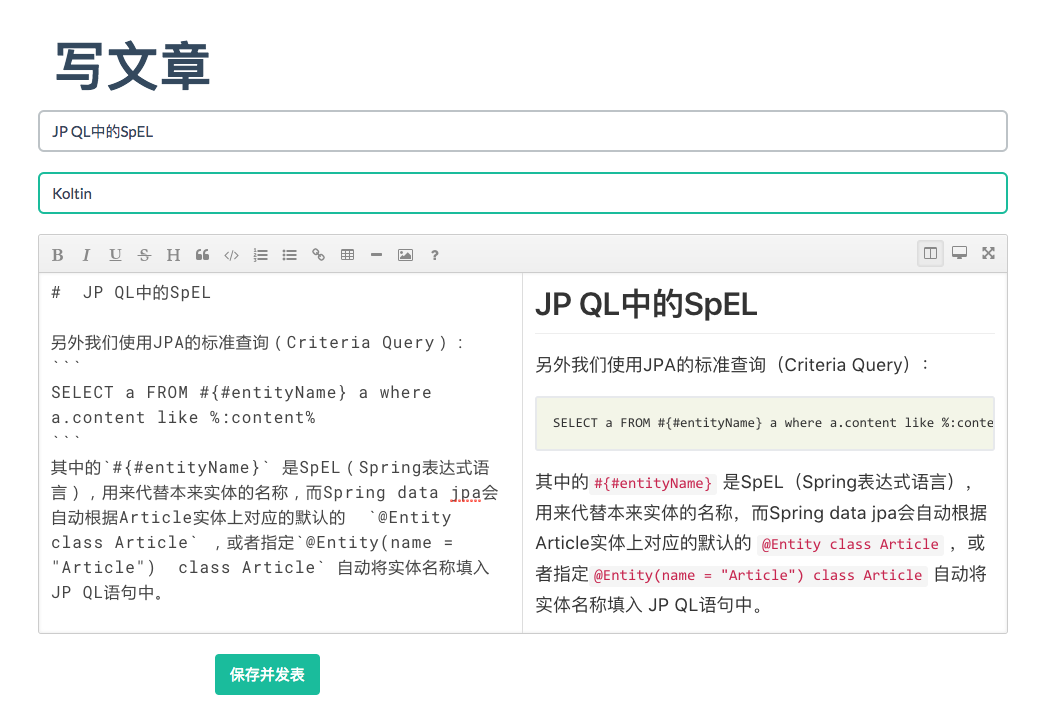
螢幕快照 2017-07-19 04.55.57.png

11.16.3 文章详情显示Markdown渲染

下面我们来使我们的详情页也能支持Markdown的渲染显示。

详情页的视图文件detailArticleView.ftl如下:

<!DOCTYPE html>
<html>
<#include "common/head.ftl">
<body>
<#include "common/navbar.ftl">
<div class="container">
    <h3>${article.title}</h3>
    <h6>${article.author}</h6>
    <h6>${article.gmtModified}</h6>
    <textarea id="articleContentShow" placeholder="<#escape  x as x?html>${article.content}</#escape>" style="display:
              none"></textarea>
    <div id="article-content" class="markdown-body"></div>

</div>
</body>
</html>

这里我们把文章内容放到一个隐藏的textarea的placeholder属性中:

<textarea id="articleContentShow" placeholder="<#escape  x as x?html>${article.content}</#escape>" style="display:
              none"></textarea>

注意,这里我们作了字符的转义escape,防止有特殊字符导致页面显示错乱。 然后,我们在js中获取这个内容:

<script>
    $(function () {
        // 文章详情 mditor
        var parser = new Mditor.Parser();
        var articleContent = document.getElementById('articleContentShow').placeholder //直接取原本的字符串。不会被转译,默认html页面中textarea区域text需要escape编码
        articleContent = unescape(articleContent);//unescape解码
        var html = parser.parse(articleContent);

        $('#article-content').append(html);

        hljs.initHighlightingOnLoad();
        //源码高亮
        $('pre code').each(function (i, block) {
            hljs.highlightBlock(block);
        });
    })
</script>

其中,我们是直接调用的Mditor.Parser()函数来解析Markdown字符文本的。

这样我们的详情页也支持了Markdown的渲染显示了:
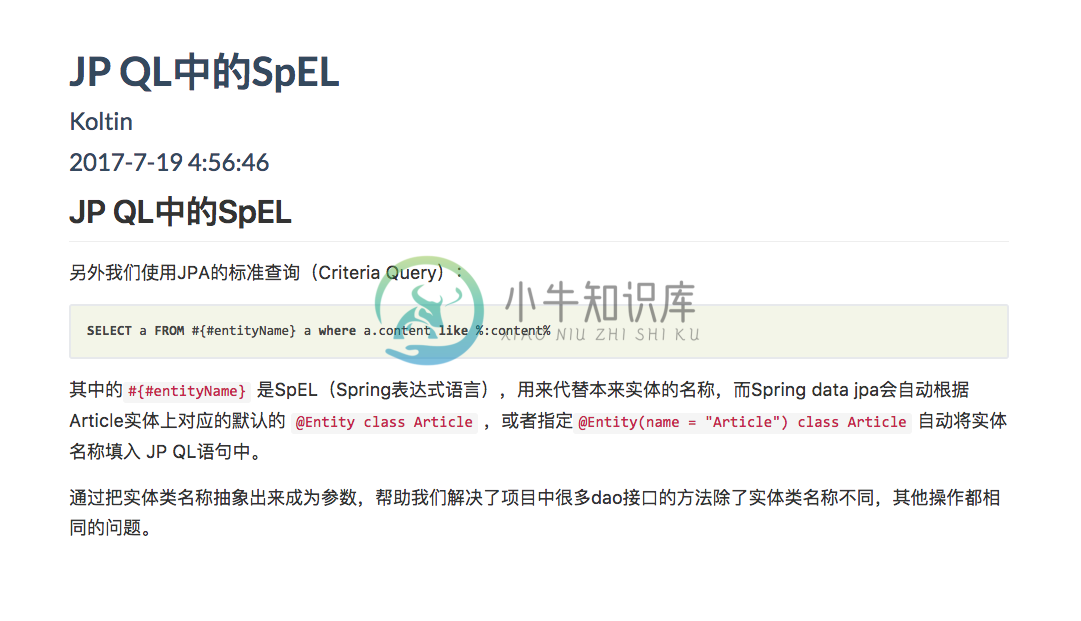
螢幕快照 2017-07-19 05.03.08.png

11.17 文章列表分页搜索

为了方便检索我们的博客文章,我们再来给文章列表页面添加分页、搜索、排序等功能。我们使用前端组件DataTables来实现。

提示:更多关于DataTables,可参考: http://www.datatables.club/

11.17.1 引入静态资源文件

    <link href="/datatables/media/css/jquery.dataTables.css" rel="stylesheet">
    <script src="/datatables/media/js/jquery.dataTables.js"></script>

11.17.2 给表格加上id

我们给表格加个属性id="articlesDataTable" :

    <table id="articlesDataTable" class="table table-responsive table-bordered">
        <thead>
        <th>序号</th>
        <th>标题</th>
        <th>作者</th>
        <th>发表时间</th>
        <th>操作</th>
        </thead>
        <tbody>
        <#-- 使用FTL指令 -->
        <#list articles as article>
        <tr>
            <td>${article.id}</td>
            <td><a target="_blank" href="detailArticleView?id=${article.id}">${article.title}</a></td>
            <td>${article.author}</td>
            <td>${article.gmtModified}</td>
            <td><a href="#" target="_blank">编辑</a></td>
        </tr>
        </#list>
        </tbody>
    </table>

11.17.3 调用DataTable函数

首先,我们配置一下DataTable的选项:

    var aLengthMenu = [7, 10, 20, 50, 100, 200]
    var dataTableOptions = {
        "bDestroy": true,
        dom: 'lfrtip',
        "paging": true,
        "lengthChange": true,
        "searching": true,
        "ordering": true,
        "info": true,
        "autoWidth": true,
        "processing": true,
        "stateSave": true,
        responsive: true,
        fixedHeader: false,
        order: [[1, "desc"]],
        "aLengthMenu": aLengthMenu,
        language: {
            "search": "<div style='border-radius:10px;margin-left:auto;margin-right:2px;width:760px;'>_INPUT_  <span class='btn btn-primary'><span class='fa fa-search'></span> 搜索</span></div>",

            paginate: {//分页的样式内容
                previous: "上一页",
                next: "下一页",
                first: "第一页",
                last: "最后"
            }
        },
        zeroRecords: "没有内容",//table tbody内容为空时,tbody的内容。
        //下面三者构成了总体的左下角的内容。
        info: "总计 _TOTAL_ 条,共 _PAGES_ 页,_START_ - _END_ ",//左下角的信息显示,大写的词为关键字。
        infoEmpty: "0条记录",//筛选为空时左下角的显示。
        infoFiltered: ""//筛选之后的左下角筛选提示
    }

然后把我们刚才添加了id的表格使用JQuery选择器获取对象,然后直接调用:

$('#articlesDataTable').DataTable(dataTableOptions)

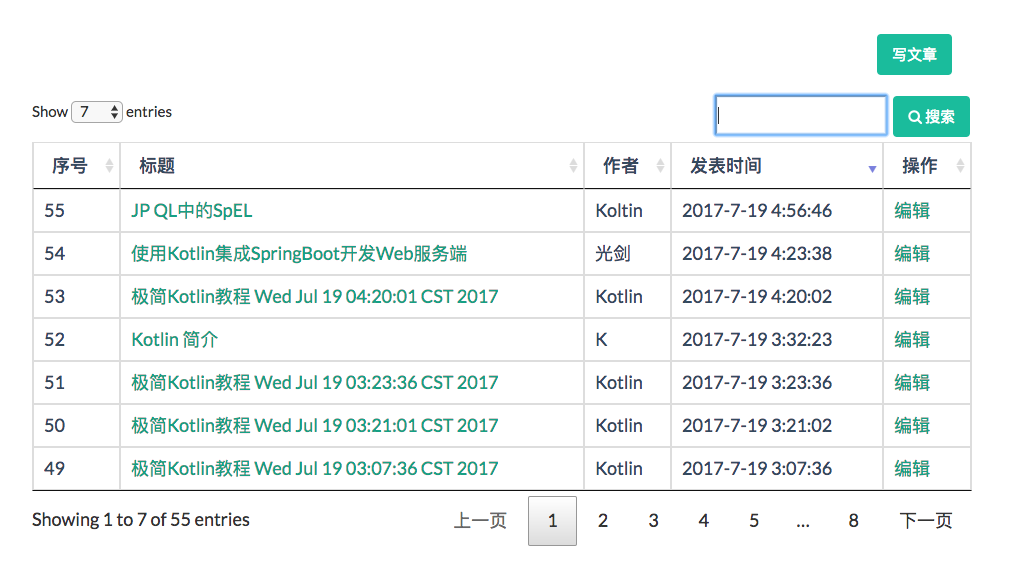
再次看我们的文章列表页:

螢幕快照 2017-07-19 05.23.21.png

已经具备了分页、搜索、排序等功能了。

到这里,我们的这个较为完整的极简博客站点应用基本就开发完成了。

11.18 Spring 5.0对Kotlin的支持

Kotlin 关键性能之一就是能与 Java 库很好地互用。但要在 Spring 中编写惯用的 Kotlin 代码,还需要一段时间的发展。 Spring 对 Java 8 的新支持:函数式 Web 编程、bean 注册 API , 这同样可以在 Kotlin 中使用。

Kotlin 扩展是Kotlin 的编程利器。它能对现有的 API 实现非侵入式的扩展,从而向 Spring中加入 Kotlin 的专有的功能特性。

11.18.1 一种注册 Bean 的新方法

Spring Framework 5.0 引入了一种注册 Bean 的新方法,作为利用 XML 或者 JavaConfig 的 @Configuration 或者 @Bean 的替代方案。简言之就是 Lambda 表达式。

例如用 Java 代码我们会这样写:

GenericApplicationContext context = new GenericApplicationContext();
context.registerBean(Foo.class);
context.registerBean(Bar.class, () -> new
    Bar(context.getBean(Foo.class))
);

而使用 Kotlin 我们可以将代码写成这样:

val context = GenericApplicationContext {
    registerBean<foo>()
    registerBean { Bar(it.getBean<foo>()) }
}

11.18.2 Spring Web 函数式 API

Spring 5.0 中的 RouterFunctionDsl 可以让我们使用干净且优雅的 Kotlin 代码来使用崭新的 Spring Web 函数式 API:

fun route(request: ServerRequest) = RouterFunctionDsl {
    accept(TEXT_HTML).apply {
            (GET("/user/") or GET("/users/")) { findAllView() }
            GET("/user/{login}") { findViewById() }
    }
    accept(APPLICATION_JSON).apply {
            (GET("/api/user/") or GET("/api/users/")) { findAll() }
            POST("/api/user/") { create() }
            POST("/api/user/{login}") { findOne() }
    }
 } (request)

11.18.3 Reactor Kotlin 扩展

Reactor 是 Spring 5.0 中提供的响应式框架。而 reactor-kotlin 项目则是对 Reactor 中使用Kotlin 的支持。目前该项目正在早期阶段。

11.18.4 基于 Kotlin脚本的 Gradle 构建配置

之前我们的 Gradle 构建配置文件都是用Groovy 来编写的,这导致我们基于 Gradle 的 Kotlin 工程还要配置 Groovy 的语法的构建配置文件。

在gradle-script-kotlin 项目中,我们可以直接用 Kotlin 脚本来编写 Gradle 的构建配置文件了。而且 IDE 还为我们提供了在编写配置文件过程中的自动完成功能和重构功能的支持。

11.18.5 基于模板的 Kotlin 脚本

从 4.3 版本开始,Spring 提供了一个 ScriptTemplateView,用于利用支持 JSR-223 的脚本引擎来渲染模板。 Kotlin 1.1-M04 提供了这样的支持,并支持渲染基于 Kotlin 的模板,类似下面这样:

import io.spring.demo.User
import io.spring.demo.joinToLine

"""
${include("header", bindings)}
<h1>Title : $title</h1>
<ul>
    ${(users as List<User>).joinToLine{ "<li>User ${it.firstname} ${it.lastname}</li>" }}
</ul>
${include("footer")}
"""

本章小结

本章我们较为细致完整地介绍了使用Kotlin集成SpringBoot进行服务后端开发,并结合简单的前端开发,完成了一个极简的技术博客Web站点。我们可以看到,使用Kotlin结合Spring Boot、Spring MVC、JPA等Java框架的无缝集成,关键是大大简化了我们的代码。同时,在本章最后我们简单介绍了Spring 5.0中对Kotlin的支持诸多新特性,这些新特性令人惊喜。

使用Kotlin编写Spring Boot应用程序越多,我们越觉得这两种技术有着共同的目标,让我们广大程序员可以使用——

  • 富有表达性
  • 简洁优雅
  • 可读

的代码来更高效地编写应用程序,而Spring Framework 5 Kotlin支持将这些技术以更加自然,简单和强大的方式来展现给我们。

未来Spring Framework 5.0 和 Kotlin 结合的开发实践更加值得我们期待。

在下一章中我们将一起学习Kotlin 集成 Gradle 开发的相关内容。

本章项目源码: https://github.com/EasyKotlin/chapter11_kotlin_springboot