Git管理分支
分支操作允许创建另一路线/方向上开发。我们可以使用这个操作将开发过程分为两个不同的方向。 例如,我们发布了1.0版本的产品,可能需要创建一个分支,以便将2.0功能的开发与1.0版本中错误修复分开。
创建分支
我们可使用git branch <branch name>命令创建一个新的分支。可以从现有的分支创建一个新的分支。 也可以使用特定的提交或标签作为起点创建分支。 如果没有提供任何特定的提交ID,那么将以HEAD作为起点来创建分支。参考如下代码,创建一个分支:new_branch -
$ git branch new_branch

Administrator@MY-PC /D/worksp/sample (master)
$ git branch
* master
  new_branch
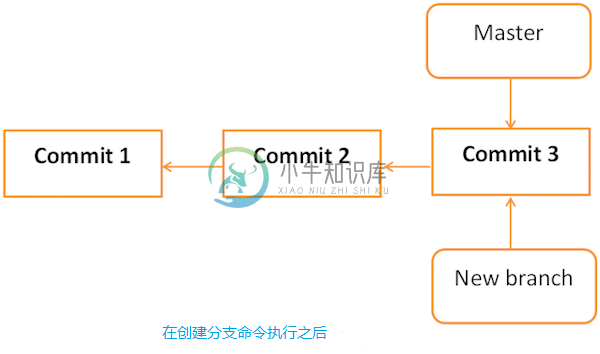
执行上命令后,它创建了一个新的分支:new_branch; 使用git branch命令列出可用的分支。Git在当前签出分支之前显示一个星号。
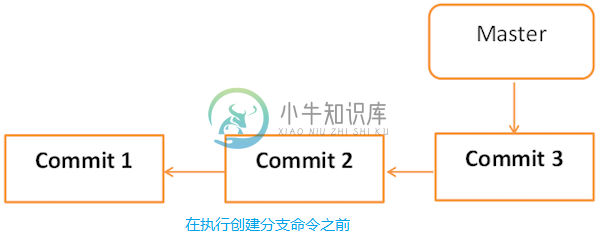
创建分支操作的图示表示如下:


切换分支
使用git checkout命令在分支之间切换。
$ git checkout new_branch
M       src/string.py
Switched to branch 'new_branch'
创建和切换分支的快捷方式
在上面的例子中,分别使用两个命令创建和切换分支。 Git为checkout命令提供-b选项; 此操作将创建一个新的分支,并立即切换到新分支。
$ git checkout -b test_branch
M       src/string.py
Switched to a new branch 'test_branch'

Administrator@MY-PC /D/worksp/sample (test_branch)
$ git branch
  master
  new_branch
* test_branch
删除分支
可以通过向git branch命令提供-D选项来删除分支。 但在删除现有分支之前,请切换到其他分支。
如上面所示,目前在test_branch分支,如要想删除该分支。需要先切换到其它分支再删除此分支,如下所示。
$ git branch
  master
  new_branch
* test_branch

Administrator@MY-PC /D/worksp/sample (test_branch)

$ git checkout master
M       src/string.py
Switched to branch 'master'
Your branch is ahead of 'origin/master' by 4 commits.
  (use "git push" to publish your local commits)

Administrator@MY-PC /D/worksp/sample (master)

$ git branch -D test_branch
Deleted branch test_branch (was b759faf).
Administrator@MY-PC /D/worksp/sample (master)
当前剩下的分支如下 -
$ git branch
* master
  new_branch
重命名分支
假设需要在项目中添加对宽字符的支持。并且已经创建了一个新的分支,但分支名称需要重新命名。那么可通过使用-m选项后跟旧的分支名称和新的分支名称来更改/重新命名分支名称。
$ git branch
* master
  new_branch

Administrator@MY-PC /D/worksp/sample (master)
$ git branch -m new_branch wchar_support
现在,使用git branch命令显示新的分支名称。
$ git branch
* master
  wchar_support
合并两个分支
实现一个函数来返回宽字符串的字符串长度。新的代码将显示如下:
$ git branch
master
* wchar_support

$ pwd
/D/worksp/sample

Administrator@MY-PC /D/worksp/sample (master)
$ git diff
diff --git a/src/string.py b/src/string.py
index 18f165f..89e82b3 100644
--- a/src/string.py
+++ b/src/string.py
@@ -8,3 +8,9 @@ print ("var2[1:5]: ", var2[1:5]) #   切片 加索引

 def my_strcat(str1, str2):
        return (str1+str2)
+
+a = '我'
+b = 'ab'
+ab = '我ab'
+
+print(len(a), len(b), len(ab), len('='))
\ No newline at end of file

Administrator@MY-PC /D/worksp/sample (master)
假设经过测试,代码没有问题,最后将其变更推送到新分行。
$ git status
On branch master
Your branch is ahead of 'origin/master' by 5 commits.
  (use "git push" to publish your local commits)

Changes not staged for commit:
  (use "git add <file>..." to update what will be committed)
  (use "git checkout -- <file>..." to discard changes in working directory)

        modified:   src/string.py

no changes added to commit (use "git add" and/or "git commit -a")

Administrator@MY-PC /D/worksp/sample (master)
$ git add src/string.py

Administrator@MY-PC /D/worksp/sample (master)
$ git commit -m 'Added w_strlen function to return string lenght of wchar_t
> string'
[master 6bab70a] Added w_strlen function to return string lenght of wchar_t string
 1 file changed, 6 insertions(+)
请注意,下面将把这些更改推送到新的分支,所以这里使用的分支名称为wchar_support而不是master分支。
执行过程及结果如下所示 -
$ git push origin wchar_support
Username for 'http://git.oschina.net': 769728683@qq.com
Password for 'http://769728683@qq.com@git.oschina.net':
Counting objects: 18, done.
Delta compression using up to 4 threads.
Compressing objects: 100% (12/12), done.
Writing objects: 100% (15/15), 1.72 KiB | 0 bytes/s, done.
Total 15 (delta 3), reused 0 (delta 0)
To http://git.oschina.net/yiibai/sample.git
 * [new branch]      wchar_support -> wchar_support

Administrator@MY-PC /D/worksp/sample (master)
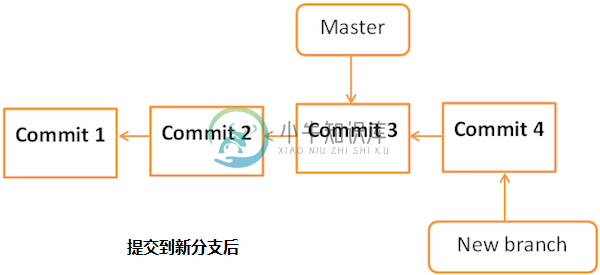
提交更改后,新分支将显示如下:

如果其他开发人员很想知道,我们在私人分支上做什么,那么可从wchar_support分支检查日志。
yiibai@ubuntu:~/git/sample$ git log origin/wchar_support -2
输出结果如下 -
yiibai@ubuntu:~/git/sample$ pwd
/home/yiibai/git/sample
yiibai@ubuntu:~/git/sample$ git pull
remote: Counting objects: 15, done.
remote: Compressing objects: 100% (12/12), done.
remote: Total 15 (delta 3), reused 0 (delta 0)
Unpacking objects: 100% (15/15), done.
From http://git.oschina.net/yiibai/sample
 * [new branch]      wchar_support -> origin/wchar_support
Already up-to-date.
yiibai@ubuntu:~/git/sample$ git log origin/wchar_support -2
commit b759fafeb2a58bd1104f4142e4c0ababdadce01d
Author: maxsu <your_email@mail.com>
Date:   Mon Jul 10 23:44:24 2017 +0800

    fdasjkfdlaks

commit de08fcc70df3a31c788a2e926263b18498d2df09
Author: maxsu <your_email@mail.com>
Date:   Mon Jul 10 23:40:00 2017 +0800

    delete
yiibai@ubuntu:~/git/sample$
通过查看提交消息,其他开发人员(minsu)到有一个宽字符的相关计算函数,他希望在master分支中也要有相同的功能。不用重新执行代码编写同样的代码,而是通过将分支与主分支合并来执行代码的合并。下面来看看应该怎么做?
yiibai@ubuntu:~/git/sample$ git branch
* master

yiibai@ubuntu:~/git/sample$ pwd
/home/yiibai/git/sample

yiibai@ubuntu:~/git/sample$ git merge origin/wchar_support
Updating 44ea8e4..b759faf
Fast-forward
 src/string.py | 4 +++-
 1 file changed, 3 insertions(+), 1 deletion(-)
yiibai@ubuntu:~/git/sample$
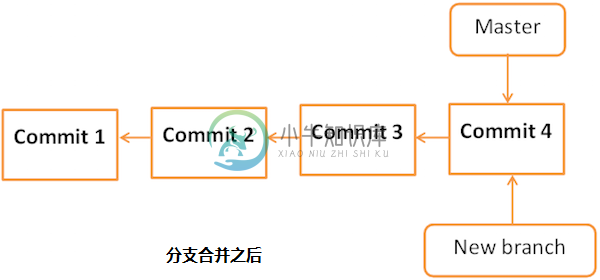
合并操作后,master分支显示如下:

现在,分支wchar_support已经和master分支合并了。 可以通过查看提交消息或者通过查看string.py文件中的修改来验证它。
yiibai@ubuntu:~/git/sample$ git branch
* master
yiibai@ubuntu:~/git/sample$ cd src/
yiibai@ubuntu:~/git/sample/src$ git log -2
commit b759fafeb2a58bd1104f4142e4c0ababdadce01d
Author: maxsu <your_email@mail.com>
Date:   Mon Jul 10 23:44:24 2017 +0800

    fdasjkfdlaks

commit de08fcc70df3a31c788a2e926263b18498d2df09
Author: maxsu <your_email@mail.com>
Date:   Mon Jul 10 23:40:00 2017 +0800
上述命令将产生以下结果。
#!/usr/bin/python3

var1 = 'Hello World!'
var2 = "Python Programming"

print ("var1[0]: ", var1[0])
print ("var2[1:5]: ", var2[1:5]) #   切片 加索引

def my_strcat(str1, str2):
    return (str1+str2)

a = '我'
b = 'ab'
ab = '我ab'

print(len(a), len(b), len(ab), len('='))
测试后,就可将代码更改推送到master分支了。
$ git push origin master
Total 0 (delta 0), reused 0 (delta 0)
To http://git.oschina.net/yiibai/sample.git
5776472..64192f9 master −> master
