Git更新操作
在本文章教程中,我们将演示如何查看 Git 存储库的文件和提交文件记录,并对存储库中的文件作修改和提交。
注意:在开始学习本教程之前,先克隆一个存储库,有关如何克隆存储库,请参考: https://www.xnip.cn/git/git_clone_operation.html
执行克隆操作,并得到了一个新的文件:main.py。想知道谁将这个文件修改变提交到存储库中,那么可以执行git log命令,为了更好的演示,开发人员minsu另外一台机(Ubuntu Linux)上,使用以下命令克隆 -
yiibai@ubuntu:~$ cd /home/yiibai/git
yiibai@ubuntu:~/git$ git clone http://git.oschina.net/yiibai/sample.git
Cloning into 'sample'...
remote: Counting objects: 15, done.
remote: Compressing objects: 100% (14/14), done.
remote: Total 15 (delta 3), reused 0 (delta 0)
Unpacking objects: 100% (15/15), done.
Checking connectivity... done.
yiibai@ubuntu:~/git$
克隆操作将在当前工作目录中创建一个新的目录(sample)。 将目录更改(cd /home/yiibai/git/sample)为新创建的目录,并执行git log命令。
yiibai@ubuntu:~/git$ cd /home/yiibai/git/sample
yiibai@ubuntu:~/git/sample$ git log
commit 51de0f02eb48ed6b84a732512f230028d866b1ea
Author: your_name <your_email@mail.com>
Date:   Fri Jul 7 23:04:16 2017 +0800

    add the sum of a & b

commit be24e214620fa072efa877e1967571731c465884
Author: your_name <your_email@mail.com>
Date:   Fri Jul 7 18:58:16 2017 +0800

    ??mark

commit 5eccf92e28eae94ec5fce7c687f6f92bf32a6a8d
Author: your_name <your_email@mail.com>
Date:   Fri Jul 7 18:52:06 2017 +0800

    this is main.py file commit mark use -m option

commit 6e5f31067466795c522b01692871f202c26ff948
Author: your_name <your_email@mail.com>
Date:   Fri Jul 7 18:42:43 2017 +0800

    this is main.py file commit mark without use "-m" option

commit 290342c270bc90f861ccc3d83afa920169e3b07e
Author: Maxsu <769728683@qq.com>
Date:   Fri Jul 7 16:55:12 2017 +0800

    Initial commit
yiibai@ubuntu:~/git/sample$
观察日志后,可以看到maxsu添加了文件代码来实现两个变量a和b之和,现在假设minsu在文本编辑器中打开main.py,并修改优化代码。在示两个变量a和b之和,定义一个函数来实现两个变量之和。修改后,代码如下所示:
#!/usr/bin/python3
#coding=utf-8

a = 10
b = 20

def sum(a, b):
    return (a+b)

c = sum(a, b)
print("The value of c is  ", c)
使用 git diff 命令查看更改,如下所示 -
yiibai@ubuntu:~/git/sample$ git diff
diff --git a/main.py b/main.py
index 25eb22b..e84460d 100644
--- a/main.py
+++ b/main.py
@@ -7,5 +7,9 @@ print ("Life is short, you need Python !")
 a = 10

 b = 20
-c = a + b
-print("The value of c is  ", c)
\ No newline at end of file
+
+def sum(a, b):
+    return (a+b)
+
+c = sum(a, b)
+print("The value of c is  ", c)
yiibai@ubuntu:~/git/sample$
经过测试,代码没有问题,提交了上面的更改。
yiibai@ubuntu:~/git/sample$ git status
On branch master
Your branch is up-to-date with 'origin/master'.
Changes not staged for commit:
  (use "git add <file>..." to update what will be committed)
  (use "git checkout -- <file>..." to discard changes in working directory)

        modified:   main.py

no changes added to commit (use "git add" and/or "git commit -a")

yiibai@ubuntu:~/git/sample$ git add main.py
yiibai@ubuntu:~/git/sample$ git commit -m "add a new function sum(a,b)"
[master 01c5462] add a new function sum(a,b)
 1 file changed, 6 insertions(+), 2 deletions(-)
yiibai@ubuntu:~/git/sample$
再次查看提交记录信息 -
yiibai@ubuntu:~/git/sample$ git log
commit 01c54624879782e4657dd6c166ce8818f19e8251
Author: minsu <minsu@yiibai.com>
Date:   Sun Jul 9 19:01:00 2017 -0700

    add a new function sum(a,b)

commit 51de0f02eb48ed6b84a732512f230028d866b1ea
Author: your_name <your_email@mail.com>
Date:   Fri Jul 7 23:04:16 2017 +0800

    add the sum of a & b
....
经过上面添加和提交修改后,其它开发人员并不能看到代码中定义的 sum(a, b) 函数,还需要将这里提交的本地代码推送到远程存储库。使用以下命令 -
yiibai@ubuntu:~/git/sample$ git push origin master
Username for 'http://git.oschina.net': 769728683@qq.com
Password for 'http://769728683@qq.com@git.oschina.net':<你的帐号的密码>
Counting objects: 3, done.
Compressing objects: 100% (3/3), done.
Writing objects: 100% (3/3), 419 bytes | 0 bytes/s, done.
Total 3 (delta 0), reused 0 (delta 0)
To http://git.oschina.net/yiibai/sample.git
   51de0f0..01c5462  master -> master
yiibai@ubuntu:~/git/sample$
现在,代码已经成功提交到远程存储库中了,只要其它开发人员使用 git clone 或 git pull 就可以得到这些新提交的代码了。
下面我们将学习其它一些更为常用的 git 命令,经过下面的学习,你就可以使用这些基本的git操作命令来文件和代码管理和协同开发了。
添加新函数
在开发人员B(minsu)修改文件main.py中的代码的同时,开发人员A(maxsu)在文件main.py中实现两个变量的乘积函数。 修改后,main.py文件如下所示:
#!/usr/bin/python3
#coding=utf-8

print ("Life is short, you need Python !")


a = 10

b = 20
c = a + b
print("The value of c is  ", c)

def mul(a, b):
    return (a * b)
现在修改完代码,运行以下命令 -
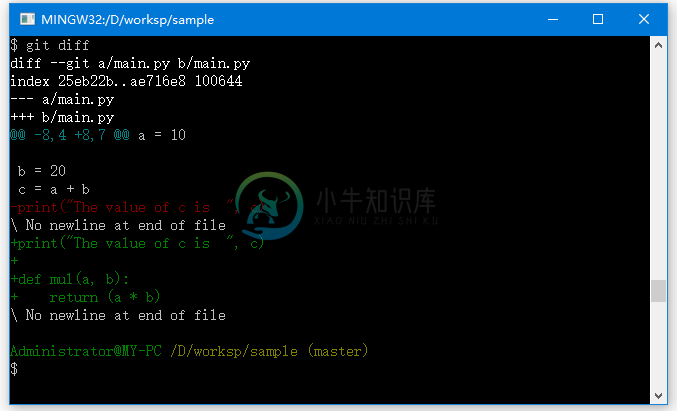
$ git diff
得到如下结果 -

现在添加并提交上面的代码 -
$ git status
On branch master
Your branch is up-to-date with 'origin/master'.

Changes not staged for commit:
  (use "git add <file>..." to update what will be committed)
  (use "git checkout -- <file>..." to discard changes in working directory)

        modified:   main.py

no changes added to commit (use "git add" and/or "git commit -a")

$ git add main.py

Administrator@MY-PC /D/worksp/sample (master)
$ git commit -m "add a mul(a, b) function"
[master e5f8dfa] add a mul(a, b) function
 1 file changed, 4 insertions(+), 1 deletion(-)
现在查看上提交的日志信息,如下结果 -
$ git log
commit e5f8dfa9e7e89fea8813ab107e14b9b7412df2ae
Author: your_name <your_email@mail.com>
Date:   Sun Jul 9 23:06:32 2017 +0800

    add a mul(a, b) function

commit 51de0f02eb48ed6b84a732512f230028d866b1ea
Author: your_name <your_email@mail.com>
Date:   Fri Jul 7 23:04:16 2017 +0800

    add the sum of a & b
... ...
好了,现在要将上面的代码推送到远程存储库,使用以下命令 -
$ git push origin master
执行上面命令,结果如下 -
$ git push origin master
Username for 'http://git.oschina.net': 769728683@qq.com
Password for 'http://769728683@qq.com@git.oschina.net':
To http://git.oschina.net/yiibai/sample.git
 ! [rejected]        master -> master (fetch first)
error: failed to push some refs to 'http://git.oschina.net/yiibai/sample.git'
hint: Updates were rejected because the remote contains work that you do
hint: not have locally. This is usually caused by another repository pushing
hint: to the same ref. You may want to first integrate the remote changes
hint: (e.g., 'git pull ...') before pushing again.
hint: See the 'Note about fast-forwards' in 'git push --help' for details.
但Git推送失败。因为Git确定远程存储库和本地存储库不同步。为什么呢?因为在向文件main.py添加以下代码片段时 -
def mul(a, b):
    return (a * b)
另外一个开发人员B已经向远程存储库推送修改的代码,所以这里在向远程存储库推送代码时,发现上面的新的推送代码,现在这个要推送的代码与远程存储库中的代码不一致,如果强行推送上去,Git不知道应该以谁的为准了。
所以,必须先更新本地存储库,只有在经过此步骤之后,才能推送自己的改变。
获取最新更改
执行git pull命令以将其本地存储库与远程存储库同步。
$ git pull
remote: Counting objects: 3, done.
remote: Compressing objects: 100% (3/3), done.
remote: Total 3 (delta 0), reused 0 (delta 0)
Unpacking objects: 100% (3/3), done.
From http://git.oschina.net/yiibai/sample
   51de0f0..01c5462  master     -> origin/master
Auto-merging main.py
CONFLICT (content): Merge conflict in main.py
Automatic merge failed; fix conflicts and then commit the result.
现在打开 main.py 内容如下 -
#!/usr/bin/python3
#coding=utf-8

print ("Life is short, you need Python !")


a = 10

b = 20
<<<<<<< HEAD
c = a + b
print("The value of c is  ", c)

def mul(a, b):
    return (a * b)
=======

def sum(a, b):
    return (a+b)

c = sum(a, b)
print("The value of c is  ", c)
>>>>>>> 01c54624879782e4657dd6c166ce8818f19e8251
拉取操作后,检查日志消息,并发现其它开发人员的提交的详细信息,提交ID为:01c54624879782e4657dd6c166ce8818f19e8251
打开 main.py 文件,修改其中的代码,修改完成后保文件,文件的代码如下所示 -
#!/usr/bin/python3
#coding=utf-8

print ("Life is short, you need Python !")

a = 10
b = 20

c = a + b
print("The value of c is  ", c)

def mul(a, b):
    return (a * b)

def sum(a, b):
    return (a+b)

c = sum(a, b)
print("The value of c is  ", c)
再次添加提交,最后推送,如下命令 -
$ git add main.py

Administrator@MY-PC /D/worksp/sample (master|MERGING)
$ git commit -m "synchronized with the remote repository "
[master ef07ab5] synchronized with the remote repository

Administrator@MY-PC /D/worksp/sample (master)
$ git status
On branch master
Your branch is ahead of 'origin/master' by 2 commits.
  (use "git push" to publish your local commits)

nothing to commit, working directory clean

Administrator@MY-PC /D/worksp/sample (master)
$ git push origin master
Username for 'http://git.oschina.net': 769728683@qq.com
Password for 'http://769728683@qq.com@git.oschina.net':
Counting objects: 10, done.
Delta compression using up to 4 threads.
Compressing objects: 100% (6/6), done.
Writing objects: 100% (6/6), 657 bytes | 0 bytes/s, done.
Total 6 (delta 2), reused 0 (delta 0)
To http://git.oschina.net/yiibai/sample.git
   01c5462..ef07ab5  master -> master
现在,一个新的代码又提交并推送到远程存储库中了。
