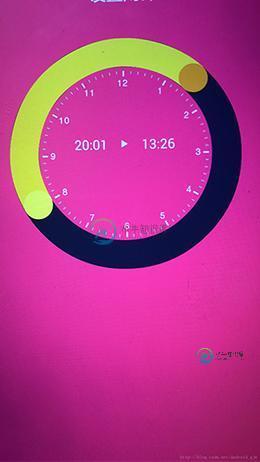
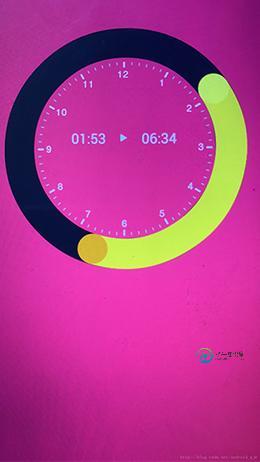
Android自定义View仿IOS圆盘时间选择器
通过自定义view实现仿iOS实现滑动两端的点选择时间的效果
效果图


自定义的view代码
public class Ring_Slide2 extends View {
 private static final double RADIAN = 180 / Math.PI;
 private int max_progress; // 设置最大进度
 private int cur_progress; //设置锚点1当前进度
 private int cur_progress2; //设置锚点2进度
 private int bottom_color;//设置底色
 private int circle_color; //设置圆的颜色(锚点)
 private int slide_color; //设置滑动过的颜色
 private float ring_width; //圆环的宽度
 private double cur_Angle; //当前锚点1旋转角度
 private double cur_Angle2; //当前锚点2的旋转角度
 private float ring_Radius;//圆环的半径
 private final int[] arrColorCircle = new int[]{0xFFFFde37, 0xFFFFa400};
 private int main_width; //圆的宽度
 private float mWheelCurX, mWheelCurY; //圆的位置
 private float mWheelCurX2, mWheelCurY2; //圆2的位置
 private Paint circle_Paint; //圆环的画笔
 private Paint select_Paint;//选中的画笔
 private Paint dot1; //圆点1
 private Paint dot2; //圆点2
 private Context context;
 private OnSeekBarChangeListener changeListener,changeListener2;
 public Ring_Slide2(Context context) {
  this(context,null);
 }
 public Ring_Slide2(Context context, AttributeSet attrs) {
  this(context, attrs,0);
 }
 public Ring_Slide2(Context context, AttributeSet attrs, int defStyleAttr) {
  super(context, attrs, defStyleAttr);
  this.context=context;
  initAttrs(attrs,defStyleAttr);
  initPadding();
  //初始化画笔
  initPaints();
 }
 //初始化属性
 private void initAttrs(AttributeSet attrs, int defStyle){
  TypedArray typedArray = getContext().obtainStyledAttributes(attrs, R.styleable.Cricle_slide, defStyle, 0);
  max_progress=typedArray.getInt(R.styleable.Cricle_slide_max_progress,720);
  cur_progress=typedArray.getInt(R.styleable.Cricle_slide_cur_progress,420);
  cur_progress2=typedArray.getInt(R.styleable.Cricle_slide_cur_progress2,540);
  if (cur_progress > max_progress) cur_progress = max_progress;
  if (cur_progress2 > max_progress) cur_progress2 = max_progress;
  Bitmap bitmap = BitmapFactory.decodeResource(context.getResources(), R.mipmap.select_sun_bg2);
  main_width= bitmap.getWidth();
  ring_width=typedArray.getFloat(R.styleable.Cricle_slide_Ring_Width,main_width);
  bottom_color=typedArray.getColor(R.styleable.Cricle_slide_bottom_color,getColor(R.color.select_main_bg_color));
  circle_color=typedArray.getColor(R.styleable.Cricle_slide_circle_color,getColor(R.color.duration));
  slide_color=typedArray.getColor(R.styleable.Cricle_slide_slide_color,getColor(R.color.time));
  typedArray.recycle();
 }
 //初始化边距
 private void initPadding(){
  int paddingLeft = getPaddingLeft();
  int paddingTop = getPaddingTop();
  int paddingRight = getPaddingRight();
  int paddingBottom = getPaddingBottom();
  int paddingStart = 0, paddingEnd = 0;
  if (Build.VERSION.SDK_INT >= 17) {
   paddingStart = getPaddingStart();
   paddingEnd = getPaddingEnd();
  }
  int maxPadding = Math.max(paddingLeft, Math.max(paddingTop,
    Math.max(paddingRight, Math.max(paddingBottom, Math.max(paddingStart, paddingEnd)))));
  setPadding(maxPadding, maxPadding, maxPadding, maxPadding);
 }
 private void initPaints(){
  /*
  圆环的画笔
   */
  circle_Paint=new Paint(Paint.ANTI_ALIAS_FLAG);
  circle_Paint.setAntiAlias(true);
  circle_Paint.setColor(bottom_color);
  circle_Paint.setStyle(Paint.Style.STROKE);
  circle_Paint.setStrokeWidth(ring_width);
  /*
  选中区域的画笔
   */
  select_Paint=new Paint(Paint.ANTI_ALIAS_FLAG);
  select_Paint.setShader(new SweepGradient(0, 0, arrColorCircle, null));
  /*select_Paint.setColor(circle_color);*/
  select_Paint.setAntiAlias(true);
  select_Paint.setStyle(Paint.Style.STROKE);
  select_Paint.setStrokeWidth(ring_width);
  // 画锚点
  dot1 = new Paint(Paint.ANTI_ALIAS_FLAG);
  dot1.setColor(circle_color);
  dot1.setAntiAlias(true);
  dot1.setStyle(Paint.Style.FILL);
  // 画锚点2
  dot2 = new Paint(Paint.ANTI_ALIAS_FLAG);
  dot2.setColor(slide_color);
  dot2.setAntiAlias(true);
  dot2.setStyle(Paint.Style.FILL);
 }
 //获取宽度
 private float getDimen(int dimenId) {
  return getResources().getDimension(dimenId);
 }
 //获取颜色
 @TargetApi(Build.VERSION_CODES.M)
 private int getColor(int colorId) {
  final int version = Build.VERSION.SDK_INT;
  if (version >= 23) {
   return getContext().getColor(colorId);
  } else {
   return ContextCompat.getColor(getContext(), colorId);
  }
 }
 @Override
 protected void onMeasure(int widthMeasureSpec, int heightMeasureSpec) {
  super.onMeasure(widthMeasureSpec, heightMeasureSpec);
  Bitmap bitmap = BitmapFactory.decodeResource(context.getResources(), R.mipmap.setalarm_colock_bg);
  int height = bitmap.getHeight()+main_width*2;
  int width = bitmap.getWidth()+main_width*2;
  int min = Math.min(height, width);
  setMeasuredDimension(min,min);
  initposition();
 }
 private void initposition(){
  //转换为360度
  cur_Angle=(double) cur_progress / max_progress*360.0;
  cur_Angle2=(double)cur_progress2 / max_progress*360.0;
  //计算初始化旋转的角度
  double cos = -Math.cos(Math.toRadians(cur_Angle));
  double cos2 = -Math.cos(Math.toRadians(cur_Angle2));
  //根据旋转的角度来确定位置
  MakeCurPosition(cos);
  MakeCurPosition2(cos2);
  //确定圆环的半径
  ring_Radius=(getMeasuredWidth() - getPaddingLeft() - getPaddingRight() - ring_width) / 2;
 }
 private void MakeCurPosition(double cos){
  //根据旋转的角度来确定圆的位置
  //确定x点的坐标
  mWheelCurX = calcXLocationInWheel(cur_Angle, cos);
  //确定y点的坐标
  mWheelCurY=calcYLocationInWheel(cos);
 }
 private void MakeCurPosition2(double cos2){
  //根据旋转的角度来确定圆的位置
  //确定x点的坐标
  mWheelCurX2 = calcXLocationInWheel(cur_Angle2, cos2);
  //确定y点的坐标
  mWheelCurY2=calcYLocationInWheel(cos2);
 }
 //确定x点的坐标
 private float calcXLocationInWheel(double angle,double cos){
  if (angle < 180) {
   return (float) (getMeasuredWidth() / 2 + Math.sqrt(1 - cos * cos) * ring_Radius); //Math.sqrt正平分根 9-3
  } else {
   return (float) (getMeasuredWidth() / 2 - Math.sqrt(1 - cos * cos) * ring_Radius);
  }
 }
 //确定y点的坐标
 private float calcYLocationInWheel(double cos) {
  return getMeasuredWidth() / 2 + ring_Radius * (float) cos;
 }
 @Override
 protected void onDraw(Canvas canvas) {
  super.onDraw(canvas);
  float left = getPaddingLeft() + ring_width / 2;
  float top = getPaddingTop() + ring_width / 2;
  float right = canvas.getWidth() - getPaddingRight() - ring_width / 2;
  float bottom = canvas.getHeight() - getPaddingBottom() - ring_width / 2;
  float centerX = (left + right) / 2;
  float centerY = (top + bottom) / 2;
  float wheelRadius = (canvas.getWidth() - getPaddingLeft() - getPaddingRight()) / 2 - ring_width / 2;
  canvas.drawCircle(centerX, centerY, wheelRadius, circle_Paint);
  //画选中区域
  // canvas.drawArc(new RectF(left, top, right, bottom), (float) (Math.PI * RADIAN + Math.acos(cur_Angle) * RADIAN), (float) (Math.abs(cur_Angle-cur_Angle2)), false, select_Paint);
  Log.i("TAG","第一个的角度="+cur_Angle);
  Log.i("TAG","第一个的角度2="+cur_Angle2);
  float begin=0; //圆弧的起点位置
  float stop=0;
  if(cur_Angle>180 && cur_Angle>cur_Angle2 ){ //180 -- 360
   begin=(float) (-Math.abs(cur_Angle-360)-90);
   stop=(float) Math.abs(Math.abs(cur_Angle-360)+cur_Angle2);
   Log.i("TAG","begin="+begin);
   Log.i("TAG","stop="+stop);
  }else if(cur_Angle>cur_Angle2){
   begin=(float) cur_Angle-90;
   stop=(float)(360-(cur_Angle-cur_Angle2));
  }else {
    begin=(float) cur_Angle-90;
   stop=(float) Math.abs(cur_Angle-cur_Angle2);
  }
  canvas.drawArc(new RectF(left, top, right, bottom), begin,stop, false, select_Paint);
  //画锚点 画圆
  canvas.drawCircle(mWheelCurX, mWheelCurY, ring_width/2, dot1);
  //画锚点 画圆
  canvas.drawCircle(mWheelCurX2, mWheelCurY2, ring_width/2, dot2);
  Log.i("TAG","锚点1Y"+mWheelCurY+"锚点1X"+mWheelCurX);
  Log.i("TAG","锚点2Y"+mWheelCurY2+"锚点1X"+mWheelCurX2);
 }
 @Override
 public boolean onTouchEvent(MotionEvent event) {
  float x = event.getX();
  float y = event.getY();
  int flag=0;
  //判断是否触控到两个点中的其中某个点
  if(isMovedot2(x,y)){
   flag=2;
  }else if(isMovedot1(x,y)){
   flag=1;
  }
  /* if(isMovedot1(x,y)){
   flag=1;
  }else if(isMovedot2(x,y)){
   flag=2;
  }*/
  if(event.getAction()==MotionEvent.ACTION_MOVE || isMovedot1(x,y) ==true || isMovedot2(x,y)==true ){
   Log.i("TAG","进入X="+x+"进入Y="+y);
   //通过触摸点算出cos角度值
   float cos = calculateCos(x, y);
   // 通过反三角函数获得角度值
   double angle; //获取滑动的角度
   if (x < getWidth() / 2) { // 滑动超过180度
    angle = Math.PI * RADIAN + Math.acos(cos) * RADIAN; //通过计算得到滑动的角度值
   } else { // 没有超过180度
    angle = Math.PI * RADIAN - Math.acos(cos) * RADIAN; //PI 周长比直径 返回弧角度的余弦值
   }
   if(flag==1){
    cur_Angle=angle;
    cur_progress=getSelectedValue(cur_Angle);
    MakeCurPosition(cos);
    if (changeListener != null) {
     changeListener.onChanged(this, cur_progress);
    }
   }else if(flag==2){
    cur_Angle2=angle;
    cur_progress2=getSelectedValue(cur_Angle2);
    MakeCurPosition2(cos);
    if (changeListener2 != null) {
     changeListener2.onChanged(this, cur_progress2);
    }
   }
   invalidate();
   return true;
  }else {
   return super.onTouchEvent(event);
  }
 }
 private boolean isMovedot1(float x,float y){
  float dot1x = Math.abs(mWheelCurX - x);
  float dot1y = Math.abs(mWheelCurY - y);
  if(dot1x<30 && dot1y<30){
   return true;
  }else{
   return false;
  }
 }
 private boolean isMovedot2(float x,float y){
  float dot1x = Math.abs(mWheelCurX2 - x);
  float dot1y = Math.abs(mWheelCurY2 - y);
  if(dot1x<30 && dot1y<30){
   return true;
  }else{
   return false;
  }
 }
 //拿到切斜角的cos值
 private float calculateCos(float x, float y){
  float width = x - getWidth() / 2;
  float height = y - getHeight() / 2;
  float slope = (float) Math.sqrt(width * width + height * height);
  return height / slope;
 }
 private int getSelectedValue(double mCurAngle) { //角度转进度
  return Math.round(max_progress * ((float) mCurAngle / 360)); //四舍五入
 }
 public void setOnSeekBarChangeListener(OnSeekBarChangeListener listener) {
  changeListener = listener;
 }
 public void setOnSeekBarChangeListener2(OnSeekBarChangeListener listener) {
  changeListener2 = listener;
 }
 public void initRadian(int pro1,int pro2){
  this.cur_progress=pro1;
  this.cur_progress2=pro2;
  invalidate();
 }
 public interface OnSeekBarChangeListener {
  void onChanged(Ring_Slide2 seekbar, int curValue);
 }
}
自定义stayle样式,在values下新建sttrs.xml文件
 <declare-styleable name="Cricle_slide">
  //设置最大进度
  <attr name="max_progress" format="integer"></attr>
  //设置当前进度
  <attr name="cur_progress" format="integer"></attr>
  //设置当前进度
  <attr name="cur_progress2" format="integer"></attr>
  //设置底色
  <attr name="bottom_color" format="color"></attr>
  //设置圆的颜色
  <attr name="circle_color" format="color"></attr>
  //设置滑动的颜色
  <attr name="slide_color" format="color"></attr>
  //圆环的宽度 (dimension是代表尺寸值)
  <attr name="Ring_Width" format="dimension"></attr>
 </declare-styleable>
以上所述是小编给大家介绍的Android自定义View仿IOS圆盘时间选择器,希望对大家有所帮助,如果大家有任何疑问请给我留言,小编会及时回复大家的。在此也非常感谢大家对小牛知识库网站的支持!
-
本文向大家介绍Android自定义view仿IOS开关效果,包括了Android自定义view仿IOS开关效果的使用技巧和注意事项,需要的朋友参考一下 本文主要讲解如何在 Android 下实现高仿 iOS 的开关按钮,并非是在 Android 自带的 ToggleButton 上修改,而是使用 API 提供的 onDraw、onMeasure、Canvas 方法,纯手工绘制。基本原理就是在 Ca
-
本文向大家介绍Android自定义View画圆功能,包括了Android自定义View画圆功能的使用技巧和注意事项,需要的朋友参考一下 本文实例为大家分享了Android自定义View画圆的具体代码,供大家参考,具体内容如下 引入布局 自定义View的java类,继承View 效果图: 以上就是本文的全部内容,希望对大家的学习有所帮助,也希望大家多多支持呐喊教程。
-
本文向大家介绍Android自定义View实现角度选择器,包括了Android自定义View实现角度选择器的使用技巧和注意事项,需要的朋友参考一下 首先来看一下Google Photos的效果 实现最终的效果: 实现思路 仔细观察这个效果,先分析构成结构,我把它分成三部分: 1、表示刻度的点 2、相应点上方的数字 3、控件中央的当前刻度与三角 可以看出,构成元素十分简单,不
-
本文向大家介绍Android自定义view仿淘宝快递物流信息时间轴,包括了Android自定义view仿淘宝快递物流信息时间轴的使用技巧和注意事项,需要的朋友参考一下 学了Android有一段时间了,一直没有时间写博客,趁着周末有点空,就把自己做的一些东西写下来. 一方面锻炼一下自己的写文档的能力,另一方面分享代码的同时也希望能与大家交流一下技术,共同学习,共同进步. 废话不多少说,我们先来看看我
-
本文向大家介绍iOS自定义日期选择器,包括了iOS自定义日期选择器的使用技巧和注意事项,需要的朋友参考一下 前言 封装了一个日期选择器,解决两个问题: 1、点击textField,键盘弹出和日期选择器弹出的逻辑处理; 2、同一个界面需要多次用到日期选择器时,判断点击的textField; 一、封装日期选择器类YCDatePickerView 1、新建一个类,基于UIView,取名YCDatePic
-
本文向大家介绍Android自定义View之酷炫圆环(二),包括了Android自定义View之酷炫圆环(二)的使用技巧和注意事项,需要的朋友参考一下 先看下最终的效果 静态: 动态: 一、开始实现 新建一个DoughnutProgress继承View 先给出一些常量、变量以及公共方法的代码,方便理解后面的代码 重写onMeasure方法,为什么要重写onMeasure方法可以看我的上一篇
-
本文向大家介绍Android自定义View实现拖动选择按钮,包括了Android自定义View实现拖动选择按钮的使用技巧和注意事项,需要的朋友参考一下 本文为大家分享了Android实现拖动选择按钮的具体代码,供大家参考,具体内容如下 效果图 View代码 第一步:自定义属性 第二步:自定义圆形 第三步:自定义拖动按钮 使用方法 布局文件: 页面代码: 以上就是本文的全部内容,希望对大家的学习有所
-
本文向大家介绍Android自定义view实现拖拽选择按钮,包括了Android自定义view实现拖拽选择按钮的使用技巧和注意事项,需要的朋友参考一下 本文实例为大家分享了Android实现拖拽选择按钮的具体代码,供大家参考,具体内容如下 github地址:https://github.com/xuezj/DragChooseDemo DragChooseDemo 效果图 Attributes属性

