
bootstrap表格分页实例讲解

本文实例为大家分享了bootstrap表格分页的具体实现代码,供大家参考,具体内容如下
引用:
<script src="~/Scripts/jquery.min.js"></script>
<script src="~/Scripts/bootstrap.min.js"></script>
<script src="~/Scripts/plugins/bootstrap-table/bootstrap-table.min.js"></script>
<script src="~/Scripts/plugins/bootstrap-table/locale/bootstrap-table-zh-CN.min.js"></script>
html代码:
<div class="panel-body" style="padding-bottom:0px;">
  <div class="tableWrap">
   <div class="cxbottom"><button type="submit" class="cxbtn" onclick="Search();">查 询</button></div>
   <table width="100%" border="0">
    <tr>
     <th width="12%">活动日期:</th>
     <td width="21%">
      <div class="" id="data_5">
       <div class="input-daterange input-group" id="datepicker">
        <input type="text" class="input-sm form-control" name="start" value="2014-11-11" />
        <span class="input-group-addon">到</span>
        <input type="text" class="input-sm form-control" name="end" value="2014-11-17" />
       </div>
      </div>

     </td>
     <th width="12%">活动名称:</th>
     <td width="21%">
      <input type="text" placeholder="" class="form-control" style="border-radius:3px; height:30px" id="activeName">
     </td>
     <th width="12%">是否推荐:</th>
     <td width="22%"><input type="checkbox" class="js-switch" checked /></td>
    </tr>
    <tr>
     <th>活动名称:</th>
     <td><input type="text" placeholder="" class="form-control" style="border-radius:3px; height:30px"></td>
     <th>是否上线:</th>
     <td><input type="text" placeholder="" class="form-control" style="border-radius:3px; height:30px" id="online"></td>

    </tr>
   </table>
  </div>

  <div id="toolbar" class="btn-group">
   <button id="btn_add" type="button" class="btn btn-default" data-toggle="modal" data-target="#modal-form">
    <span class="glyphicon glyphicon-plus" aria-hidden="true"></span>新增
   </button>
   <button id="btn_edit" type="button" class="btn btn-default">
    <span class="glyphicon glyphicon-pencil" aria-hidden="true"></span>修改
   </button>
   <button id="btn_delete" type="button" class="btn btn-default">
    <span class="glyphicon glyphicon-remove" aria-hidden="true"></span>删除
   </button>
  </div>
 <table id="tb_departments"></table>
js代码:
var TableInit = function () {
   var oTableInit = new Object();
   //初始化Table
   oTableInit.Init = function () {
    $('#tb_departments').bootstrapTable({
     url: '/Active/ActivityS',   //请求后台的URL(*)
     method: 'post',      //请求方式(*)
     toolbar: '#toolbar',    //工具按钮用哪个容器
     striped: true,      //是否显示行间隔色
     cache: false,      //是否使用缓存,默认为true,所以一般情况下需要设置一下这个属性(*)
     pagination: true,     //是否显示分页(*)
     sortable: false,      //是否启用排序
     sortOrder: "asc",     //排序方式
     queryParams: oTableInit.queryParams,//传递参数(*)
     sidePagination: "server",   //分页方式:client客户端分页,server服务端分页(*)
     pageNumber: 1,      //初始化加载第一页,默认第一页
     pageSize: 10,      //每页的记录行数(*)
     pageList: [10, 25, 50, 100],  //可供选择的每页的行数(*)
     search: true,      //是否显示表格搜索,此搜索是客户端搜索,不会进服务端,所以,个人感觉意义不大
     strictSearch: true,
     showColumns: true,     //是否显示所有的列
     showRefresh: true,     //是否显示刷新按钮
     minimumCountColumns: 2,    //最少允许的列数
     clickToSelect: true,    //是否启用点击选中行
     //height: 500,      //行高,如果没有设置height属性,表格自动根据记录条数觉得表格高度
     uniqueId: "ActivityGuid",      //每一行的唯一标识,一般为主键列
     showToggle: true,     //是否显示详细视图和列表视图的切换按钮
     cardView: false,     //是否显示详细视图
     detailView: false,     //是否显示父子表
     columns: [{
      checkbox: true
     },
     {
      field: 'ActivityGuid',
      title: '活动报名主键'
     },
     {
      field: 'Name',
      title: '活动名称'
     }, {
      field: 'Introduction',
      title: '活动简介'
     }, {
      field: 'StartDateTime',
      title: '活动开始时间'
     }, {
      field: 'EndDateTime',
      title: '活动结束时间'
     },
     {
      field: 'TotalPlaces',
      title: '活动总名额'
     },
     {
      field: 'ActivityType',
      title: '活动类型'
     },
     {
      field: 'AccountGuid',
      title: '操作人'
     },
     {
      field: 'isLine',
      title: '是否上线'
     },
     {
      field: 'isMail',
      title: '是否邮寄'
     },
     ]
    });
   };

   //得到查询的参数
   oTableInit.queryParams = function (params) {
    var temp = { //这里的键的名字和控制器的变量名必须一直,这边改动,控制器也需要改成一样的
     limit: params.limit, //页面大小
     offset: params.offset, //页码
     departmentname: "aa",
     statu: "true",
     search: params.search
    };
    return temp;
   };
   return oTableInit;
  };

  var ButtonInit = function () {
   var oInit = new Object();
   var postdata = {};

   oInit.Init = function () {
    //初始化页面上面的按钮事件
   };
   return oInit;
  };
后台对应的方法
[HttpPost]
  public ActionResult ActivityS(int limit, int offset, string activeName, string online, string search)
  {
   var list = new List<Activitys>();
   DataTable dt = bll.GetActivity();
   for (int i = 0; i < dt.Rows.Count; i++)
   {
    Activitys model = new Activitys();
    model.ActivityGuid = dt.Rows[i]["ActivityGuid"].ToString();
    model.Name = dt.Rows[i]["Name"].ToString();
    model.Introduction = dt.Rows[i]["Introduction"].ToString();

    model.StartDateTime = Convert.ToDateTime(dt.Rows[i]["StartDateTime"]);
    model.EndDateTime = Convert.ToDateTime(dt.Rows[i]["EndDateTime"]);


    model.TotalPlaces = Convert.ToInt32(dt.Rows[i]["TotalPlaces"]);
    model.ActivityType = Convert.ToInt32(dt.Rows[i]["ActivityType"]);
    model.AccountGuid = dt.Rows[i]["AccountGuid"].ToString();
    model.isLine = dt.Rows[i]["isLine"].ToString() == "1" ? false : true;
    model.isMail = dt.Rows[i]["isMail"].ToString() == "1" ? false : true;
    list.Add(model);
   }
   //去除时间带T
   var iso = new IsoDateTimeConverter();
   iso.DateTimeFormat = "yyyy-MM-dd";

   var pageCount = dt.Rows.Count;
   var rows = list.Skip(offset).Take(limit).ToList();
   return Content(JsonConvert.SerializeObject(new { total = pageCount, rows = rows }, iso));
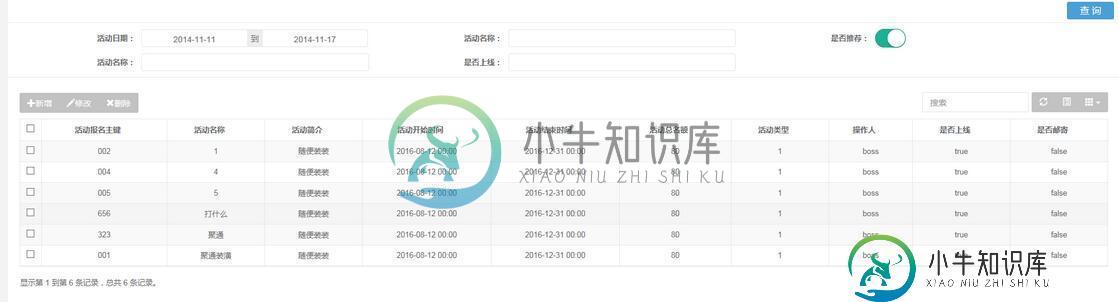
最终的效果
方便以后可以用到。
以上就是本文的全部内容,希望对大家的学习有所帮助,也希望大家多多支持小牛知识库。
-
本文向大家介绍django之session与分页(实例讲解),包括了django之session与分页(实例讲解)的使用技巧和注意事项,需要的朋友参考一下 前面我们介绍了cookies,主要应用在用户登录上,保存用户登录状态,不过cookies直接放在了浏览器上,安全性较低,所以我们便引出了session功能与cookies相同,不同的是它放在了客户端,相比较cookies来说安全性更高。还有分页
-
本文向大家介绍jquery pagination插件动态分页实例(Bootstrap分页),包括了jquery pagination插件动态分页实例(Bootstrap分页)的使用技巧和注意事项,需要的朋友参考一下 第一种Bootstrap -默认的分页实例,供大家参考,具体内容如下 第二个实例jquery pagination分页控件 分页效果: 源码:https://github.com/gb
-
本文向大家介绍Vue Cli与BootStrap结合实现表格分页功能,包括了Vue Cli与BootStrap结合实现表格分页功能的使用技巧和注意事项,需要的朋友参考一下 1、首先需要在vue-cli项目中配置bootstrap,jquery 2、 然后新建vue文件,如index.vue,index.vue内容如下: 3、配置路由即可运行实现。 总结 以上所述是小编给大家介绍的Vue Cli与B
-
本文向大家介绍Python中用xlwt制作表格实例讲解,包括了Python中用xlwt制作表格实例讲解的使用技巧和注意事项,需要的朋友参考一下 在Python中,我们也可以用xlwt来制作excel表格,是不是很神奇,接下来一起学习吧。 举例: 单元格样式控制: 背景色对照: 到此这篇关于Python中用xlwt制作表格实例讲解的文章就介绍到这了,更多相关Python中如何用xlwt制作表格内容请
-
本文向大家介绍JSP基于Bootstrap分页显示实例解析,包括了JSP基于Bootstrap分页显示实例解析的使用技巧和注意事项,需要的朋友参考一下 首先介绍一款简单利落的分页利器:bootstrap-paginator,可以参考:Bootstrap Paginator分页插件使用方法详解 这篇文章进行学习。 效果截图: GitHub官方下载地址:https://github.com/lyo
-
本文向大家介绍jQuery实现可编辑的表格实例讲解(2),包括了jQuery实现可编辑的表格实例讲解(2)的使用技巧和注意事项,需要的朋友参考一下 本文实例为大家分享了jQuery实现可编辑表格的具体代码,供大家参考,具体内容如下 我们最终要达到的效果如下: 当单击学号列的时候,可以进行编辑: 当单击ESC的时候,操作取消,当单击回车的时候,修改生效(没有与后台交互) 页面代码如下(asp.net