
Android入门之ListView应用解析(一)

Android中的ListView是一个经常用到的控件,ListView里面的每个子项Item可以使一个字符串,也可以是一个组合控件。本文先来说说ListView的实现:
1.准备ListView要显示的数据;
2.使用 一维或多维 动态数组 保存数据;
3.构建适配器 , 简单地来说, 适配器就是 Item数组 , 动态数组 有多少元素就生成多少个Item;
4.把 适配器 添加到ListView,并显示出来。
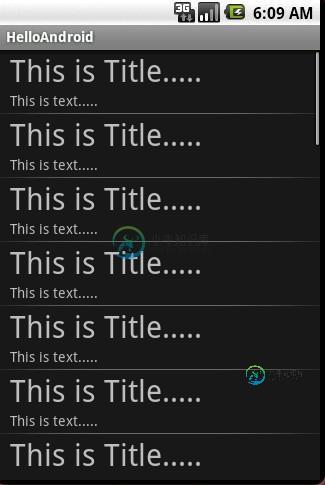
接下来,看看本文代码所实现的ListView效果:
接下来,就开始UI的XML代码:
main.xml代码如下,很简单,也不需要多做解释了:
<?xml version="1.0" encoding="utf-8"?>
<LinearLayout
    android:id="@+id/LinearLayout01"
    android:layout_width="fill_parent"
    android:layout_height="fill_parent"
    xmlns:android="http://schemas.android.com/apk/res/android">

    <ListView android:layout_width="wrap_content"
         android:layout_height="wrap_content"
         android:id="@+id/MyListView">
    </ListView>
</LinearLayout>
my_listitem.xml的代码如下,my_listitem.xml用于设计ListView的Item:
<?xml version="1.0" encoding="utf-8"?>
<LinearLayout
    android:layout_width="fill_parent"
    xmlns:android="http://schemas.android.com/apk/res/android"
    android:orientation="vertical"
    android:layout_height="wrap_content"
    android:id="@+id/MyListItem"
    android:paddingBottom="3dip"
    android:paddingLeft="10dip">
    <TextView
        android:layout_height="wrap_content"
        android:layout_width="fill_parent"
        android:id="@+id/ItemTitle"
        android:textSize="30dip">
    </TextView>
    <TextView
        android:layout_height="wrap_content"
        android:layout_width="fill_parent"
        android:id="@+id/ItemText">
    </TextView>
</LinearLayout>
解释一下,里面用到的一些属性:
1.paddingBottom="3dip",Layout往底部留出3个像素的空白区域
2.paddingLeft="10dip",Layout往左边留出10个像素的空白区域
3.textSize="30dip",TextView的字体为30个像素那么大。
最后就是JAVA的源代码:
public void onCreate(Bundle savedInstanceState) {
    super.onCreate(savedInstanceState);
    setContentView(R.layout.main);
    //绑定XML中的ListView,作为Item的容器
    ListView list = (ListView) findViewById(R.id.MyListView);

    //生成动态数组,并且转载数据
    ArrayList<HashMap<String, String>> mylist = new ArrayList<HashMap<String, String>>();
    for(int i=0;i<30;i++)
    {
     HashMap<String, String> map = new HashMap<String, String>();
     map.put("ItemTitle", "This is Title.....");
     map.put("ItemText", "This is text.....");
     mylist.add(map);
    }
    //生成适配器,数组===》ListItem
    SimpleAdapter mSchedule = new SimpleAdapter(this, //没什么解释
                       mylist,//数据来源
                       R.layout.my_listitem,//ListItem的XML实现

                       //动态数组与ListItem对应的子项
                       new String[] {"ItemTitle", "ItemText"},

                       //ListItem的XML文件里面的两个TextView ID
                       new int[] {R.id.ItemTitle,R.id.ItemText});
    //添加并且显示
    list.setAdapter(mSchedule);
}
-
本文向大家介绍Android入门之ListView应用解析(二),包括了Android入门之ListView应用解析(二)的使用技巧和注意事项,需要的朋友参考一下 上一篇关于Android中ListView的介绍讲的是如何制作一个具有两行文本的自定义控件,作为ListView的Item的使用方法。本文接下来也是围绕ListView和Item,更加深入地介绍它们的用法。 首先,先来看看本文代码运行的
-
本文向大家介绍Android入门之TableLayout应用解析(一),包括了Android入门之TableLayout应用解析(一)的使用技巧和注意事项,需要的朋友参考一下 本文初步讲述了Android中TableLayout的应用,对Android初学者有一定的学习借鉴价值。具体如下: TableLayout跟TableLayout 是一组搭配使用的布局,TableLayout置底,Table
-
本文向大家介绍Android入门之TableLayout应用解析(二),包括了Android入门之TableLayout应用解析(二)的使用技巧和注意事项,需要的朋友参考一下 本文在上一篇初步介绍TableLayout常用属性的基础上,将进一步介绍如何UI设计器设计TableLayout + TableRow。由于实际应用中,经常需要在代码里往TableLayout添加数据(9宫图也可以用Tabl
-
本文向大家介绍Android入门之TabHost与TabWidget实例解析,包括了Android入门之TabHost与TabWidget实例解析的使用技巧和注意事项,需要的朋友参考一下 本文实例介绍的是Android的Tab控件,Tab控件可以达到分页的效果,让一个屏幕的内容尽量丰富,当然也会增加开发的复杂程度,在有必要的时候再使用。Android的Tab控件使用起来有点奇怪,必须包含和按照以下
-
本文向大家介绍Android开发入门之Appwidget用法分析,包括了Android开发入门之Appwidget用法分析的使用技巧和注意事项,需要的朋友参考一下 本文实例讲述了Android Appwidget用法。分享给大家供大家参考,具体如下: App Widgets 是一个小型应用程序的View 他可以嵌入到其他应用程序中(如 桌面程序) 并且可以得到周期性刷新。 在创建App Widg
-
本文向大家介绍Android入门之AlertDialog用法实例分析,包括了Android入门之AlertDialog用法实例分析的使用技巧和注意事项,需要的朋友参考一下 本文实例讲述的是AlertDialog,这种对话框会经常遇到。AlertDialog跟WIN32开发中的Dialog不一样,AlertDialog是非阻塞的,而阻塞的对话框用的是PopupWindow。 先贴出该程序运行的截图: