
Android实现给TableLayou绘制边框的方法

本文实例讲述了Android实现给TableLayou绘制边框的方法。分享给大家供大家参考,具体如下:
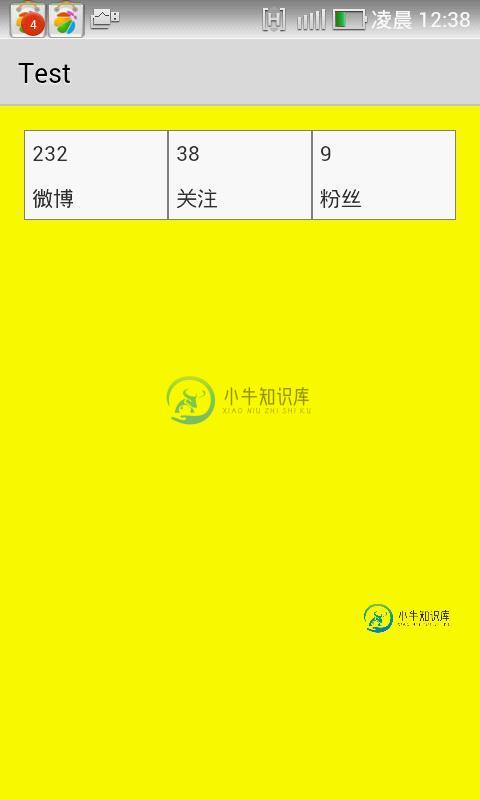
效果如下:
思路:使用share作为背景显示边框
步骤:
1.在res/drawable文件夹下建立table_frame_gray.xml文件:
<?xml version="1.0" encoding="utf-8"?>
<shape xmlns:android="http://schemas.android.com/apk/res/android"
  android:shape="rectangle" >
  <solid android:color="#ffffff" />
  <stroke
    android:width="0.01dp"
    android:color="#848484" />
</shape>
2.在布局文件里引用table_frame_gray.xml文件作为背景:
<RelativeLayout xmlns:android="http://schemas.android.com/apk/res/android"
  xmlns:tools="http://schemas.android.com/tools"
  android:layout_width="match_parent"
  android:layout_height="match_parent"
  android:background="#FFFF00"
  android:paddingBottom="@dimen/activity_vertical_margin"
  android:paddingLeft="@dimen/activity_horizontal_margin"
  android:paddingRight="@dimen/activity_horizontal_margin"
  android:paddingTop="@dimen/activity_vertical_margin"
  tools:context=".MainActivity" >
  <TableLayout
    android:layout_width="wrap_content"
    android:layout_height="wrap_content"
    android:background="#FF4000"
    android:stretchColumns="*"
    android:text="@string/hello_world" >
    <!-- 微博数 -->
    <TableRow>
      <LinearLayout
        android:layout_width="wrap_content"
        android:layout_height="wrap_content"
        android:background="@drawable/table_frame_gray"
        android:orientation="vertical" >
        <TextView
          android:layout_width="wrap_content"
          android:layout_height="wrap_content"
          android:padding="5dp"
          android:text="232" />
        <TextView
          android:layout_width="wrap_content"
          android:layout_height="wrap_content"
          android:padding="5dp"
          android:text="微博" />
      </LinearLayout>
      <!-- 关注人数 -->
      <LinearLayout
        android:layout_width="wrap_content"
        android:layout_height="wrap_content"
        android:background="@drawable/table_frame_gray"
        android:orientation="vertical" >
        <TextView
          android:layout_width="wrap_content"
          android:layout_height="wrap_content"
          android:padding="5dp"
          android:text="38" />
        <TextView
          android:layout_width="wrap_content"
          android:layout_height="wrap_content"
          android:padding="5dp"
          android:text="关注" />
      </LinearLayout>
      <!-- 好友数 -->
      <LinearLayout
        android:layout_width="wrap_content"
        android:layout_height="wrap_content"
        android:background="@drawable/table_frame_gray"
        android:orientation="vertical" >
        <TextView
          android:layout_width="wrap_content"
          android:layout_height="wrap_content"
          android:padding="5dp"
          android:text="9" />
        <TextView
          android:layout_width="wrap_content"
          android:layout_height="wrap_content"
          android:padding="5dp"
          android:text="粉丝" />
      </LinearLayout>
    </TableRow>
  </TableLayout>
</RelativeLayout>
更多关于Android相关内容感兴趣的读者可查看本站专题:《Android调试技巧与常见问题解决方法汇总》、《Android开发入门与进阶教程》、《Android多媒体操作技巧汇总(音频,视频,录音等)》、《Android基本组件用法总结》、《Android视图View技巧总结》、《Android布局layout技巧总结》及《Android控件用法总结》
希望本文所述对大家Android程序设计有所帮助。
-
我使用以下代码将图像缩放到150dpx150dp并放置在150dpx150dp按钮中,但图像在所有维度上都溢出了按钮: 按钮和图像大小相同。为什么会发生这种溢出,如何修复? (我知道我可以使用ImageButton,但我想使用button drawable,因为有些情况下我需要添加文本等。)
-
本文向大家介绍Android实现带有边框的ListView和item的方法,包括了Android实现带有边框的ListView和item的方法的使用技巧和注意事项,需要的朋友参考一下 本文实例讲述了Android实现带有边框的ListView和item的方法。分享给大家供大家参考,具体如下: 想为ListView和item四周添加边框有两种方法: 1.贴一张带有边框效果的背景图 2.自定义Draw
-
本文向大家介绍JS实现动态给图片添加边框的方法,包括了JS实现动态给图片添加边框的方法的使用技巧和注意事项,需要的朋友参考一下 本文实例讲述了JS实现动态给图片添加边框的方法。分享给大家供大家参考。具体如下: 下面的JS代码设置图片的边框为2个像素,即border=2 希望本文所述对大家的javascript程序设计有所帮助。
-
本文向大家介绍js实现鼠标悬浮给图片加边框的方法,包括了js实现鼠标悬浮给图片加边框的方法的使用技巧和注意事项,需要的朋友参考一下 本文实例讲述了js实现鼠标悬浮给图片加边框的方法。分享给大家供大家参考。具体实现方法如下: html代码: js代码: css代码: 希望本文所述对大家的javascript程序设计有所帮助。
-
我在java swing中有一个UI需求,其中我需要实现以下内容: 顶部的两个按钮放在一个JPanel中。我需要画一条线通过该面板的中心,直到两个按钮的开始。下面的面板是以卡片布局排列的面板的容器。当按钮被点击时,卡片被切换显示另一个面板。 因此,在所有方面,它看起来都像一个JTabbedPane,但有一点不同,选项卡是排列在选项卡窗格中心的按钮。我需要为我正在构建的UI提供这种差异。 正如您所看
-
本文向大家介绍iOS绘制3D饼图的实现方法,包括了iOS绘制3D饼图的实现方法的使用技巧和注意事项,需要的朋友参考一下 实现核心 1.压缩饼图,使饼图有3D的效果,并不是真正的画了个3D圆柱 2.绘制厚度,带阴影效果,让看上去像是圆柱的高 3.路径添加好了,用颜色填充后绘制一下,添加阴影后还需绘制一遍 饼图添加阴影的思考 之前这加阴影的一段不是很明白,为啥设颜色和阴影