Android实现简单画图画板
本文实例为大家分享了Android实现简单画图画板的具体代码,供大家参考,具体内容如下
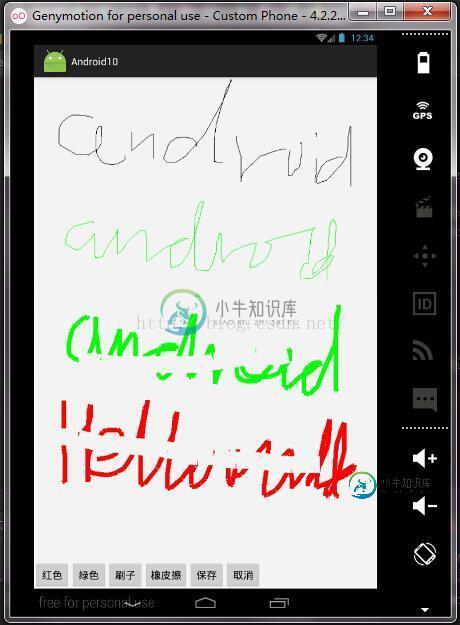
效果如图:

布局文件:
<RelativeLayout xmlns:android="http://schemas.android.com/apk/res/android"
 xmlns:tools="http://schemas.android.com/tools"
 android:layout_width="match_parent"
 android:layout_height="match_parent"
 tools:context=".MainActivity">

 <ImageView
  android:id="@+id/iv"
  android:layout_width="600px"
  android:layout_height="900px"
  android:layout_alignParentLeft="true"
  android:layout_alignParentRight="true"
  android:layout_alignParentStart="true" />

 <LinearLayout
  android:layout_width="wrap_content"
  android:layout_height="wrap_content"
  android:layout_alignParentBottom="true"
  android:layout_gravity="center_horizontal"
  android:orientation="horizontal">

  <Button
   android:layout_width="wrap_content"
   android:layout_height="wrap_content"
   android:onClick="red"
   android:text="红色" />

  <Button
   android:layout_width="wrap_content"
   android:layout_height="wrap_content"
   android:onClick="green"
   android:text="绿色"
    />

  <Button
   android:layout_width="wrap_content"
   android:layout_height="wrap_content"
   android:onClick="brush"
   android:text="刷子"
   />

  <Button
   android:layout_width="wrap_content"
   android:layout_height="wrap_content"
   android:onClick="eraser"
   android:text="橡皮擦"
    />

  <Button
   android:layout_width="wrap_content"
   android:layout_height="wrap_content"
   android:onClick="save"
   android:text="保存" />

  <Button
   android:layout_width="wrap_content"
   android:layout_height="wrap_content"
   android:onClick="cancel"
   android:text="取消" />
 </LinearLayout>

</RelativeLayout>
MainActivity.java
package com.example.yulongji.android10;

import android.app.Activity;
import android.content.Intent;
import android.graphics.Bitmap;
import android.graphics.BitmapFactory;
import android.graphics.Canvas;
import android.graphics.Color;
import android.graphics.Matrix;
import android.graphics.Paint;
import android.net.Uri;
import android.os.Bundle;
import android.os.Environment;
import android.view.MotionEvent;
import android.view.View;
import android.widget.ImageView;

import java.io.File;
import java.io.FileNotFoundException;
import java.io.FileOutputStream;


public class MainActivity extends Activity {

 private ImageView iv;
 //原图
 private Bitmap bitsrc;
 //拷贝图
 private Bitmap bitcopy;
 private Canvas canvas;
 private Paint paint;
 private int startX;
 private int startY;


 @Override
 protected void onCreate(Bundle savedInstanceState) {
  super.onCreate(savedInstanceState);
  setContentView(R.layout.activity_main);
  iv = (ImageView) findViewById(R.id.iv);
  setBitmap();

  // 设置触摸侦听
  iv.setOnTouchListener(new View.OnTouchListener() {

   // 触摸屏幕时,触摸事件产生时,此方法调用
   @Override
   public boolean onTouch(View v, MotionEvent event) {
    int action = event.getAction();
    switch (action) {
     // 用户手指摸到屏幕
     case MotionEvent.ACTION_DOWN:
      startX = (int) event.getX();
      startY = (int) event.getY();
      break;
     // 用户手指正在滑动
     case MotionEvent.ACTION_MOVE:
      int x = (int) event.getX();
      int y = (int) event.getY();
      canvas.drawLine(startX, startY, x, y, paint);
      // 每次绘制完毕之后,本次绘制的结束坐标变成下一次绘制的初始坐标
      startX = x;
      startY = y;
      iv.setImageBitmap(bitcopy);
      break;
     // 用户手指离开屏幕
     case MotionEvent.ACTION_UP:
      break;

    }
    // true:告诉系统,这个触摸事件由我来处理
    // false:告诉系统,这个触摸事件我不处理,这时系统会把触摸事件传递给imageview的父节点
    return true;
   }
  });
 }

 public void setBitmap() {
  // 加载画画板的背景图
 bitsrc = BitmapFactory.decodeResource(getResources(), R.drawable.bg);
  // 创建图片副本
  // 1.在内存中创建一个与原图一模一样大小的bitmap对象,创建与原图大小一致的白纸
  bitcopy = Bitmap.createBitmap(bitsrc.getWidth(), bitsrc.getHeight(),
    bitsrc.getConfig());
  // 2.创建画笔对象
  paint = new Paint();
  // 3.创建画板对象,把白纸铺在画板上
  canvas = new Canvas(bitcopy);
  // 4.开始作画,把原图的内容绘制在白纸上
  canvas.drawBitmap(bitsrc, new Matrix(), paint);
  // 5.将绘制的图放入imageview中
  iv.setImageBitmap(bitcopy);
 }

 public void red(View view){
  paint.setColor(Color.RED);
 }
 public void green(View view){
  paint.setColor(Color.GREEN);
 }
 public void brush(View view){
  paint.setStrokeWidth(8);
 }
 public void cancel(View view){
  setBitmap();
 }
 public void eraser(View view){
  paint.setColor(Color.rgb(243,243,243));

  paint.setStrokeWidth(30);
 }

 public void save(View view){
  String path = Environment.getExternalStorageDirectory() + "/" + "2.png";
  File file = new File(path);
  try {
   FileOutputStream fos = new FileOutputStream(file);
   bitcopy.compress(Bitmap.CompressFormat.PNG, 100, fos);
  } catch (FileNotFoundException e) {
   e.printStackTrace();
  }
  // 发送sd卡就绪广播
  Intent intent = new Intent();
  intent.setAction(Intent.ACTION_MEDIA_MOUNTED);
  intent.setData(Uri.fromFile(Environment.getExternalStorageDirectory()));
  sendBroadcast(intent);
 }

}
以上就是本文的全部内容,希望对大家的学习有所帮助,也希望大家多多支持小牛知识库。
-
本文向大家介绍Android简单实现画图功能,包括了Android简单实现画图功能的使用技巧和注意事项,需要的朋友参考一下 如何在图片上画画呢?这里写了一个demo,供大家参考 一、先看一眼工程结构 工程结构: 二、自定义view 这个自定义view实现了保留轨迹的功能,代码如下 三、主页面布局文件 主页面布局文件 四、主Activity代码 五、效果 运行效果图如下 六、疑问 当线条变粗时,线条
-
是时候写一些代码了。让我们先添加一个简单的UIView对象到屏幕上并设置它的圆角。我们要把它添加到我们的主窗口上时因为它是一个快速的例子,但在真实的app界面中你需要添加到管理当前界面的视图控制器中。 UIView *redBall = [[UIView alloc] initWithFrame:CGRectMake(50, 50, 100, 100)]; redBall.backgroundCo
-
本文向大家介绍Android 画中画模式的实现示例,包括了Android 画中画模式的实现示例的使用技巧和注意事项,需要的朋友参考一下 画中画支持 Android 8.0(API 级别 26)允许以画中画模式启动 Activity。画中画是一种特殊类型的多窗口模式,最常用于视频播放。使用该模式,用户可以通过固定到屏幕一角的小窗口观看视频,同时在应用之间进行导航或浏览主屏幕上的内容。 画中画利用 A
-
本文向大家介绍简单实现Android绘图板,包括了简单实现Android绘图板的使用技巧和注意事项,需要的朋友参考一下 本文这个实例通过前面学过的Paint、Canvas等2D绘画技术来实现一个简单的Android的绘图板。 具体实现代码: 创建一个名为DrawView的类,该类继承自android.view.View类。在该类中,首先定义程序中所需的属性,然后添加构造方法,并重写onDraw(C
-
本文向大家介绍JS简单实现动画弹出层效果,包括了JS简单实现动画弹出层效果的使用技巧和注意事项,需要的朋友参考一下 JS简单实现动画弹出层效果 以上所述就是本文的全部内容了,希望大家能够喜欢。
-
本文向大家介绍java实现画图板功能,包括了java实现画图板功能的使用技巧和注意事项,需要的朋友参考一下 本文实例为大家分享了java实现画图板的具体代码,供大家参考,具体内容如下 画图板需要满足的功能有: 画线,画三角形,画矩形,画多边形,画曲线 设置不同颜色的画笔 改变窗口大小或最小化窗口后重新打开时图案不消失 画图方法的编写: 创建一个类,继承JPanel类,重写JPanel的绘制方法,重

