javascript - vue,mapbox结合three.js,创建的三维物体坐标点如何和mapbox的地图视角适配?
我用mapbox结合three.js,结合官网的示例demo,实现了绘制三维物体到地图上,但是拖动地图的视角,发现三维物体的底部没有固定在地图上,会随着视角变化移动,有没有什么办法能让底部固定于地图上,不移动呢?
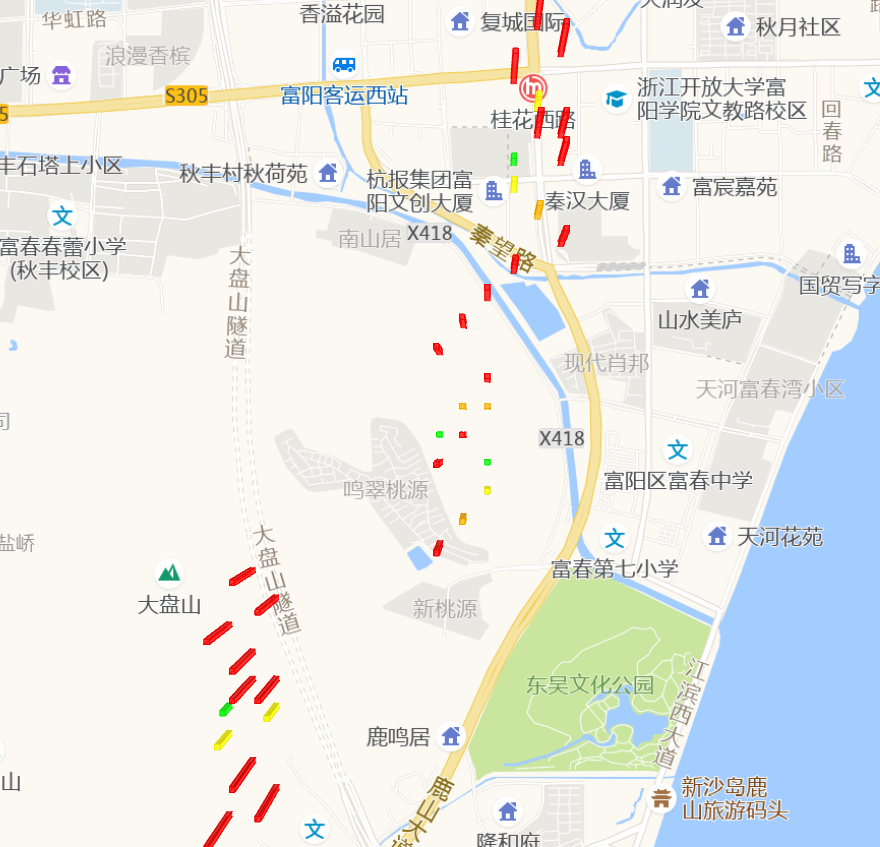
如图是渲染后的三维立方体俯视,我想让他们的坐标点位固定在此处
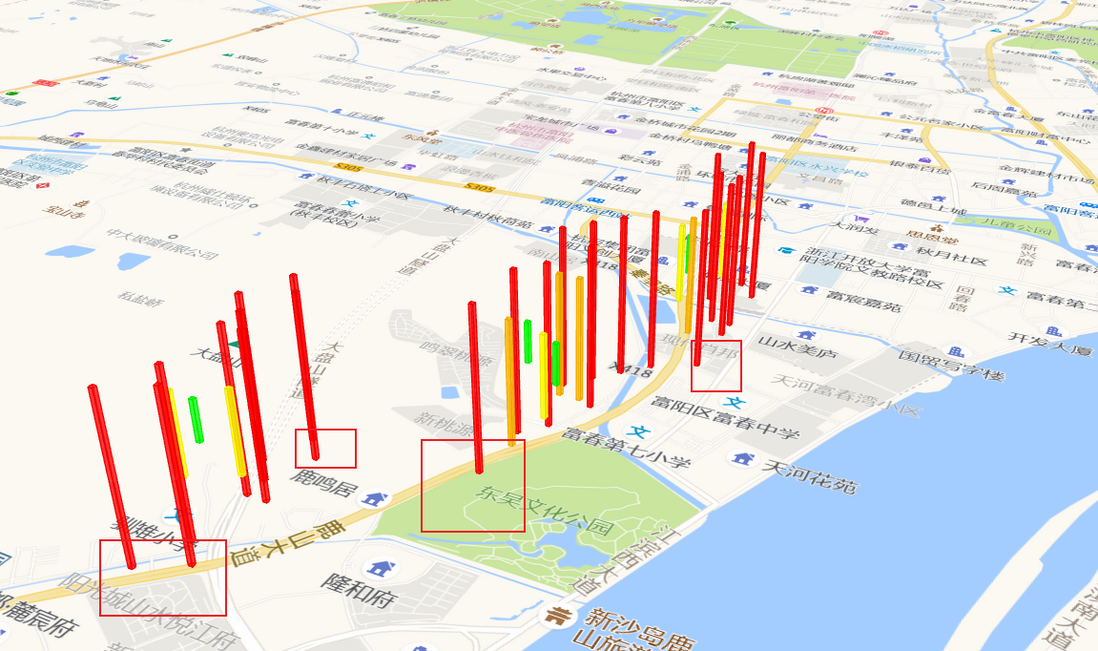
下图是拖动地图视角,发现底部的点位都偏移了
另外,官网的demo是绘制了一个三维gltf文件,无论怎么旋转视角,都能够贴合地图,代码如下
const loader = new GLTFLoader();
          loader.load(
              '/gltf/scene.gltf',
              (gltf) => {
                // 设置模型的缩放比例
                gltf.scene.scale.set(10, 10, 10); // 放大10倍
                this.scene.add(gltf.scene);
              }
          );
我只是把这部分代码替换成了three.js里的生成立方体,就出现了上述的问题
// 创建一个正方体几何体
          const geometry = new THREE.BoxGeometry(10, 60, 10); // 调整尺寸大小
          const material = new THREE.MeshStandardMaterial({ color: 0xff0000 }); // 设置颜色
          const cube = new THREE.Mesh(geometry, material);
          this.scene.add(cube);
其中坐标转换的代码,我也是按照官网的demo用的,没有做修改
//mapbox自定义图层坐标渲染
render: (gl, matrix) => {
          //控制台打印该图层id开始渲染
          console.log(`Custom layer rendering: ${customLayer.id}`);
          const m = new THREE.Matrix4().fromArray(matrix);
          const l = new THREE.Matrix4().makeTranslation(modelTransform.translateX, modelTransform.translateY, modelTransform.translateZ)
              .scale(new THREE.Vector3(modelTransform.scale, -modelTransform.scale, modelTransform.scale))
              .multiply(new THREE.Matrix4().makeRotationAxis(new THREE.Vector3(1, 0, 0), modelTransform.rotateX))
              .multiply(new THREE.Matrix4().makeRotationAxis(new THREE.Vector3(0, 1, 0), modelTransform.rotateY))
              .multiply(new THREE.Matrix4().makeRotationAxis(new THREE.Vector3(0, 0, 1), modelTransform.rotateZ));
          customLayer.camera.projectionMatrix = m.multiply(l);
          customLayer.renderer.resetState();
          customLayer.renderer.render(customLayer.scene, customLayer.camera);
          customLayer.map.triggerRepaint();
        }
坐标转换方法
calculateModelTransform(point) {
      const modelAsMercatorCoordinate = mapboxgl.MercatorCoordinate.fromLngLat([point.lng, point.lat], this.modelAltitude);
      return {
        translateX: modelAsMercatorCoordinate.x,
        translateY: modelAsMercatorCoordinate.y,
        translateZ: modelAsMercatorCoordinate.z,
        rotateX: this.modelRotate[0],
        rotateY: this.modelRotate[1],
        rotateZ: this.modelRotate[2],
        scale: modelAsMercatorCoordinate.meterInMercatorCoordinateUnits()
      };
    }
完整代码如下
<template>
  <div id="map">
    <div class="convertButton">
      <button type="button" @click="loadModels">加载3D模型</button>
      <button type="button" @click="removeModel">隐藏3D模型</button>
    </div>
  </div>
</template>

<script>
import mapboxgl from "../../static/mapboxgl/mapbox-gl.js";
import '../../static/mapboxgl/mapbox-gl.css';
import * as THREE from 'three';

export default {
  name: "MultiThreeMap",
  data() {
    return {
      map: null,
      modelAltitude: 0,
      modelRotate: [Math.PI / 2, 0, 0],
      points: [
        {"lng": "119.93234778808594", "lat": "30.035738991333008", "pm25": 123},
        {"lng": "119.92236878808594", "lat": "30.025738991333008", "pm25": 999},
        {"lng": "119.93445778808594", "lat": "30.045738991333008", "pm25": 568},
        {"lng": "119.93134778808594", "lat": "30.034738991333008", "pm25": 234},
        {"lng": "119.92336878808594", "lat": "30.024738991333008", "pm25": 88},
        {"lng": "119.93545778808594", "lat": "30.044738991333008", "pm25": 456},
        {"lng": "119.93034778808594", "lat": "30.033738991333008", "pm25": 567},
        {"lng": "119.92136878808594", "lat": "30.023738991333008", "pm25": 78},
        {"lng": "119.93345778808594", "lat": "30.043738991333008", "pm25": 89},
        {"lng": "119.93234778808594", "lat": "30.032738991333008", "pm25": 90},
        {"lng": "119.92236878808594", "lat": "30.022738991333008", "pm25": 901},
        {"lng": "119.93445778808594", "lat": "30.042738991333008", "pm25": 101},
        {"lng": "119.93134778808594", "lat": "30.031738991333008", "pm25": 111},
        {"lng": "119.92336878808594", "lat": "30.021738991333008", "pm25": 1214},
        {"lng": "119.93545778808594", "lat": "30.041738991333008", "pm25": 1315},
        {"lng": "119.93034778808594", "lat": "30.030738991333008", "pm25": 1416},
        {"lng": "119.92136878808594", "lat": "30.020738991333008", "pm25": 1517},
        {"lng": "119.93345778808594", "lat": "30.040738991333008", "pm25": 1618},
        {"lng": "119.93234778808594", "lat": "30.039738991333008", "pm25": 1719},
        {"lng": "119.92236878808594", "lat": "30.029738991333008", "pm25": 1820},
        {"lng": "119.93445778808594", "lat": "30.049738991333008", "pm25": 1921},
        {"lng": "119.93134778808594", "lat": "30.038738991333008", "pm25": 2022},
        {"lng": "119.92336878808594", "lat": "30.028738991333008", "pm25": 2123},
        {"lng": "119.93545778808594", "lat": "30.048738991333008", "pm25": 2224},
        {"lng": "119.93034778808594", "lat": "30.037738991333008", "pm25": 2325},
        {"lng": "119.92136878808594", "lat": "30.027738991333008", "pm25": 2426},
        {"lng": "119.93345778808594", "lat": "30.047738991333008", "pm25": 2527},
        {"lng": "119.93234778808594", "lat": "30.036738991333008", "pm25": 2628},
        {"lng": "119.92236878808594", "lat": "30.026738991333008", "pm25": 2729},
        {"lng": "119.93445778808594", "lat": "30.046738991333008", "pm25": 60},
        {"lng": "119.93134778808594", "lat": "30.035738991333008", "pm25": 131},
        {"lng": "119.92336878808594", "lat": "30.025738991333008", "pm25": 3032},
        {"lng": "119.93545778808594", "lat": "30.045738991333008", "pm25": 3133},
        {"lng": "119.93034778808594", "lat": "30.034738991333008", "pm25": 34},
        {"lng": "119.92136878808594", "lat": "30.024738991333008", "pm25": 35},
        {"lng": "119.93345778808594", "lat": "30.044738991333008", "pm25": 36},
        {"lng": "119.93234778808594", "lat": "30.033738991333008", "pm25": 37}
      ],
      customLayers: [],
    };
  },
  mounted() {
    this.initMap();
  },
  methods: {
    initMap() {
      this.map = new mapboxgl.Map({
        container: 'map', // container id
        style: { // 自定义样式,指向本地瓦片源
          version: 8,
          sources: {
            offlineTiles: {
              type: 'raster',
              tiles: [
                'http://wprd01.is.autonavi.com/appmaptile?x={x}&y={y}&z={z}&lang=zh_cn&size=1&scl=1&style=7',
              ],
              tileSize: 256,
            },
          },
          layers: [
            {
              id: 'offline-layer',
              type: 'raster',
              source: 'offlineTiles',
            },
          ],
        },
        center: [119.93445778808594, 30.045738991333008], // starting position [lng, lat]
        zoom: 12,
        pitch: 40,
        antialias: true
      });
    },
    loadModels() {
      this.removeModel();
      this.points.forEach((point, index) => {
        const modelTransform = this.calculateModelTransform(point);
        const customLayer = this.createCustomLayer(index, point, modelTransform);
        this.customLayers.push(customLayer);
        this.map.addLayer(customLayer);
      });
    },
    createCustomLayer(index, point, modelTransform) {
      let color;
      let altitude;

      // 根据PM2.5值设定颜色和高度
      if (point.pm25 <= 50) {
        color = 0x00ff00;
        altitude = 200; // 低污染区域
      } else if (point.pm25 <= 100) {
        color = 0xffff00;
        altitude = 400; // 中等污染
      } else if (point.pm25 <= 200) {
        color = 0xffa500;
        altitude = 600; // 较高污染
      } else {
        color = 0xff0000;
        altitude = 800; // 高污染,最高高度
      }
      // 计算轮廓线颜色,使其稍微暗一些
      const darkerColor = this.darkerColor(color, 0.1);
      const customLayer = {
        id: `3d-model-${index}`,
        type: 'custom',
        renderingMode: '3d',
        onAdd: (map, gl) => {
          //控制台打印该图层id
          console.log(`Custom layer added: ${customLayer.id}`);
          customLayer.camera = new THREE.Camera();
          customLayer.scene = new THREE.Scene();
          // 添加环境光
          const ambientLight = new THREE.AmbientLight(0xffffff1, 0.8); // 强度为 0.5
          customLayer.scene.add(ambientLight);
          // 添加定向光以增强立体感
          const directionalLight = new THREE.DirectionalLight(0xffffff, 0.5);
          directionalLight.position.set(10, 10, 10).normalize();
          customLayer.scene.add(directionalLight);
          // 创建一个正方体几何体
          const geometry = new THREE.BoxGeometry(20, altitude, 20); // 调整尺寸大小
          const material = new THREE.MeshStandardMaterial({
            color: color,// 设置颜色
            transparent: true, // 开启透明效果
            opacity: 0.8 // 设置透明度,范围从0到1
          });
          const cube = new THREE.Mesh(geometry, material);
          // 添加轮廓线
          const edgeGeometry = new THREE.EdgesGeometry(geometry);
          const lineMaterial = new THREE.LineBasicMaterial({
            color: darkerColor,// 设置轮廓线的颜色和宽度
          });
          const lines = new THREE.LineSegments(edgeGeometry, lineMaterial);
          cube.add(lines);
          customLayer.scene.add(cube);
          customLayer.map = map;
          customLayer.renderer = new THREE.WebGLRenderer({
            canvas: map.getCanvas(),
            context: gl,
            antialias: true
          });
          customLayer.renderer.autoClear = false;
        },
        render: (gl, matrix) => {
          //控制台打印该图层id开始渲染
          console.log(`Custom layer rendering: ${customLayer.id}`);
          const m = new THREE.Matrix4().fromArray(matrix);
          const l = new THREE.Matrix4().makeTranslation(modelTransform.translateX, modelTransform.translateY, modelTransform.translateZ)
              .scale(new THREE.Vector3(modelTransform.scale, -modelTransform.scale, modelTransform.scale))
              .multiply(new THREE.Matrix4().makeRotationAxis(new THREE.Vector3(1, 0, 0), modelTransform.rotateX))
              .multiply(new THREE.Matrix4().makeRotationAxis(new THREE.Vector3(0, 1, 0), modelTransform.rotateY))
              .multiply(new THREE.Matrix4().makeRotationAxis(new THREE.Vector3(0, 0, 1), modelTransform.rotateZ));
          customLayer.camera.projectionMatrix = m.multiply(l);
          customLayer.renderer.resetState();
          customLayer.renderer.render(customLayer.scene, customLayer.camera);
          customLayer.map.triggerRepaint();
        }
      };
      return customLayer;
    },
    // 计算颜色稍微暗一点的方法
    darkerColor(color, factor) {
      const r = Math.max(0, Math.floor((color >> 16) & 0xFF * (1 - factor)));
      const g = Math.max(0, Math.floor((color >> 8) & 0xFF * (1 - factor)));
      const b = Math.max(0, Math.floor(color & 0xFF * (1 - factor)));
      return (r << 16) + (g << 8) + b;
    },
    removeModel() {
      this.customLayers.forEach(layer => {
        this.map.removeLayer(layer.id);
      });
      this.customLayers = [];
    },
    calculateModelTransform(point) {
      const modelAsMercatorCoordinate = mapboxgl.MercatorCoordinate.fromLngLat([point.lng, point.lat], this.modelAltitude);
      return {
        translateX: modelAsMercatorCoordinate.x,
        translateY: modelAsMercatorCoordinate.y,
        translateZ: modelAsMercatorCoordinate.z,
        rotateX: this.modelRotate[0],
        rotateY: this.modelRotate[1],
        rotateZ: this.modelRotate[2],
        scale: modelAsMercatorCoordinate.meterInMercatorCoordinateUnits()
      };
    }
  },
  beforeDestroy() {
    if (this.map) {
      this.map.remove();
    }
  },
}
</script>

<style scoped>
#map {
  position: absolute;
  top: 0;
  bottom: 0;
  width: 100%;
}

.convertButton {
  position: relative;
  top: 10px;
  margin: 0 50px;
  padding: 5px;
  border-radius: 3px;
  z-index: 999;
  background-color: rgba(0, 168, 0, 0);
}
</style>
共有1个答案
要使three.js中的三维物体底部固定在Mapbox地图上,并且不会随着地图视角的拖动而改变位置,你需要确保三维物体的位置是相对于地图表面的,而不是相对于相机的位置。在你的代码中,你已经使用mapboxgl.MercatorCoordinate.fromLngLat来将经纬度转换为三维坐标,这是一个很好的开始。但是,你的render函数中的矩阵转换可能导致了问题。
在Mapbox的自定义图层中,你应该使用Mapbox提供的矩阵来正确地放置和缩放你的three.js场景,而不是通过手动计算一个完全新的相机投影矩阵。你应该将three.js的相机设置为正交相机(THREE.OrthographicCamera),这样它就不会受到透视效果的影响,并且可以更容易地将其与Mapbox的地图坐标系统对齐。
以下是一些修改建议:
- 使用正交相机:
将你的相机类型更改为THREE.OrthographicCamera,并设置适当的left、right、top、bottom、near和far值,这些值应该根据Mapbox的当前视图范围动态计算。 - 更新three.js的渲染逻辑:
在render函数中,不要直接修改相机的projectionMatrix,而是使用Mapbox的matrix来更新three.js场景中的物体位置。你可以使用matrix来计算物体的最终位置,但通常更简单的做法是将物体放置在Mapbox坐标系统中的一个固定高度上,并仅使用matrix来确保相机和场景之间的相对位置正确。 - 确保three.js的物体在Y轴上对齐:
由于Mapbox的Y轴是向上的,你需要确保three.js中的物体底部也沿着Y轴放置。这通常意味着物体的底部应该位于Y轴的某个固定值上,而不是随着相机或视角的变化而变化。 - 动态调整相机:
如果你的three.js场景需要随着Mapbox的缩放和平移而动态调整,你可能需要在Mapbox的moveend或zoomend事件监听器中更新three.js的相机设置。
由于代码的具体实现可能因你的具体需求而有所不同,这里只提供了一个大致的方向。你可能需要根据你的具体需求来调整这些建议。
注意:由于Mapbox和three.js使用不同的坐标系统和投影方式,因此确保它们在视觉上对齐可能需要一些试验和错误。你可能需要调整three.js的相机参数或物体位置,以获得最佳的视觉效果。
-
我在视图中使用mapbox,需要从JSON添加多个标记 这是我的JSON 下面是我如何运行脚本添加地图到视图 但是我想知道,我如何需要添加标记到map(对于json中的每个元素,我需要获得lat和lon)来映射。因为医生说我需要这样的Json var Geojson={type:'FeatureCollection',特性:[{type:'Feature',几何:{type:'Point',坐标:
-
本文向大家介绍Three.js获取鼠标点击的三维坐标示例代码,包括了Three.js获取鼠标点击的三维坐标示例代码的使用技巧和注意事项,需要的朋友参考一下 由于工作需要,但是对于three.js又是一窍不通,网上的资料又很少,所以上来就让我获取坐标,真是一个头两个大。好歹最后终于实现了。 既然已经是想要获取鼠标点击的三维坐标了,相信你camera对象和scene都已经有了,如果不了解的小伙伴,可以
-
我尝试将Mapbox与SwiftUI结合使用。 我https://stackoverflow.com/a/56551675/5653544应用了这个答案,也遵循了mapbox教程。 所以我有一个MapView.swift视图: 我的ContentView.swift调用MapView: 我还创建了一个~/。带有mapbox令牌的mapbox文件,该令牌由我的mapbox帐户获取。但我有一张空白地图
-
我目前正在将对象的3D坐标转换为2D坐标,然后在它们上绘制2D文本(目前,对象名称): 这工作正常。名称成功放置在对象上方。 我怎样才能解决这个问题?是否有某种方法可以检测到我是否正在远离它们而不渲染它们?
-
我一直在使用mapbox户外光栅瓷砖服务器处理传单地图。Mapbox有一些现成的样式,其中大部分都列在这个答案中。这个的代码/url是这样的: 我喜欢这种风格。但我的问题是,我试图添加一个图像。我希望imageoverlay位于地图地形图形之上,但位于标签之下。所以我所做的就是进入mapbox studio创建这两种样式-基本上是户外样式,标签分开: 没有标签 仅标签 旧样式在左侧,带有分离图层的
-
我试图在mapbox gl地图上设置一个标记,点击地图,然后将lngLat对象传递回父组件。请告诉我怎样才能做到这一点。我刚开始学习反应,但我知道道具只能从父类继承,setState只能设置本地状态。 父组件如下所示 我正在学习这个教程https://github.com/laneysmith/react-mapbox-example

